How to Set Up a Proxy on Windows Using Throne
 ·September 28, 2026·5 min read
If you need to use a proxy not only in a single browser but across Windows, a dedicated proxy client can be a convenient solution. Throne allows you to add a proxy profile, launch it, and route Windows application traffic through it.
In this article, we will go through how to set up Throne on Windows using Node Proxy proxies as an example: where to download the program, how to install it, where to get proxy details, how to add an IP address to Throne, and how to enable the connection.
What Is Throne and What Is It Used For?
Throne is a cross-platform graphical proxy client for Windows, Linux, and macOS. The project is a continuation of Nekoray and uses sing-box as its core. On Windows, the program supports both system proxy and TUN mode.
For regular use, the system proxy is sufficient. In this mode, Throne sets its local proxy port in the Windows settings, so applications that use the system proxy settings start working through the selected profile.
If you need to route traffic from applications that do not use the Windows system proxy settings, you can enable TUN Mode. It creates a virtual network adapter and intercepts application traffic at the system level. Administrator privileges are required for it to work.
The overall setup is quite simple:
Node Proxy → Throne → Windows → applications
First, you get an external proxy server, then add it to Throne, and the program routes your computer's traffic through it.
Datacenter and Residential proxy
For browsing and not only.
How to Download Throne for Windows
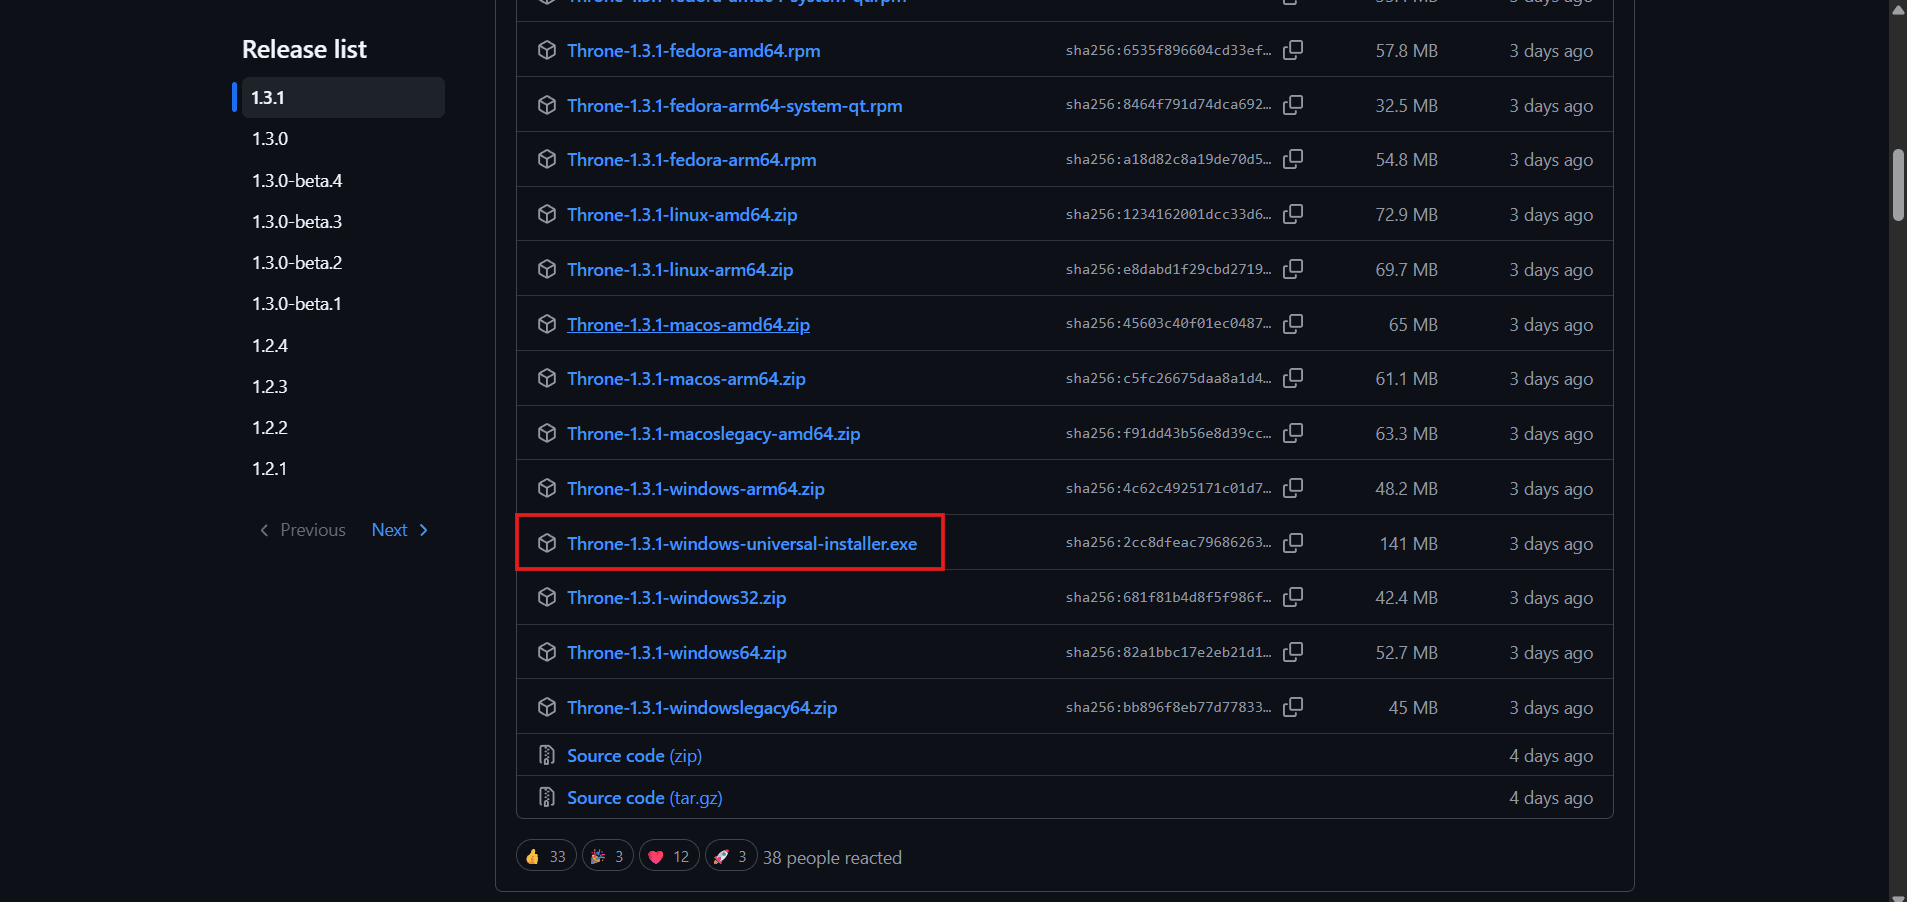
It is best to download Throne from the project's official GitHub repository. The releases page provides versions for different operating systems and architectures. The current release at the time of writing is Throne 1.3.1.
For Windows, both an installer and ZIP archives are available. For a standard installation, the easiest option is:
Throne-1.3.1-windows-universal-installer.exe
Official releases page:
If you prefer a portable version, Windows archives are also available in the release. For most users, the installer is more convenient because there is no need to manually extract the program or configure its location.
How to Install Throne
After downloading the Throne installer, run it.
The installation process is standard for Windows. Follow the installation wizard and wait until the process is complete.
After launching the program, the main Throne window will open. You cannot use a proxy yet because no profile has been added. First, you need to specify the server through which the connection will be established.
In our case, this will be a Node Proxy proxy.
Where to Get a Proxy for Throne
You will need a proxy with valid connection credentials. You can get one through the Node Proxy panel.
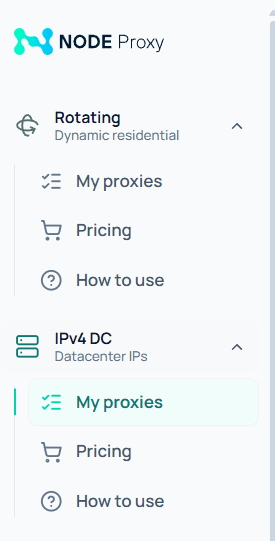
Go to the Node Proxy panel and open the “Proxies” section.
The panel provides two main proxy types:
- Rotating — residential proxies;
- IPv4 DC — datacenter proxies.
If you need a permanent IP address, you can choose a datacenter IPv4 proxy. These proxies are rented for a specific period, and the selected IP address remains assigned to you throughout the rental period.
How to Get Node Proxy Connection Details
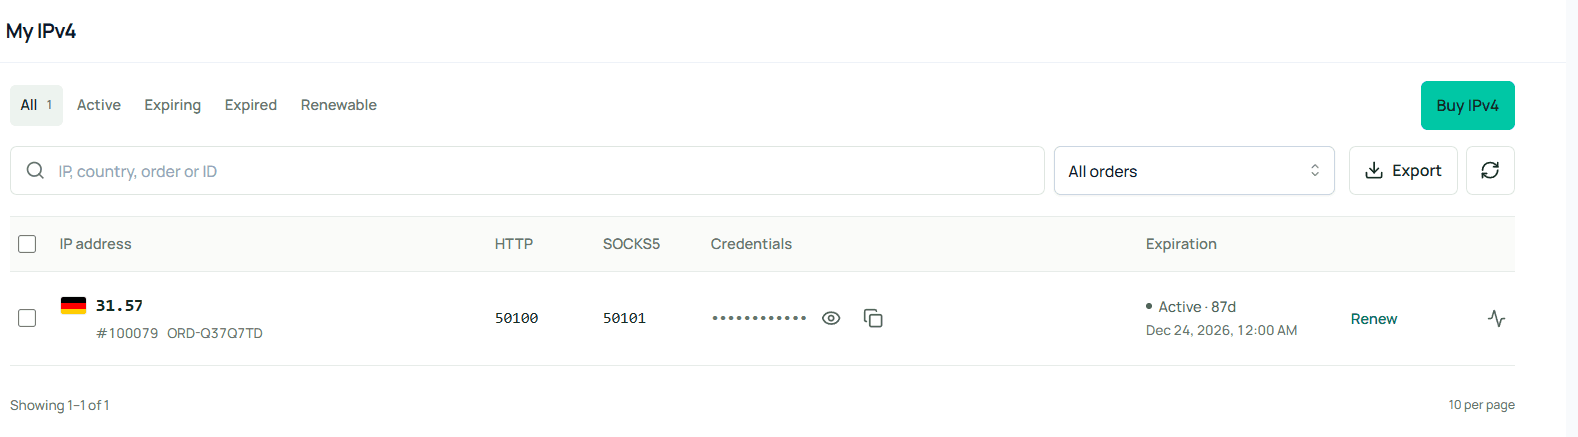
After purchasing a proxy, the panel will display the information required to connect to it.
You will usually need:
- IP address;
- port;
- username;
- password;
- protocol type.
Pay particular attention to the port: different protocols use their corresponding connection parameters. For example, if the proxy is provided via SOCKS5, you need to create a SOCKS5 profile in Throne and specify the corresponding port. If you use HTTP, select HTTP and enter the HTTP port.
How to Add a Proxy to Throne
Now you can return to Throne.
In the main window, open:
Program → New Profile
You can also use the Ctrl+N keyboard shortcut to create a new profile. This option is available in the official Throne documentation.
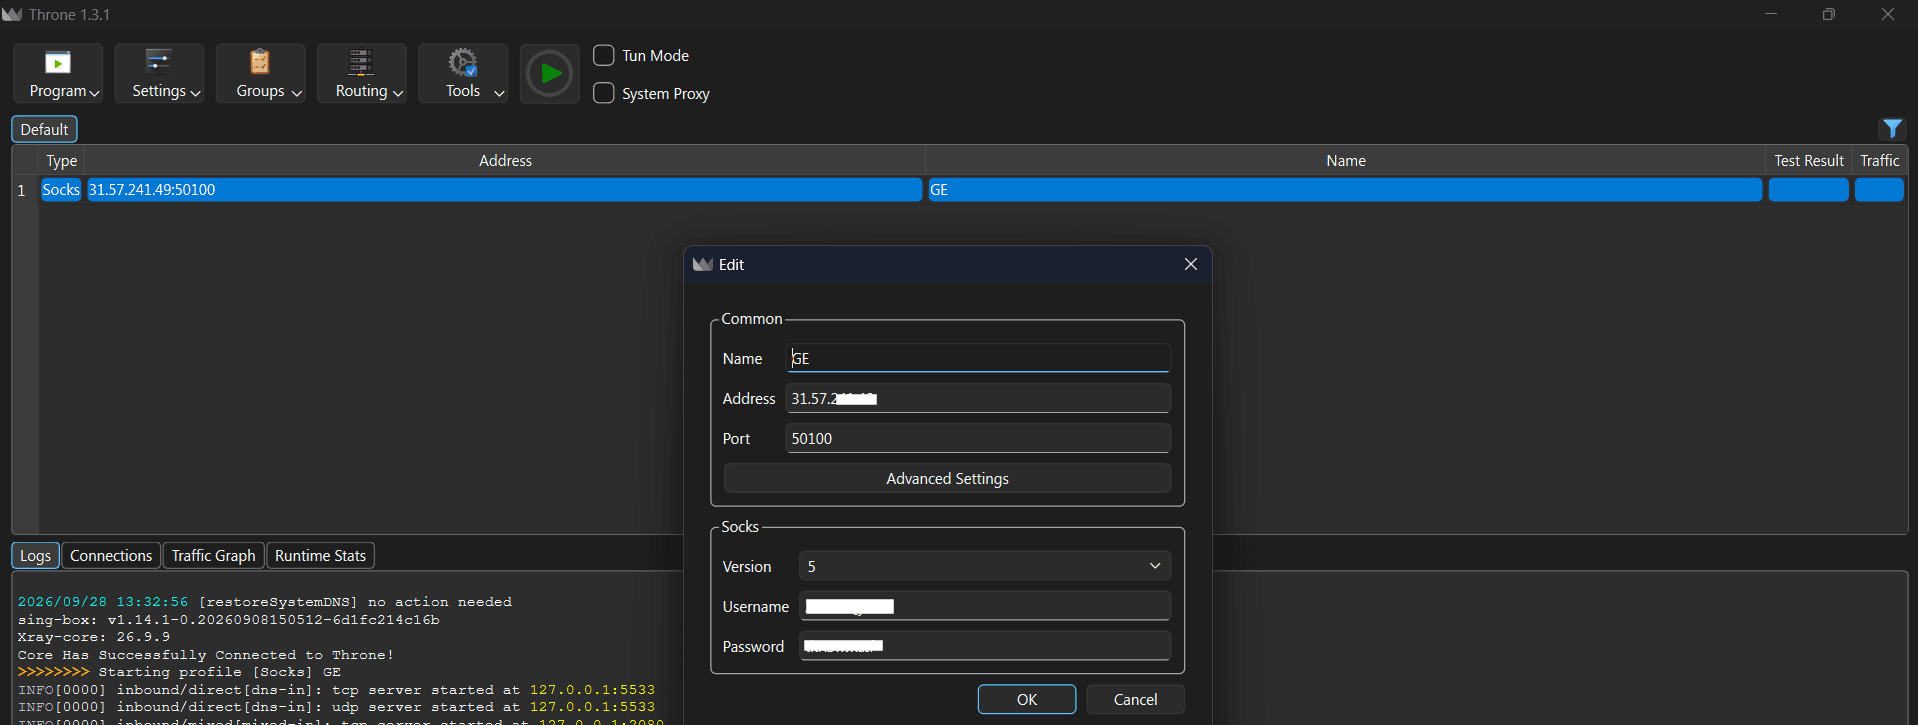
A profile creation window will open. Here, you need to select the proxy protocol and enter the connection parameters.
For a standard Node Proxy connection, specify:
- Server / Address — the IP address.
- Port — the proxy port.
- Username — the username.
- Password — the password.
You can leave the remaining parameters unchanged unless they are required for the specific proxy type.
SOCKS5 Configuration Example
If your Node Proxy connection details are intended for SOCKS5, the connection structure will look approximately like this:
Type: SOCKS5
Server: 123.123.123.123
Port: 50101
Username: heSXDdyK
Password: tkszwDxzIF
After entering the details, save the profile.
How to Start a Proxy in Throne
The created profile will appear in the main program window.
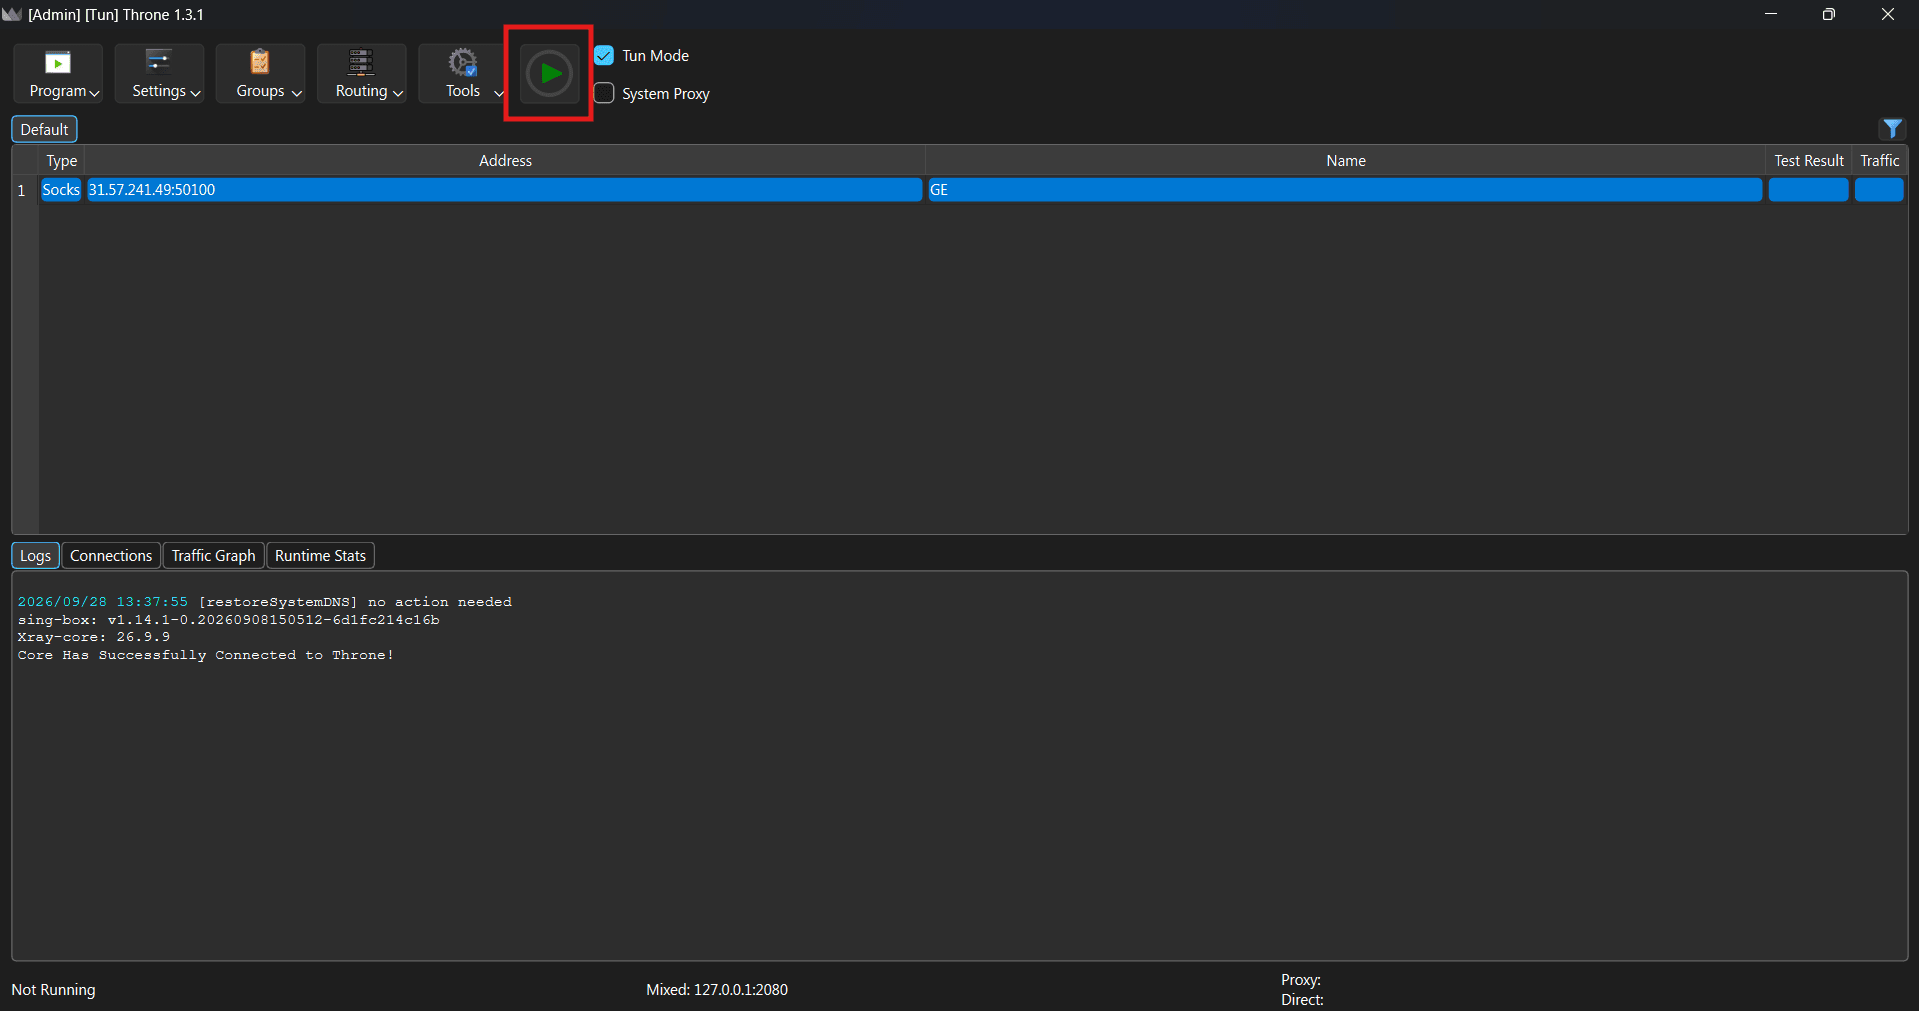
Select it and click the start button or press Enter. In Throne, a profile is considered active when the program starts using the selected configuration.
However, simply launching the profile is not enough if you want regular Windows applications to automatically use this connection.
For that, you need to choose how the traffic should be routed.
How to Enable a Proxy for Windows
The simplest option is to use System Proxy.
After launching the profile, enable the System Proxy option.
Throne will set its local proxy port in the Windows settings. By default, this is:
127.0.0.1:2080
The external Node Proxy proxy is used inside Throne, while Windows connects to the program through its local port. Throne then routes the traffic received from applications through the selected proxy profile.
The setup can be illustrated as follows:
Application → Windows → 127.0.0.1:2080 → Throne → Node Proxy → Internet
This is one of the simplest ways to use a proxy on Windows without configuring each application separately.
Keep in mind that the system proxy is only used by applications that respect the operating system's proxy settings. Browsers usually work this way, but some applications may ignore the system proxy.
When to Use TUN Mode
If an application does not use the system proxy settings, you can try TUN Mode.
TUN creates a virtual network adapter through which Throne can intercept application traffic. Unlike the system proxy, this mode is designed for applications that do not use the Windows proxy settings.
To enable it, launch the required profile and select “TUN Mode.”
When enabled for the first time, Throne will request administrator privileges in Windows. This is required to create the virtual network adapter.
If Windows displays a firewall prompt for ThroneCore, allow the program to access the network.
For regular browsing, System Proxy is usually sufficient. TUN is useful when you need to cover applications that ignore the system proxy settings.
How to Check Whether the Proxy Is Working
After launching the profile in Throne, you can check the connection status at the bottom of the window. The program displays information about the active profile and, after connecting, the country and city associated with the outgoing IP address. The connection test result is also displayed there.
You can additionally open an IP-checking service in your browser and see which IP address is detected from your computer.
If everything is configured correctly, the external IP should match the address used in the Node Proxy profile.
If necessary, you can also check the IP's GEO location. This is especially useful when you selected a specific region when purchasing the proxy.
What to Do If the Proxy Does Not Work
If Throne launches but the connection cannot be established, first check the proxy details.
Make sure that:
- The IP address is entered correctly.
- The correct port is being used.
- The username and password are correct.
- The correct protocol is selected.
- The proxy is active in the Node Proxy panel.
- The proxy rental period has not expired.
- Also check the connection mode in Throne.
If you enabled System Proxy, but a particular application continues to connect directly, the problem may not be with the proxy itself. The application may simply ignore the Windows system proxy settings. In this case, you can try TUN Mode.
Another common situation can occur after forcibly closing Throne. If the program was terminated while System Proxy was enabled, Windows may retain the system setting that Throne did not have time to reset. The official documentation recommends launching Throne again, enabling System Proxy, and then disabling it.
For this reason, it is better to close the program normally.
How to Disable the Proxy
You do not need to delete the profile to temporarily stop using the proxy.
First, stop the active profile, then disable System Proxy or TUN Mode, depending on which mode you were using.
If you no longer need the profile, you can delete it from the Throne list.
When you exit the program normally via Program → Exit, Throne correctly disables the system settings it has configured.
Can You Add Multiple Proxies?
Yes. Throne stores individual connections as separate profiles, so you can add multiple proxies to the program.
For example, you can create:
Node Proxy — US;
Node Proxy — DE;
Node Proxy — GB.
Each profile will contain its own IP address, port, and authentication details.
This is useful when you need to quickly switch between different proxies or GEO locations. At the same time, you do not necessarily need to purchase a new proxy for every profile: the number of profiles depends on which IPs you have purchased and how you plan to use them.
What Is Throne's Local Port?
When Throne is running, it creates a local connection point called a mixed port. By default, it uses 127.0.0.1:2080.
This port accepts both SOCKS and HTTP proxy connections. Therefore, other programs on the computer can connect to Throne through this local address if necessary.
It is important not to confuse this port with the Node Proxy port.
For example:
Node Proxy: external IP + external port → connection to the proxy server.
Throne: 127.0.0.1:2080 → local connection from applications to Throne.
This means that after adding Node Proxy to Throne, you do not need to enter the Node Proxy IP address separately in every application. If an application uses the system proxy, Windows will route its connection to Throne.
Conclusion
Setting up a proxy on Windows through Throne consists of several steps:
1. Download Throne from the official releases page.
2. Install the program on Windows.
3. Purchase a proxy from the Node Proxy panel.
4. Copy the IP address, port, username, and password.
5. Create a new profile in Throne and enter the proxy details.
6. Start the profile.
7. Enable System Proxy if the Windows system proxy is sufficient.
8. Use TUN Mode if you need to route traffic from applications that ignore the system proxy settings.
9. Check the external IP and GEO.
After that, Throne will act as an intermediary between Windows and the Node Proxy proxy, allowing you to use the selected IP in applications that work through the system proxy or TUN.