How to Set Up a Residential Proxy in Waterfox
 ·August 23, 2026·4 min read
Waterfox is a Mozilla-based browser with advanced settings, a classic interface, and support for most Firefox extensions. It is chosen for its flexibility and control over connection parameters. One practical use case is manually configuring a proxy server through the browser’s own system settings.
What Waterfox Is
Waterfox runs on Windows, macOS, and Linux and is aimed at users who value the ability to tailor the browser to their specific needs and maintain extension compatibility.
In terms of structure and interface logic, Waterfox is close to Firefox, so network connection setup here is organized in a familiar way: the necessary parameters are located in the general settings, in the network connection section.
Residential IPs for Everyday Browsing
Choose your preferred GEO and connect through your browser.
Where Proxy Settings Are Configured in Waterfox
Proxy settings are located in the browser’s settings menu. For manual connection, standard fields are used to enter the server address and port. If the server requires authentication, Waterfox additionally prompts for a username and password after the network settings are saved.
This method is convenient because it does not require third-party extensions: all the main actions are performed through the built-in settings window.
Step-by-Step Proxy Setup in Waterfox
1. Install and open the browser
First, download Waterfox from the official website, install it, and launch it on your computer.
2. Open the settings
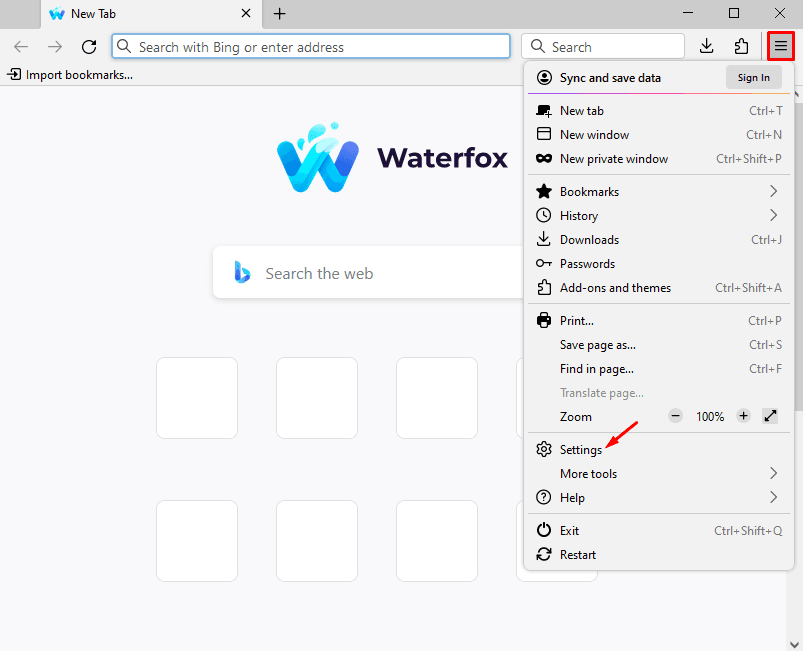
Click the menu button in the upper-right corner of the browser window. It usually looks like an icon with three horizontal lines. In the drop-down list, select Settings.
3. Go to the network settings
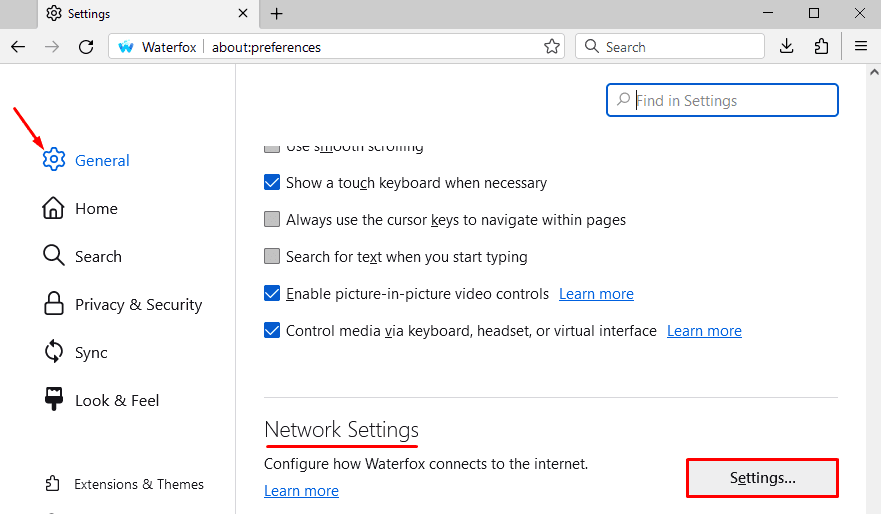
Open the General section and scroll down to the Network Settings block. In this section, click the Settings button, which opens the connection settings window.
4. Select manual configuration
In the Connection Settings window, select the Manual proxy configuration option. After that, the fields for manually entering the server parameters will become available.
Usually, you need to specify the following here (this information can be found on our website):
• the proxy IP address or host;
• the port;
• if necessary, use the same server for HTTPS connections.
If the same address should also be applied to secure connections, enable the corresponding option so that the browser uses the same settings for both HTTP and HTTPS.
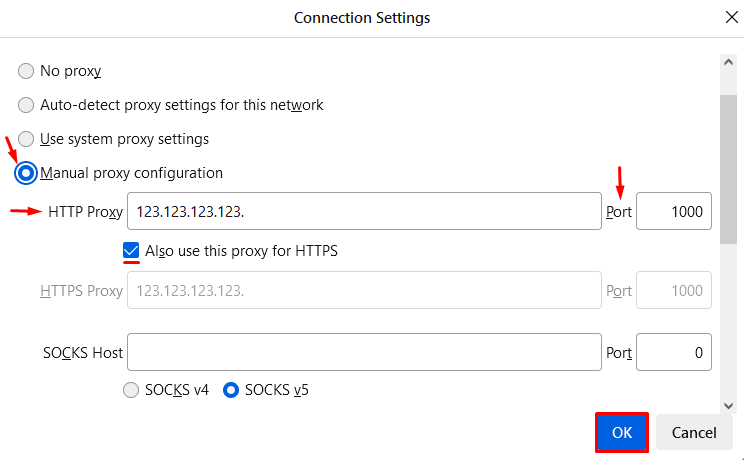
After entering the address and port, click OK. At this point, the basic part of the setup is complete: the browser will save the new network settings and begin using them for the connection.
5. Complete authentication if required
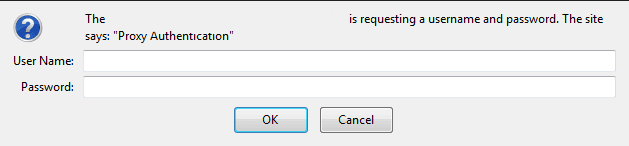
If the proxy works with a username and password, Waterfox will display an authentication window. Enter the username and password in the appropriate fields and confirm the login.
If the server does not require such authentication, no additional window will appear, and the connection will be established automatically.
6. Restart the browser
After saving the settings and entering the credentials, it is advisable to close Waterfox and open it again. This helps apply the network changes correctly and immediately verify that the connection is working in the new mode.
What Is Important to Check After Setup
After changing the connection settings, it is worth making sure that the browser is actually using the specified server. To do this, it is usually checked whether websites open without errors, whether repeated authentication prompts appear, and whether page access works correctly.
If pages do not load after setup, the cause is most often related to one of three things: the server address was entered incorrectly, there is an error in the port number, or incorrect credentials were entered. In such cases, it is enough to reopen the Network Settings window and recheck all the fields.