How to Set Up a Residential Proxy in the Accovod Browser
 ·August 4, 2026·6 min read
Accovod is a browser designed for working with multiple independent profiles. Each profile stores its own cookies, cache, connection settings, and other data separately from the others. This approach is convenient when you need to use several accounts at the same time and avoid session overlap within a single browser.
In addition to isolated profiles, Accovod supports proxy configuration both for each individual profile and for the browser as a whole. This makes it possible to manage the network connection flexibly depending on the work scenario.
It Starts with the Right IP
Use residential proxies for everyday and professional workflows.
What Accovod Can Do
The main feature of Accovod is working with separate browser profiles. Each of them functions as an independent environment with its own cookies, local storage, and network settings. As a result, data does not get mixed between profiles.
Among the browser’s useful features are the following:
Isolated profiles
Each profile operates separately. This helps keep accounts divided and prevents data overlap between sessions.
Individual environment settings
You can assign each profile its own parameters, including user agent, system language, time zone, and proxy. These settings make it possible to adapt the profile more precisely to a specific task.
Support for teamwork and cloud profiles
Accovod supports working with profiles from different locations and synchronizing data for a team, which is convenient for shared access.
Automation tools
The browser includes built-in tools for performing repetitive actions on pages, including clicks, form filling, and simple scenarios.
Resource savings
Accovod can load only the active profile without consuming unnecessary system resources on profiles that are not currently in use.
Profile preview
The user can monitor the state of profiles without constantly switching between them.
How to Set Up a Proxy for an Individual Profile in Accovod
If you need to assign a proxy to a specific profile, the setup is done when creating or editing that profile.
First, open Accovod and create a new profile by clicking New Profile on the left side of the window.
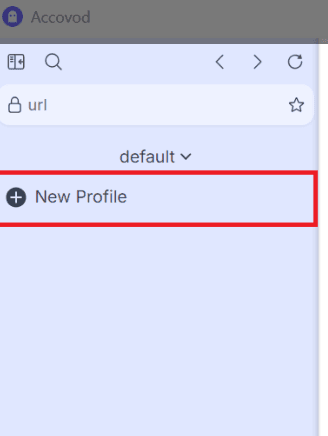
After opening the profile creation form, fill in the main fields. Specify the profile name and other required parameters. Then go to the proxy settings section.
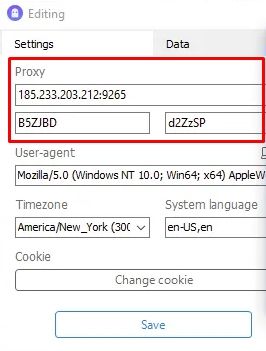
In the connection settings, you usually need to enter the following information (this information can be found on our website node-proxy.com):
• proxy IP address;
• port;
• username and password, if authorization is used.
In some versions of Accovod, the IP address and port are entered in one field separated by a colon. Similarly, credentials may be entered in the format username:password if the interface supports it. After filling in the parameters, save the profile by clicking Add.
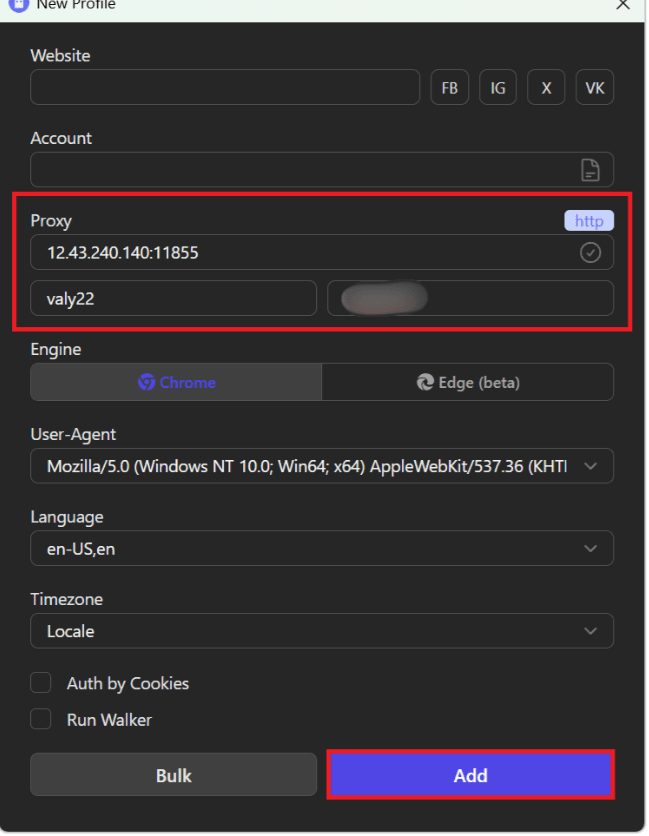
If necessary, you can also adjust additional profile parameters right away: user agent, system language, and time zone. These settings are not required, but in some cases they help make the profile more consistent in terms of configuration.
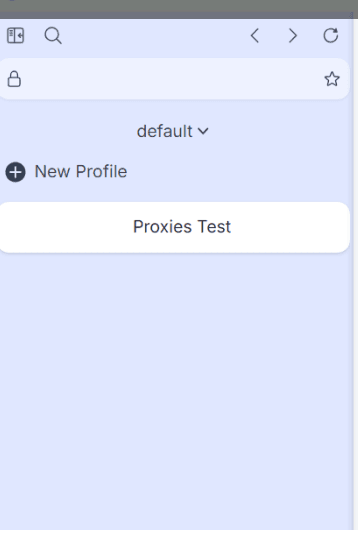
After saving, select the created profile in the sidebar and launch it. Accovod will open a separate browser window for this profile with the specified network settings already applied.
How to Change the Proxy for the Entire Browser
Accovod allows you to set a proxy not only at the level of an individual profile, but also for the browser itself.
To do this, open the top panel of the interface and click the shield icon.
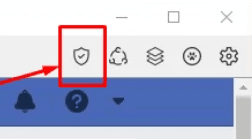
After that, a window for editing connection settings will appear. Enter the IP address and port in the required format, then save the changes.
After applying these settings, the traffic of the Accovod browser itself will be routed through the specified proxy. At the same time, it is important to understand that this configuration applies only to Accovod. Other browsers and programs on the device will continue to use the normal network connection.
How to Check Whether the Proxy Is Connected Correctly
After launching the profile or applying the general settings, it is advisable to make sure that the connection is working correctly. The easiest way is to open any IP address checking service and see what network data is detected in the browser.
If the required IP is displayed and the connection works without errors, the proxy is configured correctly. If the service shows the device’s original address or the connection is not established, it is worth checking the IP, port, username, password, and the data entry format in Accovod again.
What Is Important to Consider During Setup
When working with proxies in Accovod, it is useful to keep several practical points in mind.
First, the connection parameters must be entered exactly in the format supported by the current version of the interface. Errors most often occur because of an incorrect separator, a missing port, or invalid credentials.
Second, the settings can be applied either to individual profiles or to the entire browser, and these are two different configuration levels. Before starting work, it is better to determine in advance which option is needed in a particular situation.
Third, after saving the profile, it is worth launching it immediately and checking the connection so that you do not have to return to the setup later.
Conclusion
Accovod is suitable for working with several independent profiles in one browser and makes it possible to assign a proxy both to a profile and to the entire browser. The basic setup process comes down to creating a profile, entering the connection parameters, saving them, and checking the result through an IP detection service.