Setting Up a Residential Proxy in the AdsPower Browser
 ·July 28, 2026·5 min read
AdsPower allows you to assign separate proxies to different browser profiles and thereby distribute working sessions across different IP addresses. This is important in cases where one profile needs to operate stably and independently from others: when managing multiple accounts, testing geolocation, working with ad accounts, or collecting data.
How to Set Up a Proxy in AdsPower
Setup in AdsPower is done through the settings of a specific profile.
More Trust. Fewer Obstacles.
Residential proxies help where ordinary IPs often face additional scrutiny.
Step 1. Create a New Profile
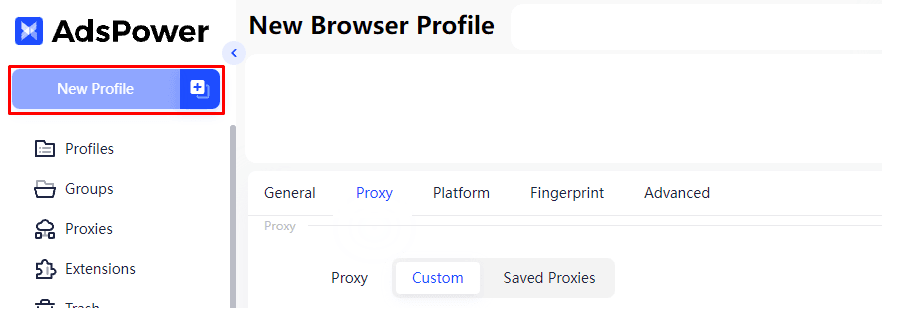
Open AdsPower and click New Profile.
If the profile already exists, you can edit its settings, but for a new configuration it is more convenient to create a separate profile for a specific proxy right away.
After that, set the profile name and, if necessary, choose the group in which it will be stored.
Step 2. Go to the Proxy Section
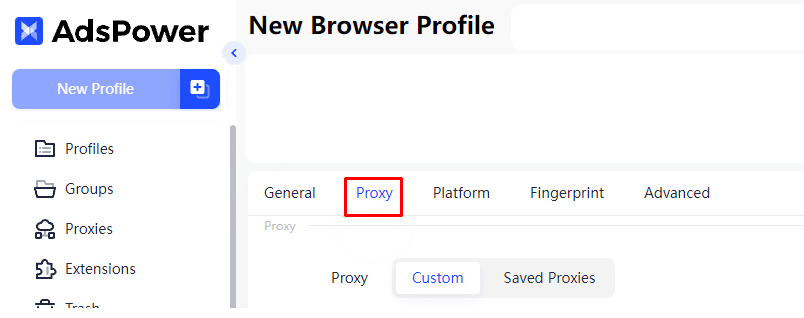
In the profile card, find the Proxy section.
Here, there is usually an option to choose a custom connection setup, where you can manually specify the proxy server parameters.
Step 3. Select the Proxy Type
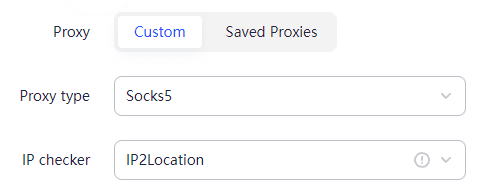
AdsPower supports several proxy types, most commonly:
• HTTP
• HTTPS
• SOCKS5
The choice depends on your tasks and on which format you plan to use. In most cases, HTTP/HTTPS or SOCKS5 is used. The main thing is to specify exactly the type that matches your server; otherwise, the connection will not be established.
Step 4. Enter the Proxy Details
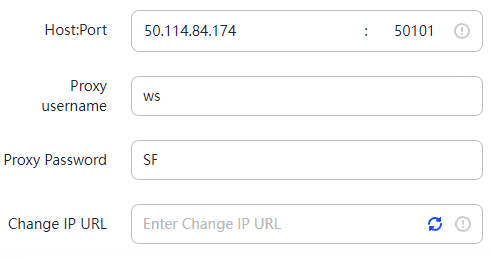
Fill in the connection parameter fields (this information can be found on our website node-proxy.com):
• IP address or host
• port
• username
• password
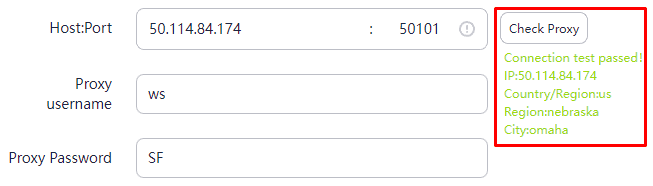
If the interface combines the field into the Host:Port format, enter the address and port in the required form, and the credentials in the separate authorization fields.
Step 5. Check the Connection
After entering the data, click Check Proxy.
This check is necessary before launching the profile: it makes it easier to immediately understand what exactly is wrong — an incorrect port, a login error, or an inactive server.
If the check indicator shows a successful connection, you can save the settings. If the connection does not go through, first check the entered parameters and the status of the proxy itself.
Step 6. Save the Profile and Open It
After a successful check, click OK. Then click Open to launch the profile with the assigned proxy.
What Is Important to Consider During Setup
Technically, the setup takes a few minutes, but the stability of further operation depends not only on whether the server connected, but also on how consistently the entire profile configuration is built.
One of the basic principles is that one profile should work through one clear and predictable network scenario. You should not change connection types chaotically within the same working scheme. If a profile is initially configured for a certain operating format, it is better to stick to it without frequent switching.
It is also important to enter the proxy data correctly. An error in even one digit of the IP address, port, or username leads to a connection failure. Therefore, after pasting the parameters, it is useful to check them once again before launch.
Why Use a Proxy in AdsPower
In AdsPower, each profile exists as a separate browser environment with its own parameters. In this setup, a proxy is needed to complement profile isolation with a network layer and assign a separate IP address to it.
This provides several practical advantages.
First, profiles overlap less with each other in terms of network data.
Second, you can distribute work tasks across different addresses and regions.
Third, it is easier to build stable sessions when one profile needs to work for a long time with the same connection.
That is why a proxy in AdsPower is not an additional option, but one of the key elements of proper profile configuration.
Common Mistakes When Setting Up a Proxy
Even if the process itself looks simple, problems usually arise for recurring reasons.
Incorrect Proxy Type Specified
One of the most common mistakes is selecting HTTP in AdsPower when the issued proxy is SOCKS5, or vice versa. As a result, the connection does not go through, even though the address, port, and username are entered correctly.
Authorization Data Error
An incorrect username or password immediately leads to a connection refusal.
If the proxy does not pass the check, the first thing to verify is the credentials.
Inactive or Expired Proxy
Sometimes the problem is not in the AdsPower settings, but in the fact that the proxy itself no longer works: the paid period has ended, the server is unavailable, or the service has been suspended.
Changing Parameters Too Frequently
If you constantly change the proxy, clear the profile, re-enter data, and test different combinations, it is easy to lose a working configuration. It is better to change one parameter at a time and check the result after each change.
How to Understand That There Is a Problem with the Proxy
Usually, issues appear in several typical scenarios:
• the Check Proxy button returns an error;
• the profile opens, but pages load very slowly;
• the connection is periodically interrupted;
• after launch, some websites do not open;
• authorization in the proxy itself does not go through.
If the problem appeared immediately after adding the data, the cause is almost always incorrect configuration.
Assign One Proxy to One Profile
You should not use the same server in several active profiles at once. When each profile has its own separate proxy, the work structure becomes cleaner and easier to understand.
Conclusion
Setting up a proxy in AdsPower comes down to a clear sequence: create a profile, choose the connection type, enter the IP, port, and credentials, check the connection, and save the configuration. The process itself is not complicated, but the quality of the result depends on input accuracy and careful work with profiles.