How to Set Up a Residential Proxy in Incogniton
 ·August 13, 2026·7 min read
Incogniton is a browser designed for working with multiple browser profiles. Each profile in it can use its own environment settings, including a separate network connection. As a result, profiles do not get mixed up with one another, and work across different sessions becomes more manageable and predictable.
One of the key stages of setting up Incogniton is connecting a proxy. This is what makes it possible to assign a separate IP address to each profile and thereby separate sessions at the network level. This is especially important in scenarios involving multiple accounts, search result monitoring, ad verification, work with social platforms, or data collection.
A Dedicated Connection for Every Profile
Pair each browser profile with its own residential IP.
What Incogniton Is and What It Is Used For
Incogniton is intended for launching and managing many independent browser profiles within a single interface. Each profile can have its own cookies, browser settings, and network configuration. This approach helps create isolated working environments for different tasks.
Among the browser’s capabilities, profile management, cookie handling, scripted workflows, and automation tools through REST API, Puppeteer, and Selenium are usually highlighted. A limited number of profiles is available on the free plan.
Why Connect a Proxy in Incogniton
Without a separate network address for each profile, multiple sessions may appear to websites as activity coming from a single source. This increases the likelihood of additional checks, restrictions, and account-related issues.
Connecting a proxy solves this problem by assigning a separate IP to a specific profile. As a result, sessions are better separated from one another, and the user gains more control over connection geography, content availability, and the stability of work across different services.
This is useful in several scenarios:
1. Managing Multiple Accounts
When each account uses a separate profile with its own network settings, the risk of session overlap and unwanted linkage between them is reduced.
2. Monitoring Search Results, Ads, and Regional Content
Separate IP addresses help check how pages, advertisements, or search results are displayed in different regions.
3. Parsing and Automation
For tasks related to data collection and automated browser activity, it is important that sessions remain isolated and connect consistently through a properly configured server.
How to Set Up a Proxy in Incogniton: Step-by-Step Instructions
The connection is configured within a specific browser profile.
1. Sign in to Incogniton and open the profiles section
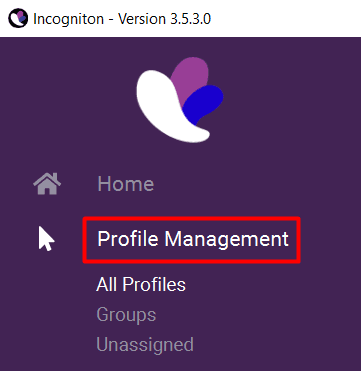
After launching the browser, sign in to your account and go to the Profile Management section.
2. Create a new profile
Click the New profile button in the control panel. At this stage, the basic settings are configured: profile name, browser configuration type, and additional environment settings.

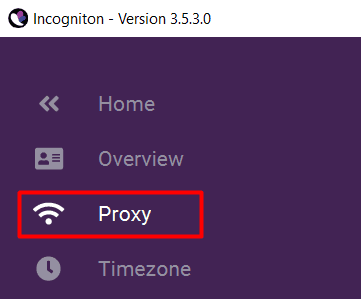
3. Go to the Proxy tab
In the profile settings window, open the Proxy section. This is where all connection parameters are specified (this information can be found on our website node-proxy.com): protocol type, IP address, port, and, if necessary, authentication details. This block determines which server the specific profile will use.
4. Select the appropriate connection type
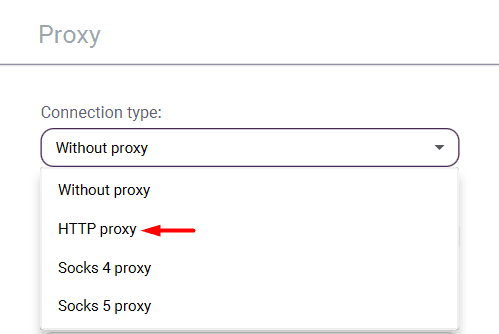
Incogniton usually supports several proxy options:
HTTP — used for regular web traffic;
HTTPS — suitable for working with secure connections;
SOCKS5 — a more flexible option that is often chosen for advanced network scenarios.
The type should be selected according to the format provided by the proxy provider. A mismatch between the protocol and the server settings will lead to a connection error.
5. Enter the IP address and port
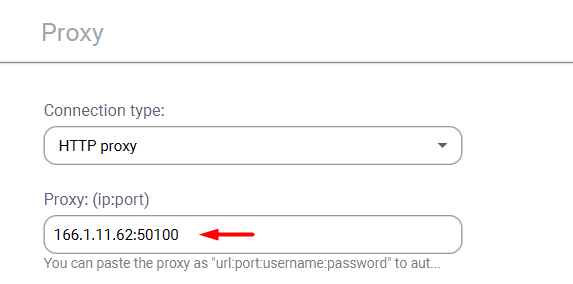
Next, enter the server address and port number into the appropriate fields. It is important to transfer the data without extra characters, spaces, or mistakes in the numbers. Even a small inaccuracy at this stage will prevent the profile from establishing a connection.
6. Add a username and password if authentication is required
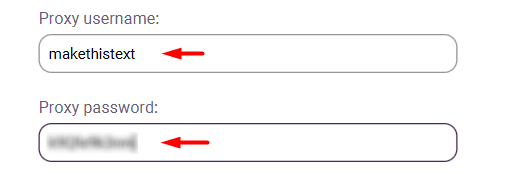
If the server uses authentication, enter the username and password. If access via username and password is not provided, the fields can be left empty — this depends on the format of the specific proxy.
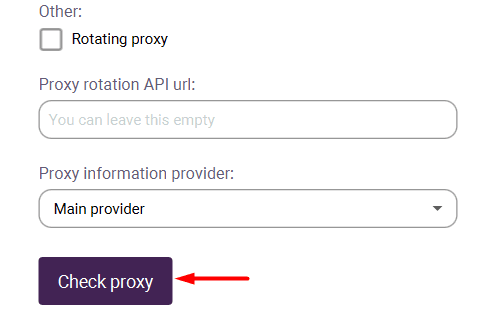
7. Check the connection
After entering the parameters, use the check button to make sure the connection is established correctly. If the server is available and the data has been entered without errors, Incogniton will confirm a successful check. If not, a problem notification will appear.
Checking before launching the profile is useful for several reasons: it helps immediately identify an incorrect address, wrong port, unsuitable protocol type, or outdated login credentials.
8. Save the profile
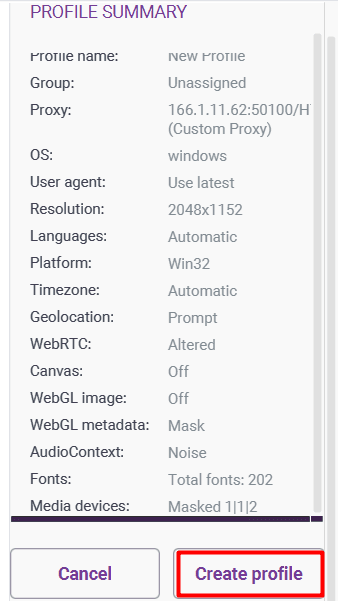
Once the connection has been successfully verified, complete the profile creation. After saving, it will be ready to launch with the assigned network settings. This profile can then be used as a separate working environment for a specific task.
What to Pay Attention to During Setup
For the connection to work stably, it is important to check several basic points before launching the profile.
First, the server data must exactly match the issued parameters: address, port, connection type, and authentication.
Second, it is better to bind each profile to its own separate server if the task requires clear session separation.
Third, after making changes, it is advisable to always run a connection test rather than proceeding directly to work.
It is also worth considering that the convenience of Incogniton lies not only in separate profiles, but also in its additional tools. The browser supports cookie management, automation through REST API, Puppeteer, and Selenium, as well as features that simplify repetitive actions within a team. Therefore, correct network configuration is only one element of the overall workflow.
Conclusion
Incogniton is suitable for working with multiple independent browser profiles and provides tools for flexible configuration of each session. Connecting a proxy in this system is necessary in cases where profiles must operate separately and use their own IP addresses.