Setting Up a Residential Proxy in the Undetectable Browser
 ·August 4, 2026·3 min read
Undetectable is a browser used for working with multiple profiles and managing browser environment parameters. One of the key stages of its setup is connecting a proxy. Without this, a profile can be created and launched, but the browser’s capabilities will not be used to their full extent.
A proxy in Undetectable is configured at the profile level. This makes it possible to assign a separate connection for each working environment, check connection parameters before launch, and, if necessary, save the proxy for repeated use. This approach is convenient for tasks where a stable network environment, profile separation, and the proper functioning of web services are important.
What You Need to Prepare Before Setup
Before starting, you will need the proxy server data (this information can be found on our website node-proxy.com):
• IP address;
• port;
• username and password, if authorization is used;
• connection type — HTTP, HTTPS, or SOCKS5;
A Reliable Foundation for Your Projects
Residential proxies for automation, analytics, and everyday workflows.
How to Add a Proxy in Undetectable
Create a New Profile
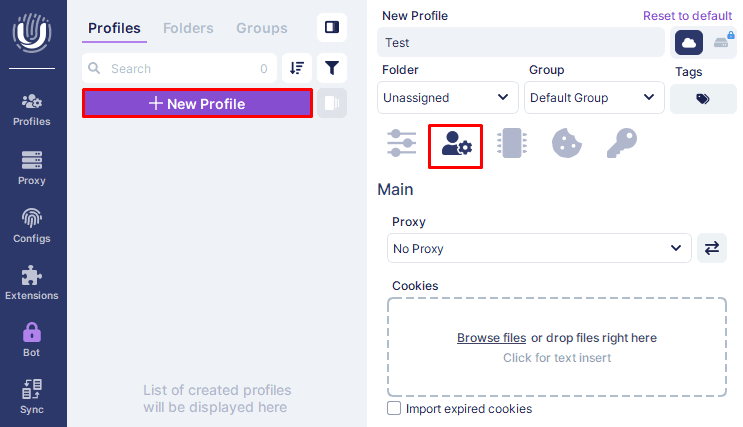
After launching Undetectable, open the profiles section and click New Profile. A window for creating a new profile will open.
Fill in the basic parameters: profile name, folder, group, and other characteristics of the working environment.
Go to the Main Section
After filling in the main parameters, open the Main tab.
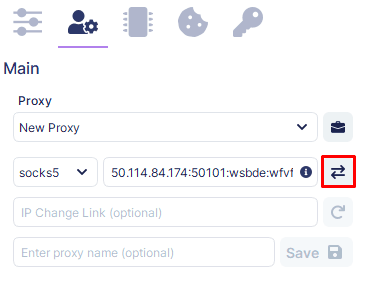
In the Proxy field, select the New Proxy option. After that, the parameters for manual input will become available.
In the drop-down list, select the protocol: HTTP, HTTPS, or SOCKS5. This step is important: if you select the wrong type, the connection may fail even if the username, password, and address are entered correctly.
Undetectable supports both HTTP(S) and SOCKS5 proxies.
Enter the server data into the appropriate fields or paste it into the line in the required format. Check:
• the correctness of the IP address;
• the port number;
• the username and password;
• the absence of extra spaces and typos.
Check the Connection
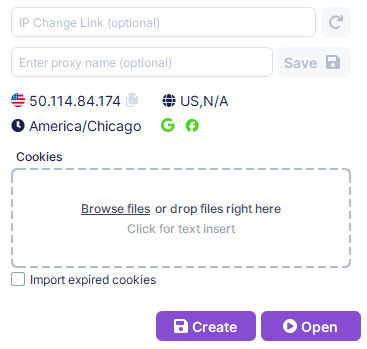
After entering the data, run a connection check using the built-in test button. If everything is specified correctly, Undetectable will show connection information: country, region, and service availability status.
It is better to perform this check before saving the profile. It allows you to immediately make sure that the proxy works and that the data has been entered correctly.
Save the Profile or Launch It Immediately
When the check has been completed successfully, you can click Create to save the profile, or Open to launch it immediately with the specified connection parameters.
Proxy Manager and Reusing Proxies
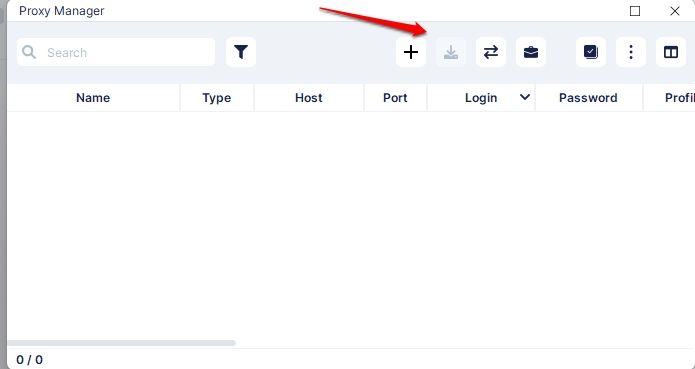
In Undetectable, proxies can be configured not only within a specific profile, but also through Proxy Manager. This option is convenient if you plan to use the same proxies across multiple profiles. In that case, the data is saved in the manager and becomes available for further work.
Bulk Proxy Import
Undetectable supports bulk proxy upload, but this feature is not available on all plans. For bulk import, the Import option in the Proxy Manager menu is used.
Usually, the list is prepared so that each proxy is on a separate line. A common format is:
IP:Port:Username:Password
Bulk upload is convenient when you need to quickly add a large set of proxies and distribute them across profiles without manually entering each record.
Common Setup Errors
Even with a simple connection scheme, problems arise regularly. Most often, they are related not to the browser itself, but to inaccuracies in the parameters.
Connection Error
If the proxy does not connect, first check the basic parameters:
• whether the IP address matches the provider’s data;
• whether the port is specified correctly;
• whether the correct proxy type is selected in the profile settings;
• whether there are any errors in the connection string.
After correcting the data, it is useful to restart the browser or reopen the profile to refresh the network parameters.
Authorization Error
If the connection fails because of authentication, the cause is usually incorrect credentials. In this case, you need to:
• recheck the username and password;
• make sure that the proxy actually works with authorization in the format being used;
• update the data in the profile and repeat the check.
Why Connect a Proxy in Undetectable
Setting up a proxy in Undetectable is needed not as an additional option, but as a basic element of the working configuration. It makes it possible to assign a separate network environment for each profile, distribute connections correctly, and manage working sessions flexibly.
Conclusion
Setting up a proxy in Undetectable comes down to a few steps: create a profile, go to the Main section, select New Proxy, specify the connection type, enter the server data, and check the connection before launch. For regular work, it makes sense to use Proxy Manager, and for a large number of addresses, bulk import.