How to Set Up a Residential Proxy in the VMLogin Browser
 ·August 15, 2026·7 min read
VMLogin uses separate browser profiles with configurable environment settings, so proper operation largely depends on how the network connection is organized. In this setup, a proxy is needed as a separate network route for each profile. This makes it possible to isolate working sessions, avoid overlap by IP address, and make profile behavior more predictable during long-term use.
When using multiple profiles, one of the basic rules is not to connect them through the same address if your tasks require separate network configurations. When several sessions go through one IP, it becomes harder to distinguish between profiles and may trigger additional checks from websites and web services. That is why in VMLogin, a separate proxy is usually assigned to each profile.
Residential Proxies for Your Browser Profiles
Node Proxy fits seamlessly into popular antidetect browsers.
Why Connect a Proxy in VMLogin
The main purpose of a proxy in VMLogin is to give each profile its own route to the internet. This is important in cases where you need to run several working sessions in parallel: for example, in account management, ad placement testing, open data collection, marketplace operations, or team workflows where stable separation of environments is required.
In addition to separating profiles, a proxy also helps solve practical tasks. First, it makes network settings more manageable: it becomes easier to assign a specific address to a specific profile and preserve the same working conditions from one launch to the next. Second, it reduces the likelihood of conflicts between sessions if each of them is tied to a separate configuration. Third, with the right type of proxy, you can achieve a more stable connection for the required load format, from regular interface work to automated requests.
How to Add a Proxy in VMLogin
1. Log in to VMLogin
After authorization, the main profile management dashboard will open.
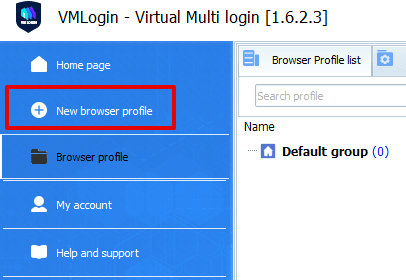
2. Create a new profile
Click New Browser Profile. A profile creation window will open, where the basic browser environment settings are configured.
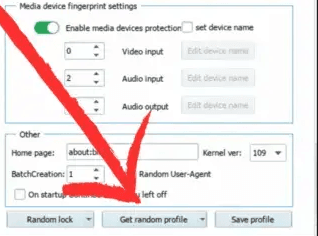
3. Generate a profile if needed
In some scenarios, before proceeding with further setup, the Get Random Profile button is used to quickly obtain a set of standard profile parameters.
4. Open the proxy settings section
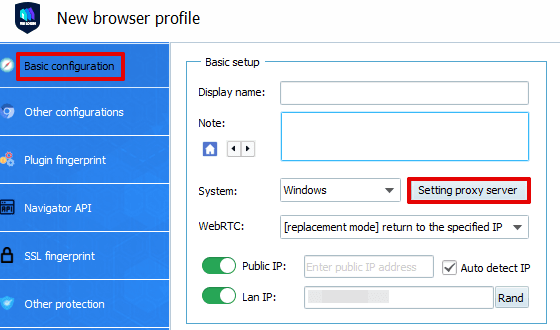
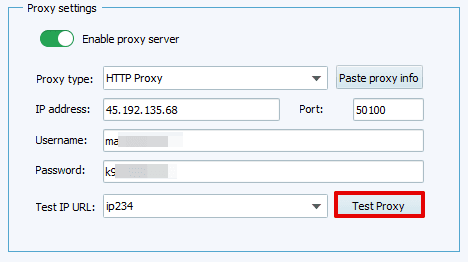
In the Basic configuration window, find Setting Proxy Server. After clicking it, a separate window will open where the network connection settings are entered.
5. Enable proxy use
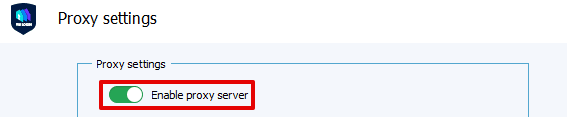
Turn on the Enable Proxy Server switch. Until this option is enabled, the profile will not use the entered settings.
6. Select the connection type
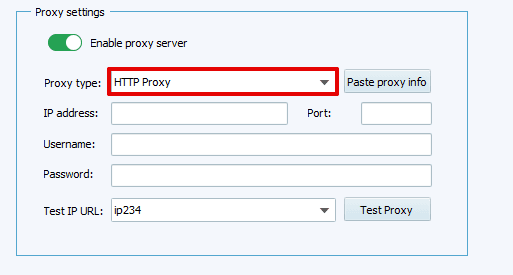
VMLogin supports several protocols: HTTP, HTTPS, SOCKS4, and SOCKS5. The choice depends on which format your provider supports and what task the profile is being created for.
For regular browser use, HTTP or HTTPS is often used. If you need a more flexible connection scheme and better compatibility with automation tools, SOCKS5 is usually the preferred option.
7. Enter the proxy details
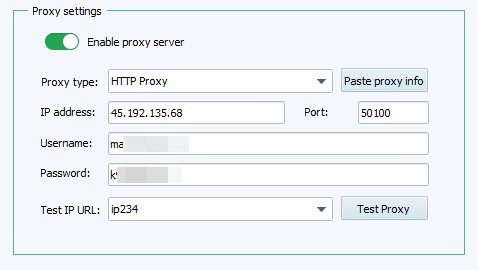
Fill in the fields (this information can be found on our website, node-proxy.com):
• IP Address
• Port
• Username
• Password
If the provider does not use authentication by username and password, the corresponding fields may not be required. It is important to transfer the data without errors: even one extra character in the address, port, or credentials will cause the connection to fail.
8. Check the connection
Click Test Proxy. VMLogin will test the entered server and show whether the connection is working. It is better not to skip this step: it allows you to immediately detect an error in the parameters instead of looking for the cause after launching the profile.
9. Confirm the result
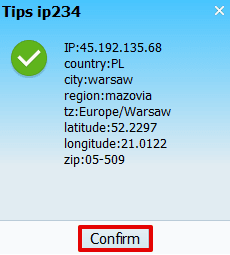
If the test is successful, click Confirm. After that, the system will accept the settings and return you to the profile editor.
10. Save the settings
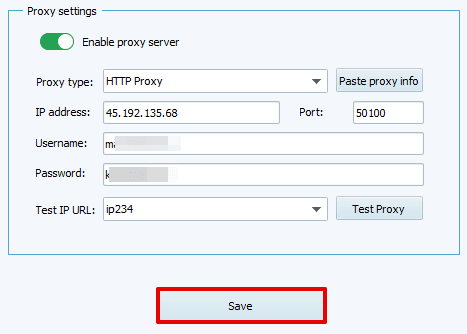
Click Save to assign the proxy to the profile settings, and then complete the profile setup through Save Profile. If necessary, at this same stage you can also set the language, screen resolution, time zone, and other environment parameters.
Which Proxy to Choose for VMLogin
The right option depends not only on price or speed, but also on how exactly you use the profiles. In VMLogin, selection is usually based on two levels: the IP type and the connection protocol.
By IP Type
Residential
Traffic goes through addresses associated with home internet connections. This option is often chosen for tasks where a careful, natural network behavior model is important and a softer reaction from websites is needed.
ISP
This is an intermediate option between residential and server-based solutions. Such proxies usually provide good stability and are suitable for long sessions.
Datacenter
Server proxies are usually faster and cheaper than other options. They are often used where speed and scale are the priorities, for example in large-scale data processing. However, they are not always suitable for sensitive scenarios, since such addresses are easier to identify.
Mobile
The connection goes through mobile operator addresses. This option is often chosen for tasks with higher requirements for IP quality, although it is usually more expensive than other approaches.
By Protocol
HTTP / HTTPS
Suitable for most standard actions in the browser. This is a common option for regular work with web interfaces and profiles where complex traffic transmission is not required.
SOCKS4 / SOCKS5
These protocols are more often used where flexibility, stability, and better compatibility with additional tools are important. SOCKS5 is usually considered the more universal option because it supports authentication and is more widely used in complex configurations.
Typical Setup Mistakes
Most often, problems arise not because of VMLogin itself, but because of inaccurately entered data or an unsuitable configuration. In practice, it is worth checking several things:
Incorrect data format
Errors in the IP, port, username, or password are the most common. This is especially true when copying data manually from the provider’s personal account.
Incorrect protocol selection
If the provider issued SOCKS5, but HTTPS is selected in the profile, the connection will fail. The proxy type in VMLogin must match the server settings.
Skipping the Test Proxy check
Sometimes users save the profile immediately and move on to work. It is much more reliable to first make sure that the server responds and that the data has been entered correctly.
The same proxy for multiple profiles
Technically, this is possible, but in tasks where separate operation of environments matters, such a setup quickly creates unnecessary overlap.
Conclusion
Connecting a proxy in VMLogin comes down to a few steps: create a profile, open Setting Proxy Server, enable the proxy, choose the protocol, enter the parameters, test the connection, and save the result. The process itself takes only a few minutes, but it is this setup that determines how cleanly the profiles will be separated and how stable they will work going forward.
If you approach the setup carefully, use the correct proxy type, and assign a separate address to each profile, VMLogin provides a convenient and manageable way to work with multiple browser environments.