How to Set Up a Residential Proxy in Google Chrome on Windows and macOS
 ·August 18, 2026·5 min read
Google Chrome does not have a separate built-in section for manually configuring a proxy. The browser uses the operating system’s network settings, so the connection is configured through Windows or macOS settings.
How to Set Up a Proxy in Google Chrome on Windows
On Windows computers, a proxy for Chrome is connected through the system network settings.
A Simple Way to Change Your IP
Connect a residential proxy and keep browsing as usual.
Step 1. Open Chrome Settings
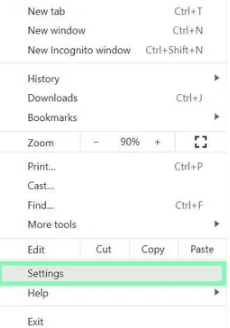
Launch Google Chrome, click the three-dot icon in the upper-right corner, and open the Settings section.
Step 2. Go to System Settings
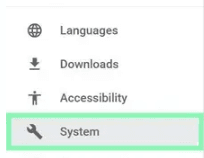
Open the System section.
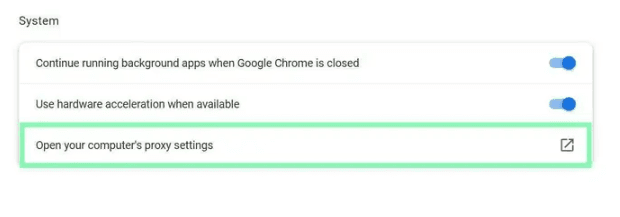
Click Open your computer’s proxy settings. After that, Chrome will redirect you to the proxy settings window in Windows.
Step 3. Open Manual Proxy Setup
In the system window, find the Manual proxy setup section.
Enable the Use a proxy server option.
Enter the proxy server address and port (this information can be found on our website, node-proxy.com).
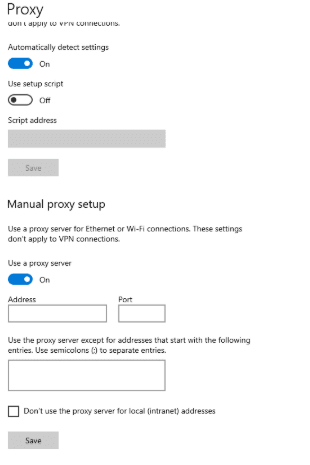
Step 4. Save the Changes
Confirm the settings. After that, Google Chrome will begin using the specified proxy, since the browser works through the Windows system network settings.
How to Disable a Proxy in Chrome on Windows
To disable the proxy, follow the same path:
1. Open Chrome.
2. Go to Settings.
3. Open System.
4. Click Open your computer’s proxy settings.
5. In the Windows system settings, disable the Use a proxy server option.
6. Save the changes.
After that, Chrome will return to a normal connection. If necessary, you can restart the browser so the changes take effect immediately.
How to Set Up a Proxy in Google Chrome on macOS
On macOS, the logic is the same: Chrome opens the system network settings, and the further configuration is done in the operating system interface.
Step 1. Open Browser Settings
Launch Google Chrome, click the three-dot menu, and go to Settings.
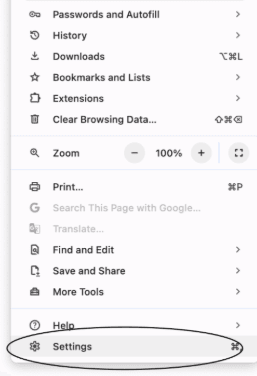
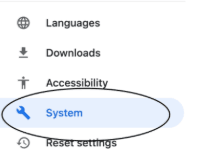
Step 2. Go to the System Section
Open the System section.
Click Open your computer’s proxy settings.
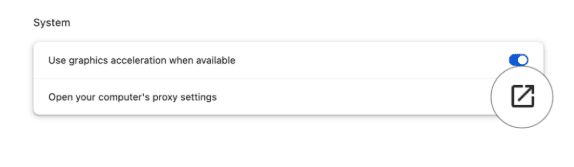
Step 3. Open macOS Network Settings
After that, the system window with network settings will open. In it, you need to select the proxy settings.
Depending on the connection type, choose the appropriate proxy protocol.
Enter the proxy server address, port, and, if required, the authorization credentials (this information can be found on our website, node-proxy.com).
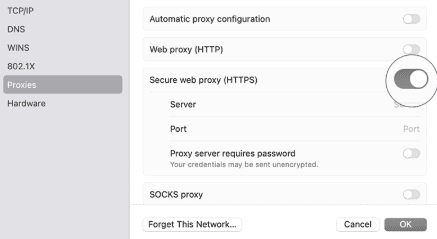
Step 4. Apply the Settings
Save the changes. After that, Chrome will use the specified proxy through the macOS system settings.
How to Disable a Proxy in Chrome on macOS
To disable the proxy, you need to open the system network settings through Chrome again and deactivate the active proxy settings or remove the entered connection data. After saving the changes, the browser will continue working without a proxy.
An Important Point Before Setup
Since Chrome uses system settings, the proxy often applies not only to the browser but also to other applications that work through the same network settings. This is especially important to consider on Windows and macOS if other programs sensitive to network connectivity are used on the device.
Why the Cannot connect to the proxy Error Sometimes Appears in Chrome
One of the most common problems is a proxy connection error. Usually, it is not related to Chrome itself, but to the connection settings. Most often, the cause lies in one of the following factors:
• the server address is entered incorrectly;
• the wrong port is entered;
• an unsuitable protocol is selected;
• the proxy server is temporarily unavailable;
• conflicting old settings remain in the system;
In most cases, the problem is solved by rechecking the connection credentials and clearing old network settings.
Conclusion
Setting up a proxy in Google Chrome on Windows and macOS is done not in the browser itself, but through the device’s system settings. In Chrome, you only need to open the required section, after which you enter the server address, port, and, if necessary, credentials in the operating system window.
For Windows, the process comes down to going to manual proxy setup and enabling the Use a proxy server option. For macOS, it involves selecting the appropriate protocol and filling in the connection details in the network settings.