iPhone and iPad Proxy Settings: Manual Setup Over Wi-Fi

Apple ties proxy settings to individual Wi-Fi networks rather than to the whole device. To use one, head into Settings, choose Wi-Fi, press the round ⓘ symbol beside the network you are joined to, scroll until Configure Proxy shows up, set that option to Manual, then type a server, a port and, when your plan requires it, a login. iPhone and iPad share this menu, so the routine is identical on both.
Below, every screen is illustrated. You will also see where Apple's built-in form stops (SOCKS5 and cellular data are out of reach), how to make sure traffic really exits through your server, and why a seemingly correct setup sometimes does nothing.
Residential proxies
Residential proxies with a login and password for iPhone and iPad
Collect These Values First
Your proxy provider's dashboard lists what you need:
- Server: either a numeric IP or a hostname;
- Port: the number tied to that server;
- Username plus Password: only for plans protected by a login.
Two Apple-specific limits influence everything that follows. Apple labels the relevant block HTTP PROXY, and it means exactly that: HTTP relays are accepted (secure HTTPS pages travel through them in a tunnel), whereas SOCKS5 has no entry anywhere. On top of that, whatever you enter is stored for a single Wi-Fi network. Hop onto another router, tether to a friend's hotspot or drop to LTE or 5G, and the device connects without any relay.
Walkthrough With Screenshots
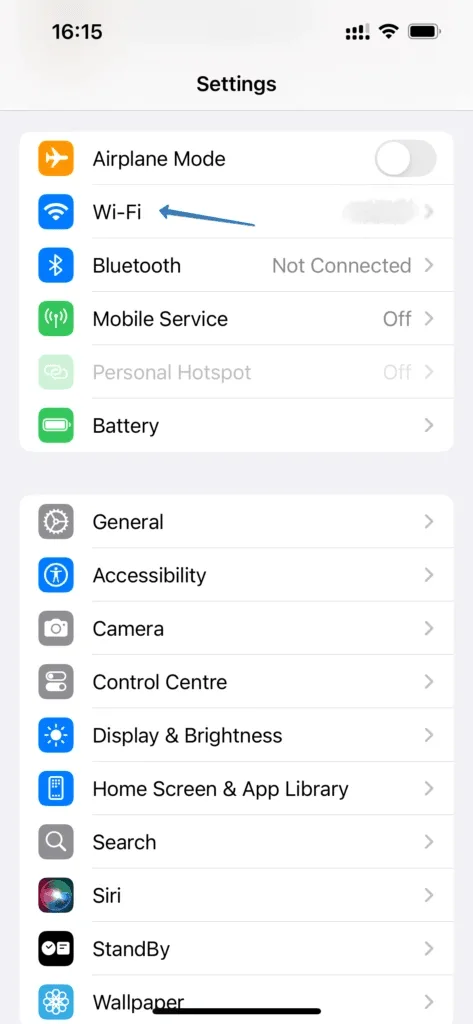
Step 1. Go to Wi-Fi
Find the grey cog called Settings on your home screen. In the first group of rows, right under Airplane Mode, sits Wi-Fi; open it.
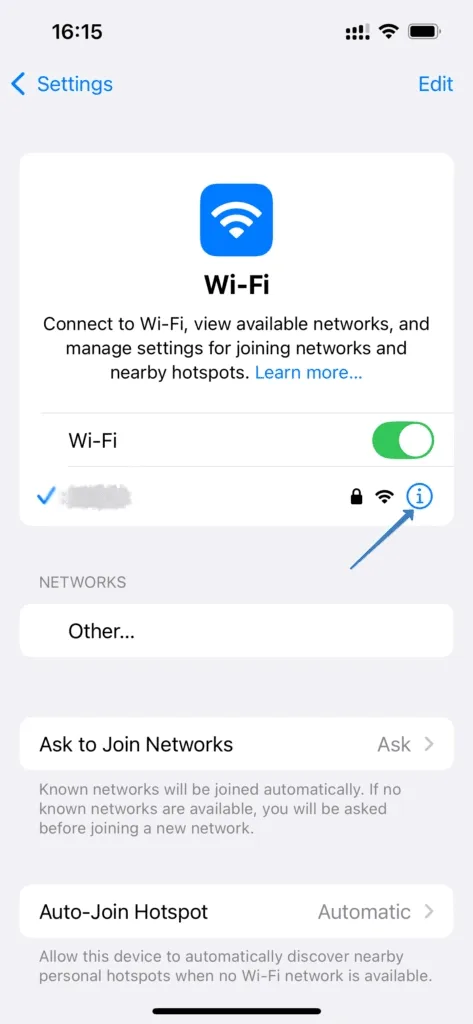
Step 2. Open the Details of the Joined Network
A blue tick marks whichever network the device is using right now. Press the small blue ⓘ circle at the far right of that row; pressing the name instead just tries to rejoin.
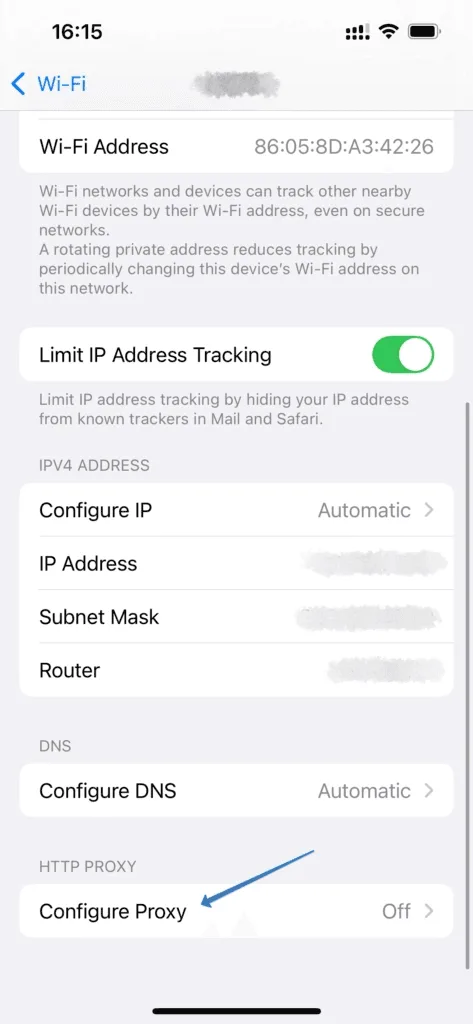
Step 3. Scroll Down to the HTTP Proxy Block
Expect a lengthy page: private Wi-Fi address, IP tracking, then the IPv4 and DNS blocks. Keep scrolling until the heading HTTP PROXY appears, then press Configure Proxy; out of the box it says Off.
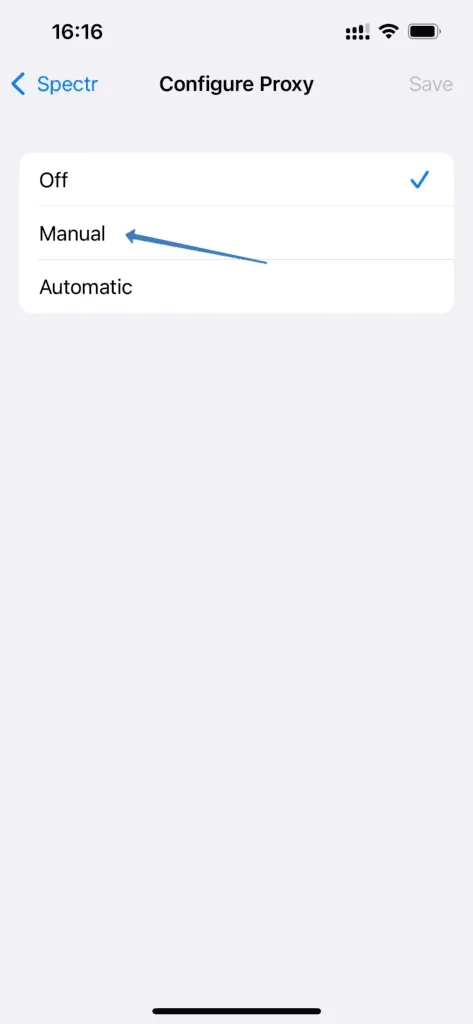
Step 4. Switch to Manual
Apple offers a trio of choices:
- Off: traffic on this network goes direct;
- Manual: you provide the server details yourself;
- Automatic: the device downloads a PAC script from a URL, a technique favoured by corporate IT.
Press Manual.
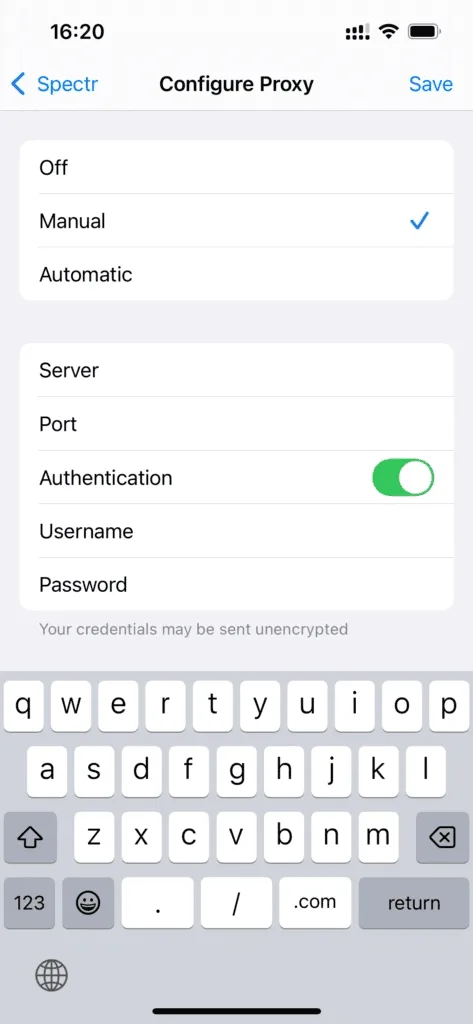
Step 5. Enter Server, Port and Credentials
New rows unfold beneath the three modes:
- Server: paste the address only, with no
http://prefix. - Port: digits only.
- Authentication: slide it to green if your plan uses a login; Username and Password rows then appear for you to complete.
Plans that rely on an IP allowlist work differently. Keep Authentication grey and check that this Wi-Fi network's public address has been added in your provider's dashboard. Once done, press Save at the upper right.
A small caption under the rows says credentials could travel unencrypted. That describes how iOS hands a login to an HTTP relay, which is a good reason never to recycle a password you use for anything important.
As long as the device stays on this network, Safari and any app using Apple's standard networking will route through the relay.
Make Sure It Took Effect
In Safari, visit a site that displays your public IP. Both the address and the location should now match the relay. Seeing your home IP instead means returning to Configure Proxy to confirm that Manual is still ticked and the values stuck.
One more thing can muddy the test: iCloud Private Relay. While this privacy feature runs, Safari can display an Apple relay IP rather than the one from your provider. Turn it off for this network, using the switch on that same details page, before judging the result. To examine the server apart from the phone altogether, paste it into our free proxy checker.
Reasons the Proxy Fails
A typo in server or port. One stray character and nothing loads. Providers also tend to assign separate ports per country or proxy type, so take the exact pair attached to the IP you purchased.
Login method mismatch. Login-based plans need Authentication switched on with both rows filled precisely. Allowlist-based plans need it switched off; otherwise iOS sends credentials the relay never asked for.
Wrong protocol. A relay speaking SOCKS5 alone will never cooperate with this form. Request an HTTP port or move to an app, described below.
You changed networks. Another Wi-Fi network, a hotspot or cellular data each start without a relay, so every network has to be configured on its own.
One app goes direct. Software with its own networking code can sidestep system settings. A few such apps have a private proxy field; Telegram is the best-known example, and our Telegram proxy guide shows how to fill it in.
Cellular Data, SOCKS5 and App-Level Rules
Apple's Settings app has no proxy option for LTE or 5G. Organisations deliver one through a configuration profile, yet for a personal iPhone an app is the practical answer. Clients such as Shadowrocket register a local VPN profile and steer everything, whether on Wi-Fi or mobile data, through HTTP or SOCKS5 servers, using rules that decide which domains take the proxy. Our Shadowrocket setup guide explains how to add a server and write those rules.
Picking a relay for an Apple device, consider what websites will infer. Residential proxies present an address from a household broadband provider, which looks natural for a phone or tablet and fits casual browsing, price comparisons and region-bound content. Still undecided on protocol? Our comparison of HTTP and HTTPS proxies lays out the differences.
Turning It Off Without Losing the Values
Nothing has to be erased. Return to Settings, open Wi-Fi, press ⓘ beside the network, enter Configure Proxy and pick Off. Your server, port and login stay stored in the background, and choosing Manual again revives them instantly.
iPhone Proxy FAQ
Can an iPhone use a proxy on LTE or 5G?
Not through Settings, where Configure Proxy appears only inside Wi-Fi networks. For mobile data, install a proxy client that creates its own VPN profile, or ask your employer's IT team for a managed configuration profile.
Can I put a SOCKS5 server into the iPhone Wi-Fi menu?
You cannot, because that form understands HTTP relays alone. SOCKS5 servers go into apps such as Shadowrocket.
Does an iPad need different steps than an iPhone?
It does not. iPadOS shows the very same Wi-Fi screens with identical labels.
What is the Automatic mode in Configure Proxy for?
It fetches a PAC script from whatever URL you supply. The script decides which sites travel through which relay and normally comes from a company IT team.
Why does iOS say credentials may be sent unencrypted?
An HTTP relay receives the login merely encoded rather than encrypted. Give the proxy its own unique password and stay away from Wi-Fi networks you do not trust.