How to Set Up a Proxy in MarketerBrowser: Profile-by-Profile Guide


In MarketerBrowser a proxy is attached while you create a profile: click Create Profile, expand the Proxy section, change Type from No Proxy to HTTP or SOCKS5, fill in Server, Port, Username and Password, hit Check, then save with Create. After that the profile shows its IP in the list and can be launched with the toggle in the Launch column.
This walkthrough follows the desktop app screen by screen, explains what each field in the side panel does, how to confirm the profile really goes online through the proxy and what to look at when the check turns red.
Proxies for MarketerBrowser
Static HTTP and SOCKS5 proxies with authorization for every MarketerBrowser profile
What MarketerBrowser Is
MarketerBrowser is a desktop multi-profile browser aimed at marketers and SMM teams who handle several accounts on the same platforms. Each profile keeps its own cookies, user agent and operating system preset, so one work identity never leaks into another. The screenshots below were taken in MarketerBrowserLite v1.0.0.1, the free edition; the Upgrade item in the sidebar leads to the paid plans.
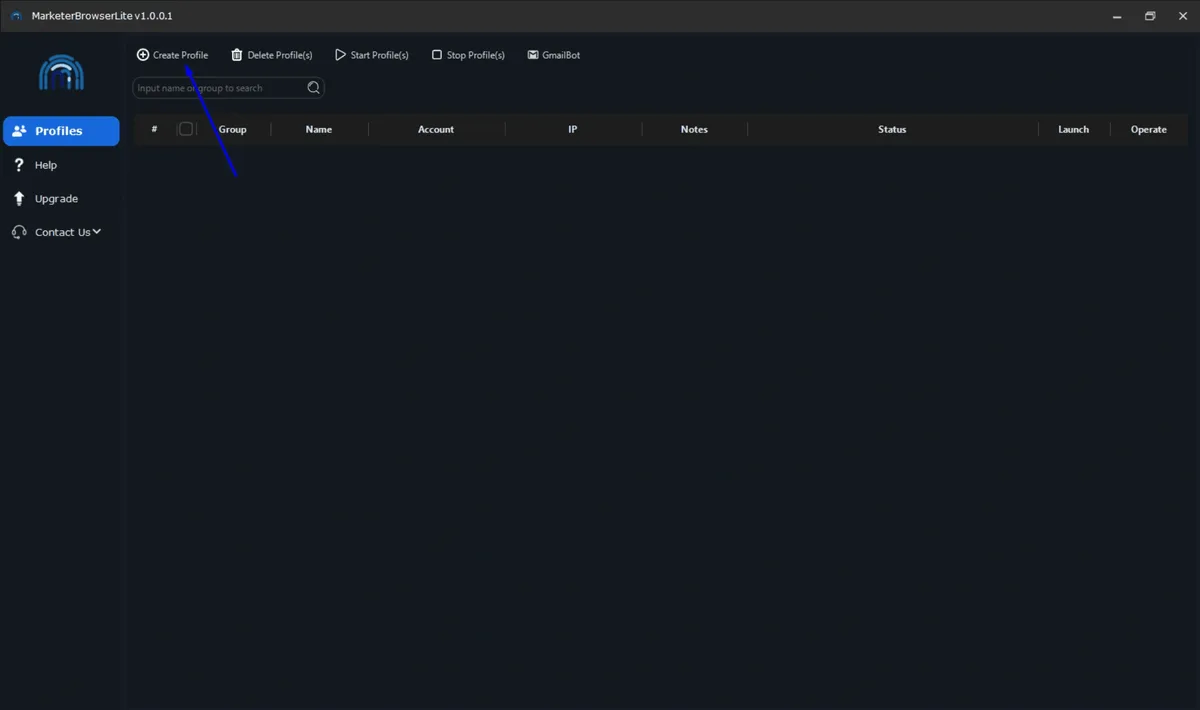
The main window is minimal. The left menu has Profiles, Help, Upgrade and Contact Us. The toolbar above the table offers Create Profile, Delete Profile(s), Start Profile(s), Stop Profile(s) and GmailBot, a built-in helper for Google mail accounts. The profile table lists Group, Name, Account, IP, Notes, Status, Launch and Operate.
Profiles separate browser data, but not the network. Without a proxy every profile reaches websites from your own address, which is why the proxy fields sit right inside the profile form. If you work with several antidetect tools, our collection of antidetect browser proxy guides shows how the same task looks elsewhere.
Connection Details to Prepare
Copy these values from your proxy dashboard:
- server — IP address or host name;
- port;
- username and password, if the proxy uses login authorization;
- protocol — HTTP or SOCKS5.
The protocol decides which option you pick in the Type list, so check it twice. If you are unsure which one to request, the article SOCKS5 vs HTTP proxies lays out the practical difference. For accounts you plan to keep for months, a fixed address works better than a rotating one, so static proxies are a sensible default.
Creating a Profile with a Proxy
Step 1. Open the Create Profile Panel
Launch MarketerBrowser, stay in Profiles and click Create Profile at the left end of the toolbar.
Step 2. Fill In the Basic Block
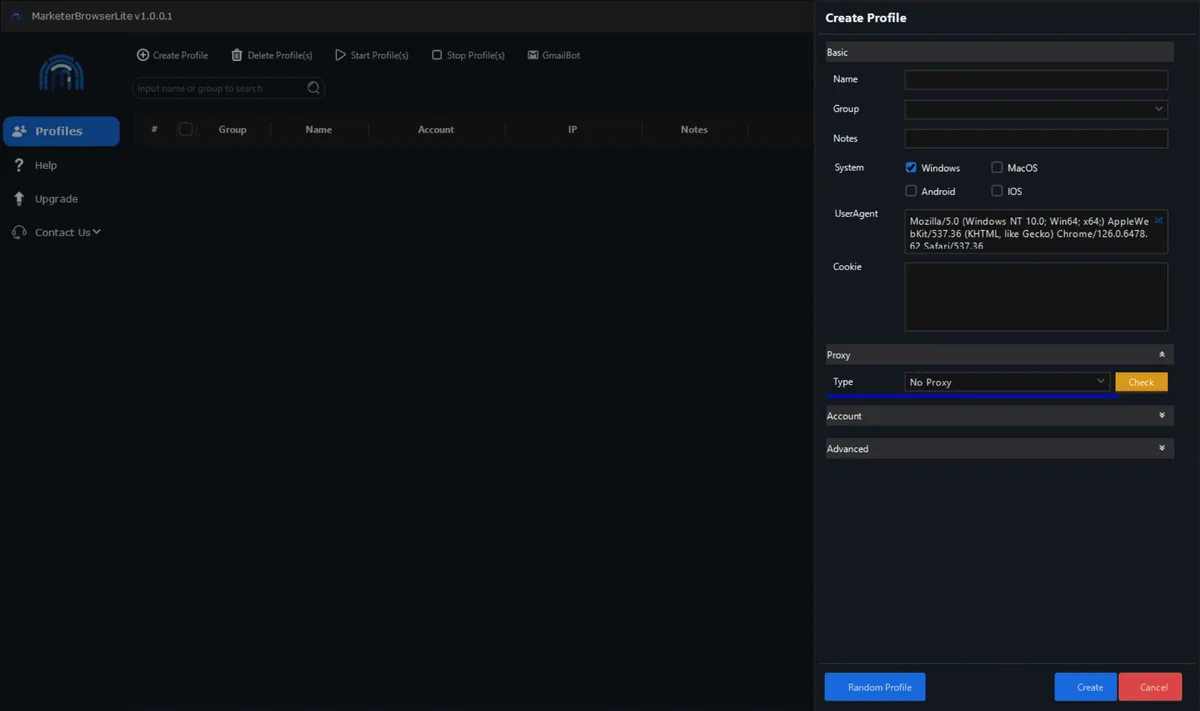
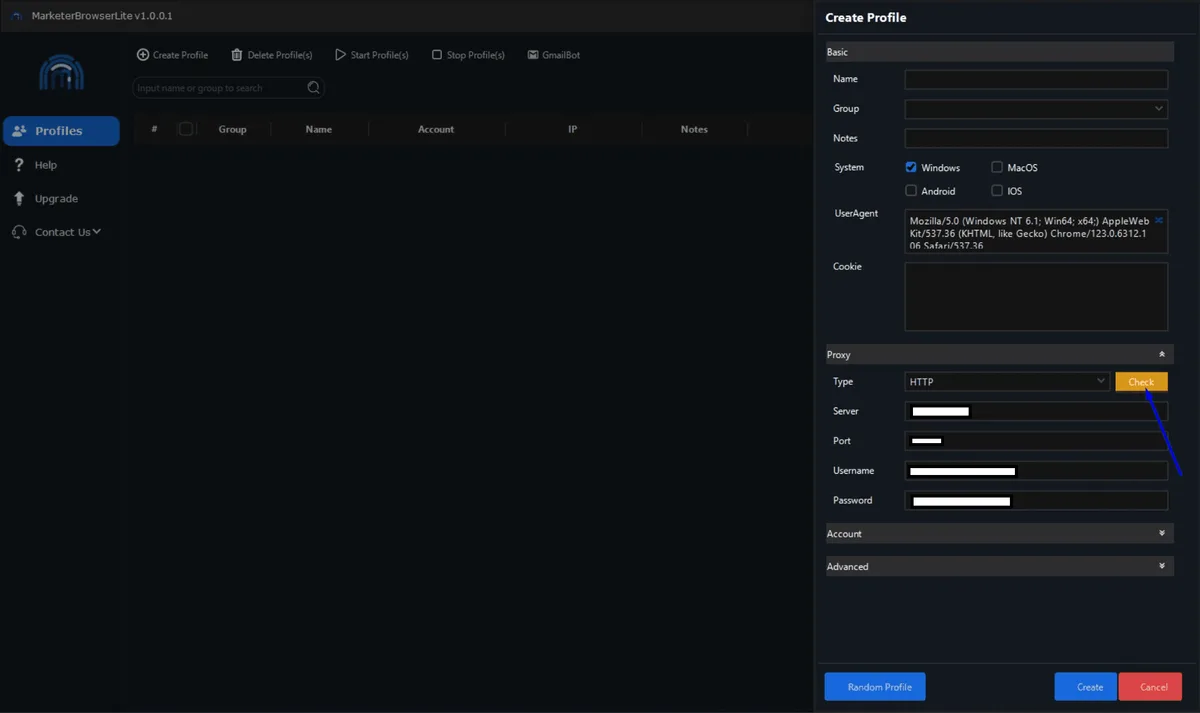
A Create Profile panel slides in from the right. Its Basic block contains:
- Name — a label you will recognise in the table.
- Group — an optional folder for sorting profiles by project or client.
- Notes — any comment, for example the proxy location.
- System — Windows, MacOS, Android or IOS.
- UserAgent — filled in automatically to match the chosen system.
- Cookie — a field for importing an existing cookie set, which you can leave empty.
The Random Profile button at the bottom fills these fields with a random but coherent combination if you do not need specific values.
Step 3. Choose the Proxy Type
Below Basic sits the Proxy section. By default Type reads No Proxy, and the profile goes online directly. Open the list and select the protocol your provider issued.
Step 4. Enter Server, Port and Credentials
Once a protocol is chosen, four inputs appear under Type:
| Field | What goes there |
|---|---|
| Server | Proxy host, for example 203.0.113.57 |
| Port | Port number from your dashboard |
| Username | Proxy login |
| Password | Proxy password |
Paste each value separately. If your provider gives a single line like host:port:user:pass, split it at the colons before pasting.
Step 5. Press Check and Save
Click the yellow Check button next to the Type list. MarketerBrowser tries to connect through the server and reports whether it succeeded. If the result is positive, press Create at the bottom of the panel. The Account and Advanced sections below can stay collapsed for a basic setup.
Launching and Verifying the Profile
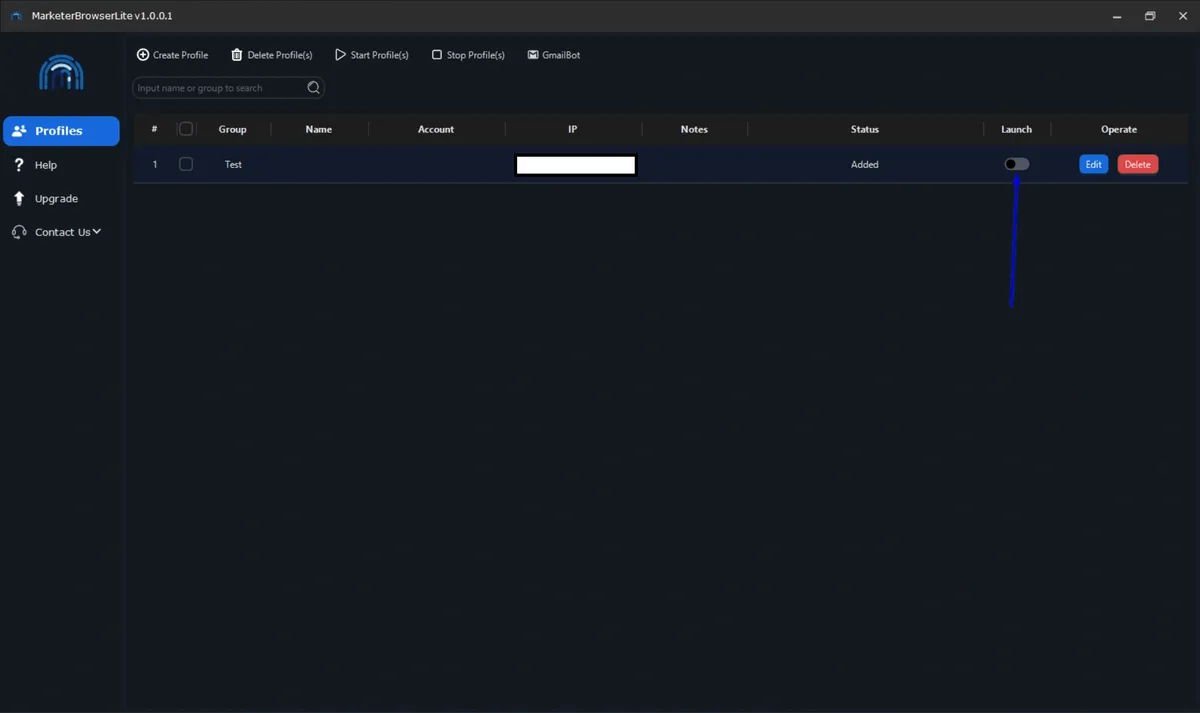
The new profile appears in the table with the status Added, and the IP column shows the proxy address. Flip the switch in the Launch column to start it; Edit and Delete in the Operate column let you change or remove the profile later.
In the opened browser window, visit any what-is-my-IP page. It should report the proxy address and its country rather than your home connection. Also glance at the time zone and language the page detects: they should not contradict the proxy location.
When the Check Fails or Pages Will Not Load
- Typo in server or port. One wrong digit is enough. Re-copy both values from the dashboard.
- Wrong protocol. An HTTP proxy must be added as HTTP, and a SOCKS5 port as SOCKS5. Switching the type often fixes a failed check instantly.
- Login rejected. Retype the username and password and look for spaces at the end.
- Proxy inactive. Make sure the proxy or port is still active and paid in your provider's control panel.
- Changes not applied. After editing proxy fields with Edit, stop the profile with the toggle and launch it again.
Working with Many Profiles
Give each profile its own proxy and do not reuse one IP across unrelated accounts, otherwise the separation of browser data loses most of its value. Groups help keep client projects apart, and the Notes field is a handy place to record which proxy belongs where. Teams that run Gmail accounts through GmailBot may also find our guide on using proxies with Gmail useful. Whatever you automate, respect each platform's rules on multiple accounts.
MarketerBrowser Proxy FAQ
Which proxy protocols does MarketerBrowser accept?
The Type list in the Proxy section offers HTTP and SOCKS5. Choose the protocol that matches the port your provider issued.
Can I add a proxy to an existing profile?
Yes. Click Edit in the Operate column, change the Proxy section, press Check and save. Restart the profile so the new address takes effect.
Is the free MarketerBrowserLite enough for proxy work?
Yes for a basic setup: the proxy fields and the Check button are already present in the Lite edition. The Upgrade section lists what the paid plans add on top.
How do I see which proxy a profile uses?
Look at the IP column of the profile table or open the profile with Edit. The Notes field is a convenient spot to record the proxy location or port as well.
Do I need a separate proxy for every profile?
For independent accounts, yes. Profiles that share one IP look connected to websites even if their cookies and user agents differ.