How to Set Up a Residential Proxy in the Logii Browser
 ·August 2, 2026·6 min read
How to Set Up a Proxy in the Logii Browser
Logii is a browser with support for isolated profiles, where network settings can be configured separately for each workspace. This approach is convenient when you need to separate accounts, divide tasks, and assign a dedicated IP address to a profile. For everything to work stably, it is important not only to add a proxy, but also to properly align it with the profile’s own settings.
Why Connect a Proxy in Logii
In Logii, a proxy is used as part of configuring an individual profile. This makes it possible to assign each profile its own traffic route and avoid a situation where all sessions go through the same connection. In practice, this simplifies working with multiple accounts, helps distribute the environment more precisely for specific tasks, and makes the profile more consistent in terms of network settings.
Additionally, a proxy is useful where it is important to separate work sessions, reduce direct association with the main connection, and organize cleaner work across several profiles at the same time. When configured correctly, it also simplifies access to websites and services for which regional or network connection parameters are critical.
Built for Reliable Performance
Residential proxies for projects of any size.
Step-by-Step Proxy Setup in Logii
1. Install and open the browser
First, download and install the latest version for your operating system. After installation, open the browser and go to the profile management section.
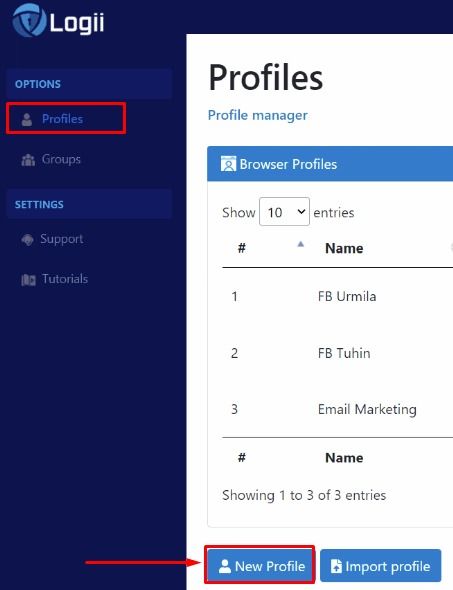
2. Create a new profile
In the control panel, open the Profile or Profile Management section and choose to create a new profile. At this stage, the foundation of the future workspace is defined: name, description, group, and general browser settings.
3. Fill in the profile details
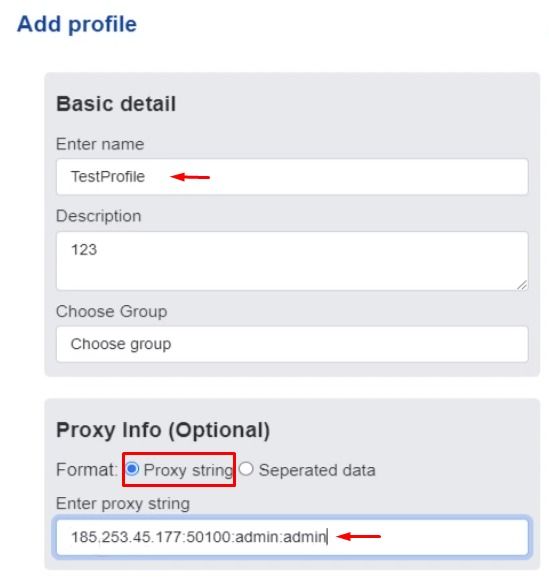
After creating the profile, enter the basic information. This usually includes the profile name, its description, as well as the settings that determine what environment the browser should emulate.
Depending on the Logii interface, you can choose the browser type, language, screen resolution, and other characteristics.
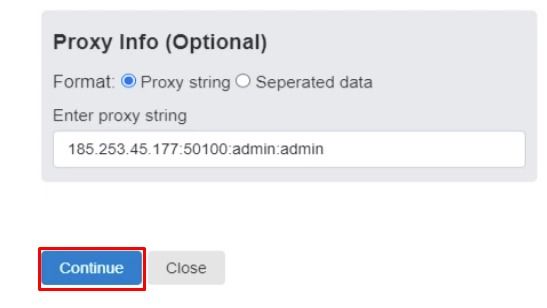
Within the profile settings, find the Proxy section. Then select manual data entry and enter the information provided by your provider (this information can be found on our website):
• IP address;
• port;
• username;
• password.
In some cases, the data is entered into separate fields; in others, it is entered as a single string in the format IP:Port:Username:Password.
At this stage, accuracy is especially important. An error in even one character can lead to a connection failure or incorrect validation.
4. Adjust the profile settings to match the connection
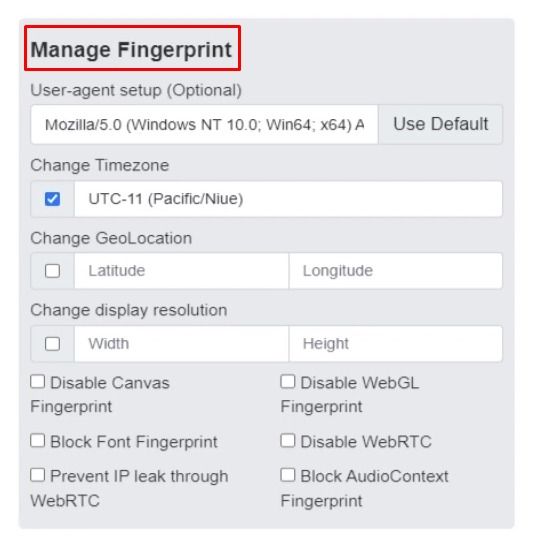
After adding the proxy, the rest of the profile settings should also be brought into order. In Logii, this usually includes fingerprint and environment parameters: User Agent, language, time zone, screen resolution, and other characteristics.
If the profile uses a specific network connection, its system parameters should not stand out from the overall configuration. It is exactly this alignment that makes the profile more coherent and reduces the likelihood of technical inconsistencies when working with websites.
5. Save the profile
When all parameters have been filled in and checked, save the changes via Continue. After that, the profile will be created with the proxy already attached and ready to launch.
6. Launch the profile and start working
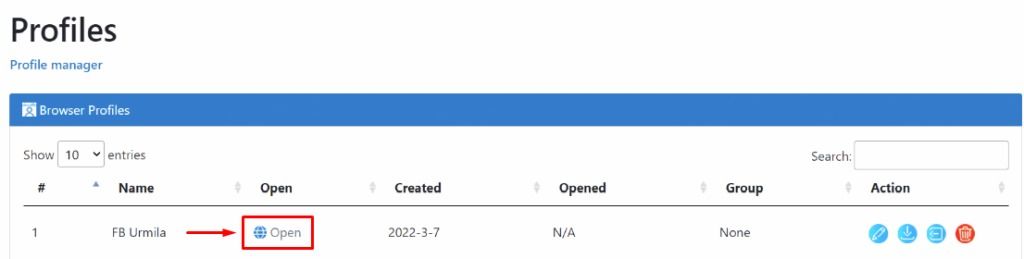
All that remains is to open the saved profile and make sure that the traffic is actually going through the specified connection. From that point on, the profile can be used as a separate workspace with its own network and browser settings.
What Errors Occur Most Often
Problems when setting up Logii are usually related not to the browser itself, but to configuration details. Most often, users encounter the following situations:
• the IP address or port is entered incorrectly;
• the login or password for authorization is missing;
• the data is pasted in the wrong format;
• the profile parameters are not consistent with one another;
What Using a Proxy in Logii Provides
When configured properly, a proxy in Logii provides several practical advantages.
First, each profile can be assigned a separate connection. This is convenient when working in parallel with different accounts and projects.
Second, a proxy helps isolate the network part of each environment. Because of this, profiles are easier to separate by task and use in a more organized way.
Third, it provides more flexibility when working with services that are sensitive to IP address and connection region. If a specific task requires a certain geography or a separate traffic route, this can be configured at the profile level.
In some scenarios, a properly selected proxy helps stabilize the connection and make work more predictable.
Conclusion
Setting up a proxy in the Logii browser comes down to a clear sequence: install the browser, create a profile, enter the network data, align the environment settings, check the connection, and save the result. The key point here is not only entering the IP address and port correctly, but also preserving the overall integrity of the profile.
If the proxy is specified without errors and the browser environment settings are selected carefully, Logii becomes a convenient tool for working with multiple profiles, separate sessions, and tasks where distinct network parameters are important for each environment.