Residential Proxy Setup in Surfinite
 ·August 4, 2026·4 min read
Surfinite is a Chromium-based browser designed for working with isolated profiles and flexible session parameter configuration. One of the basic elements of such a setup is connecting a proxy. How exactly it is added and linked to a profile affects connection stability, the correctness of network parameters, and the overall convenience of further work.
In Surfinite, proxies can be connected in two ways: through a separate proxy list with subsequent selection during profile creation, or directly during the setup of the session itself. The more convenient option for ongoing work is to use the built-in Proxy List section. This approach makes it possible to save servers in advance, check them, and then quickly assign the required proxy to a specific profile.
What parameters Surfinite supports
The browser works with common connection types, including HTTP, HTTPS, SOCKS5, and SSH. When adding a proxy, you can specify the standard set of data: IP address, port, login, and password if the server requires authorization. For configurations with IP rotation, a separate field is provided for the IP change URL.
Surfinite also supports quick parameter entry in a single line. This is convenient when the data is provided in a ready-made format, for example ip:port:login:password. In that case, the browser automatically distributes the information into the required form fields.
Choose the Right IP for the Job
195+ locations and flexible rotation options.
How to add a proxy through Proxy List
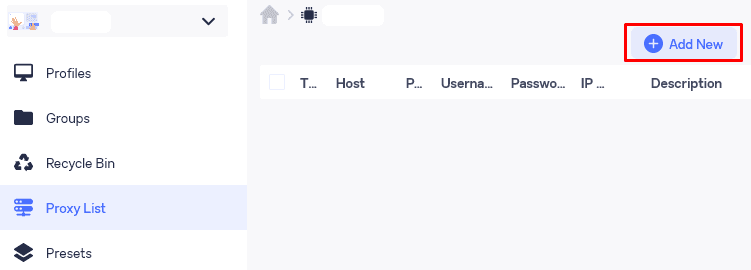
To save a proxy in the general list, open the Proxy List tab and click +Add New in the upper-right corner. After that, a form for adding a new server will appear.
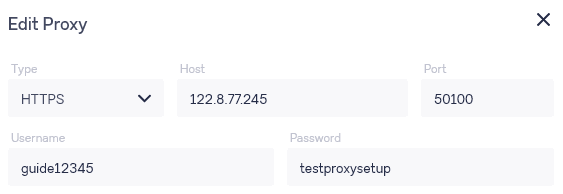
First, select the connection type. Then enter the IP address and port. If you are using a proxy with authorization, fill in the login and password fields (this information can be found on our website).
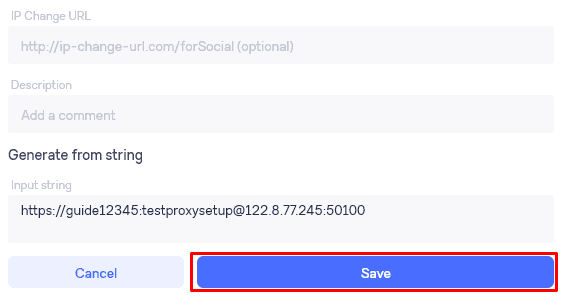
When working with a rotating option, add the URL responsible for changing the IP address. If necessary, you can also specify a description right away — this helps avoid confusion in the list if there are many servers and they are used for different tasks.
If the parameters are provided in a single line, they can be pasted into the corresponding input field. Surfinite will recognize the format and fill in the data automatically. After completing the form, save the entry using the Save button.
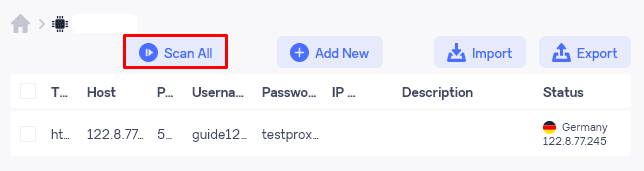
The added server will appear in the proxy list. There, you can also check it by clicking Scan All to make sure the connection works correctly and the parameters are entered without errors.
How to assign a proxy to a profile
After the proxy has been saved in the general list, it can be linked to a specific profile. To do this, when creating a new session, open the Proxy section, select the Proxy List source, and specify the required server from those added earlier.
This workflow is convenient for everyday use: first, a proxy library is created, and then the required servers are quickly distributed across profiles without repeated manual entry. This is especially useful if several working configurations are used in the browser.
What else is important to consider when working in Surfinite
A proxy in Surfinite is only one part of the overall profile configuration. The browser itself allows flexible management of the digital fingerprint, structuring workspaces through groups and subgroups, distributing access among team members, and using preset categories with predefined parameters. Font configuration stands out separately, since this parameter can also affect profile consistency.
Because of this architecture, Surfinite is suitable for scenarios where separate work with multiple profiles and precise environment configuration for each session are required.
Conclusion
In Surfinite, proxy setup is implemented as follows: the server can be added manually, imported in a single line, saved in the general list, tested, and then assigned to the required profile. In practice, this comes down to two stages: first, the proxy is entered into Proxy List, then it is selected in the parameters of a specific session.
This order simplifies working with multiple profiles and reduces the number of manual operations.