How to Set Up a Proxy in Vivaldi on Windows, macOS and Linux


To set up a proxy in Vivaldi, open Settings → Network → Proxy Settings and enter the proxy server address and port in the system settings that open. Vivaldi does not use a separate built-in proxy management module and relies on the operating system’s network settings. This means that the configuration is performed not inside the browser as a standalone function, but through the system settings of Windows, macOS, or Linux. After these changes are applied, Vivaldi starts working through the specified proxy server automatically.
This approach is convenient in cases where it is necessary to centrally define the network configuration for applications that use the system connection settings. At the same time, it is important to understand that correct operation in the browser directly depends on how accurately the server address, port, protocol type, and authentication parameters are specified.
Residential Proxies for Web Services
Connect through your browser using an IP from your chosen location.
Vivaldi Proxy Settings on Windows
In Windows, the configuration is performed through the system network settings, which Vivaldi provides quick access to from its own settings.
The procedure is as follows:
1. Open Vivaldi.
2. Go to the browser menu.
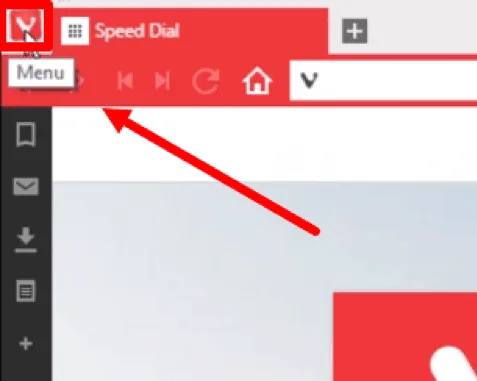
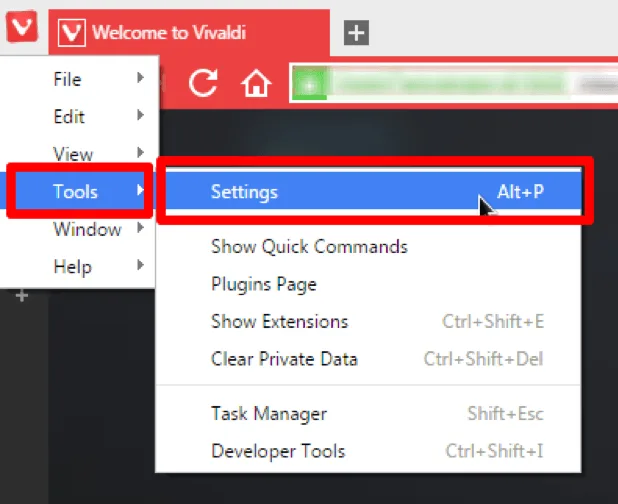
3. Open the Settings section.
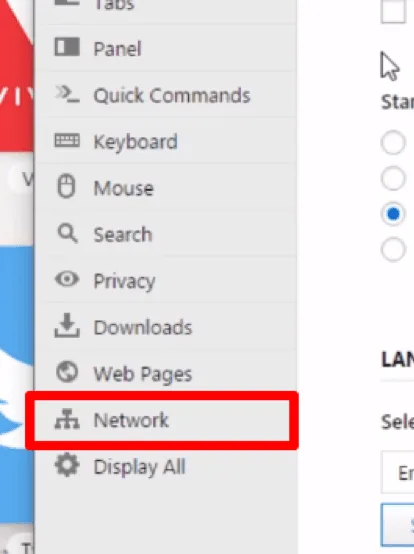
4. In the sidebar, select Network.
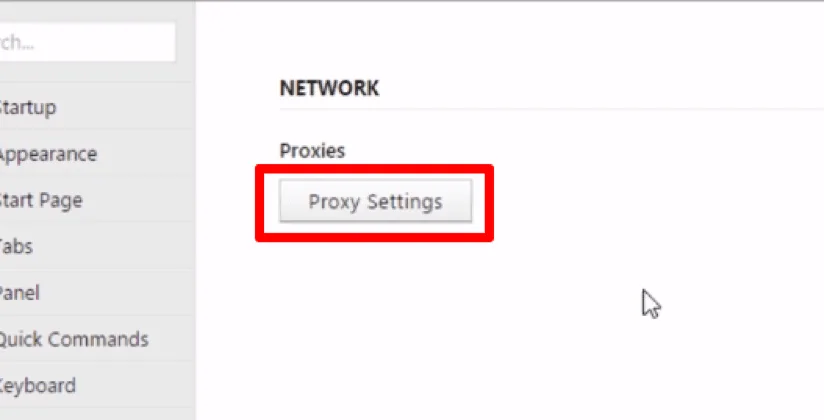
5. Click Proxy Settings.
After that, the Windows system settings will open.
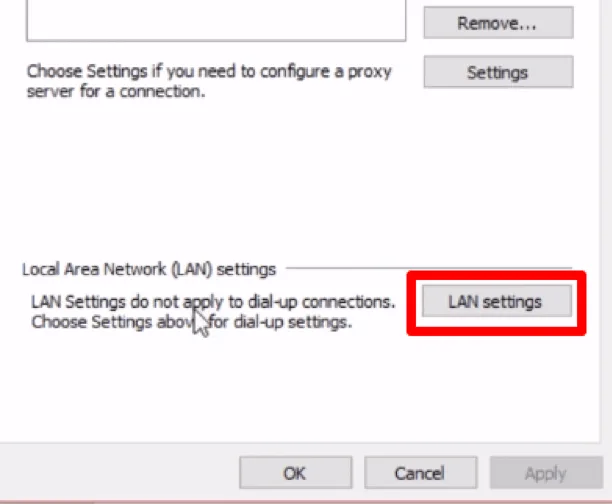
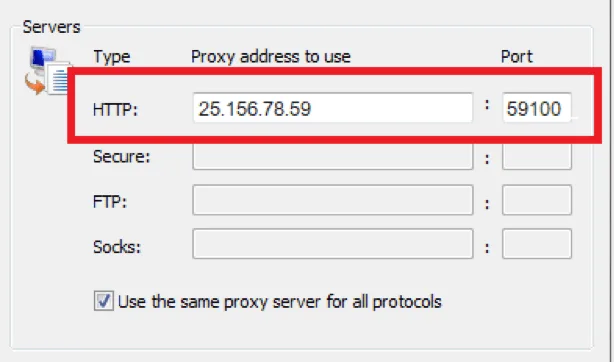
Open the local network settings.
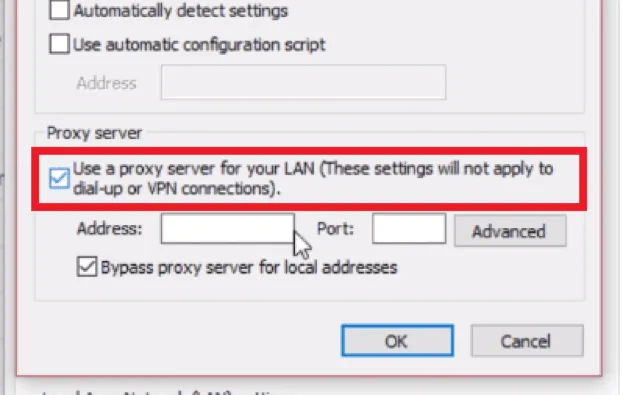
Enable the use of a proxy server for LAN.
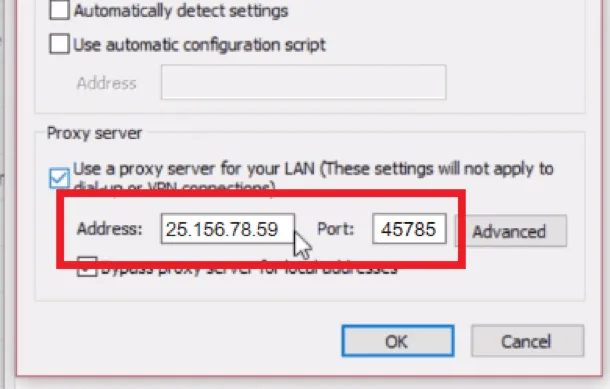
Then specify the IP address and port of the proxy server. You receive these details after purchasing residential proxies from Node Proxy.
If necessary, open the Advanced settings.
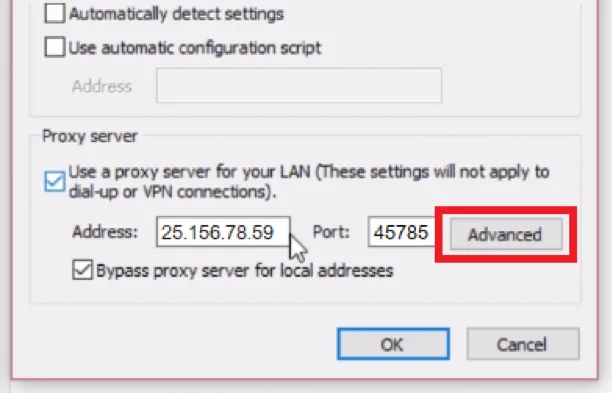
There you can specify separate settings for different protocols.
Setting Up a Proxy in Vivaldi on macOS
In macOS, the proxy for Vivaldi is also configured through the system network settings.
Sequence of actions:
1. Open System Preferences or the system network settings.
2. Select the active connection — Wi-Fi or Ethernet.
3. Go to the Advanced section.
4. Open the Proxies tab.
5. Enable the required proxy types, such as HTTP, HTTPS, or SOCKS.
6. Enter the server address, port, and authentication data, if required.
7. Apply the changes.
8. Restart Vivaldi.
After restarting, the browser will begin using the system proxy configuration. If the changes do not take effect immediately, it is worth checking whether another extension or service affecting the network route is being used at the same time. Safari on Mac uses the same system settings, as shown in our guide to setting up a proxy in Safari.
Setting Up a Proxy in Vivaldi on Linux
In Linux, the setup methods depend on the environment in use and the system administration model.
The three most common methods are:
Through environment variables
You can set http_proxy, https_proxy, and no_proxy in the terminal or in profile files. This method is suitable for scenarios where network behavior is managed centrally and must be inherited by applications.
Through the graphical interface of the desktop environment
In GNOME, KDE, and other environments, proxy settings are often available in the network settings. If Vivaldi uses the system configuration correctly, this is sufficient for the browser to work through the proxy.
Through additional tools for complex scenarios
For more advanced routing, proxychains, systemd-networkd settings, and other system mechanisms may be used. This option is relevant in environments where traffic needs to be flexibly separated according to rules.
How to Check That the Proxy Is Connected
After configuration, it is important to make sure that Vivaldi is actually working through the specified server rather than using a regular connection.
To check this, it is usually enough to:
- open an IP address checking service or the free proxy checker;
- view the current external IP;
- compare it with the value assigned to your proxy;
- if necessary, additionally check DNS routing.
If the displayed IP matches the proxy address, the configuration is being applied correctly. If there is no match, the cause is most often related to incorrect system settings, an extension conflict, or an error in the protocol type. The difference between protocols is explained in SOCKS5 vs HTTP proxies.
How to Disable the Proxy in Vivaldi
Since the browser uses system settings, disabling it is also done at the OS level.
In Windows, you need to open Settings → Network & Internet → Proxy and disable the use of a proxy server.
In macOS, you need to go to System Preferences → Network → Advanced → Proxies and uncheck the active proxy protocols.
After that, it is advisable to restart the browser to rule out the use of a previously saved network session.
Additional Vivaldi Features Useful for Work
In the context of network configuration, Vivaldi has several features that may be useful in practical work.
Compatibility with Chrome extensions.
This makes it possible to use proxy management tools without workarounds or manual adaptation.
Separate window mode.
Sites and web applications can be launched in separate windows tied to a specific resource. This helps separate work scenarios and reduce the load on the main tab space.
Settings synchronization.
Vivaldi supports synchronization of themes, tabs, history, extensions, and search engines between devices. If the browser is used on multiple machines, this simplifies the transfer of the working environment, although the network settings of the OS itself still have to be configured separately on each device.
Vivaldi Proxy FAQ
Does Vivaldi have its own proxy settings?
No. Vivaldi uses the proxy settings of the operating system. The Proxy Settings button in the Network section of the browser settings simply opens the system proxy settings.
How do I check that Vivaldi is working through the proxy?
Open any IP checking service in Vivaldi and compare the external IP address with the address of your proxy. If they match, the browser is using the proxy.
Can I use a proxy only in Vivaldi?
The system proxy applies to all applications that use the system network settings. To route only the browser through a proxy, you can use a proxy management extension, since Vivaldi supports Chrome extensions.
How do I turn off the proxy in Vivaldi?
Disable the proxy server in the Windows or macOS network settings and restart the browser. Vivaldi will then connect to the internet directly.
Conclusion
Setting up a proxy in Vivaldi comes down to correctly configuring the operating system’s network settings. The browser uses them directly, so the accuracy of the address, port, protocol type, and authentication parameters is of key importance. After configuration, it is necessary to check the external IP and make sure that the changes have actually been applied.