Yunlark Proxy Setup: Step-by-Step Guide for Store Profiles

In Yunlark, a proxy belongs to a store profile: open Store Management, click Create, and in the Single Import panel choose the Proxy Type, fill in Proxy Host, Proxy Port, Proxy User and Proxy Password, press Check Proxy and confirm with OK. Each profile keeps its own address, so changing one never touches the others.
Yunlark (spelled YunLark inside the app) is a Chinese fingerprint browser aimed at sellers who run several marketplace or e-commerce accounts. That focus explains its vocabulary: profiles are called stores, and the creation form asks for the account platform first. The guide follows the Windows client, version 3.8.56, and points out the fields that are easy to confuse, such as the account login versus the proxy login.
Residential proxies for stores
Home-ISP addresses by city for Yunlark store profiles
Data to Prepare
From your proxy provider:
- protocol: HTTP, HTTPS, SOCKS5 or SSH;
- host (IP or domain) and port;
- proxy login and password, if the server uses them.
From the marketplace side, decide which platform the profile is for, because Yunlark will not save a store without it.
Store accounts are usually tied to one country and are touchy about sudden location changes. Residential proxies with a fixed city give each store a home-ISP address in the right region, which looks like an ordinary seller working from one place.
Creating a Store Profile With a Proxy
Step 1. Open Store Management
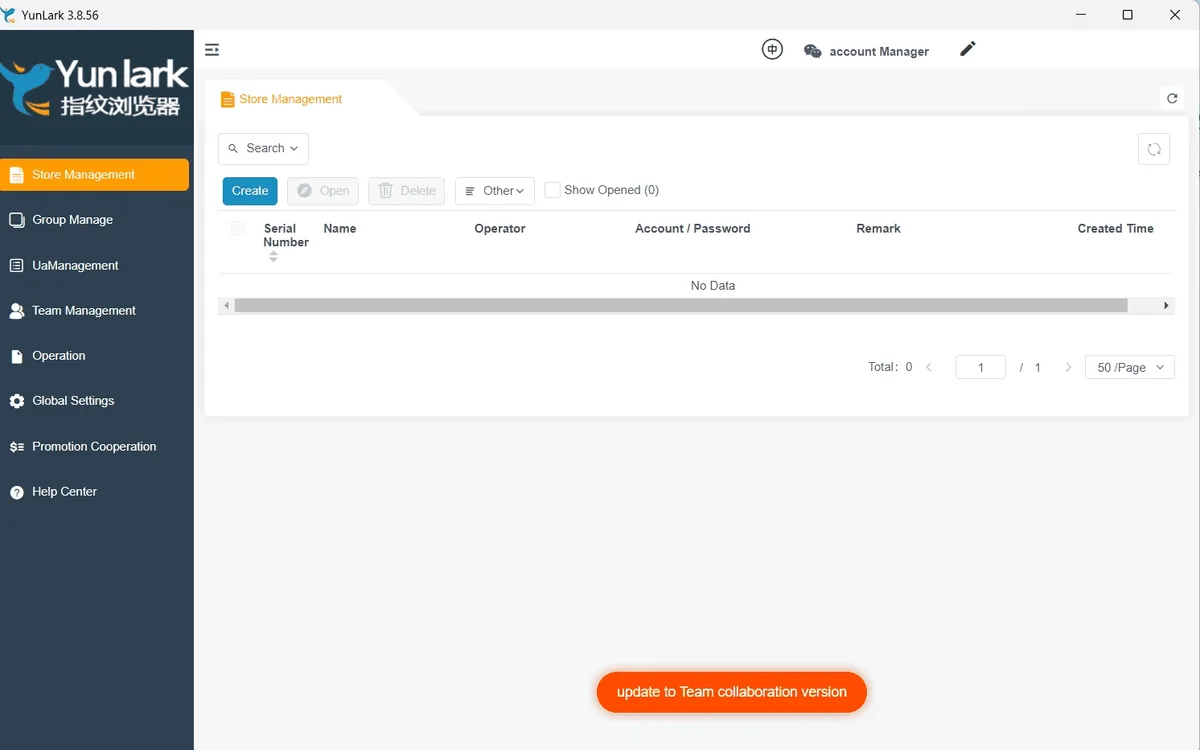
Launch Yunlark and sign in. The left menu lists Store Management, Group Manage, UaManagement, Team Management, Operation, Global Settings, Promotion Cooperation and Help Center. Store Management opens by default with an empty table and a toolbar: Create, Open, Delete, Other and the Show Opened filter.
Step 2. Click Create and Fill the Account Part
Press Create. A side panel called Single Import slides in. Its upper half describes the account the profile will hold:
- Account Platform: required; pick the marketplace or service from the list;
- Name: optional profile name, up to 100 characters;
- Username and Password: optional, the login of the store account itself, not of the proxy;
- Cookie: optional, accepts JSON, Netscape or Name=Value format if you are moving an existing session.
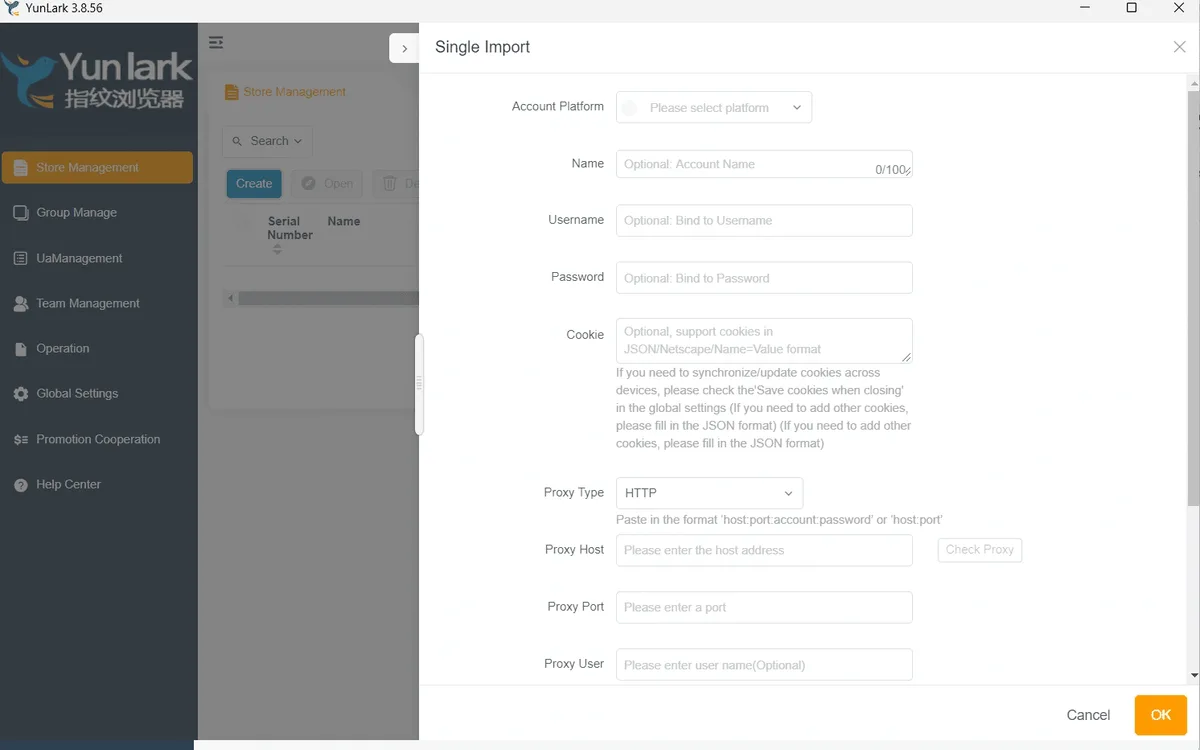
Keep the two pairs of credentials apart: Username and Password near the top bind the marketplace account, while Proxy User and Proxy Password lower down unlock the proxy server.
Step 3. Select the Proxy Type
Open the Proxy Type list. It contains NONE (Direct), HTTP, SOCKS5, SSH, HTTPS and presets for a large proxy vendor. Pick the protocol your provider specified; choosing SOCKS5 simply because it is on the list will not work if the port speaks HTTP. If the choice between HTTP and HTTPS is unclear, our comparison of HTTP and HTTPS proxies sorts it out.
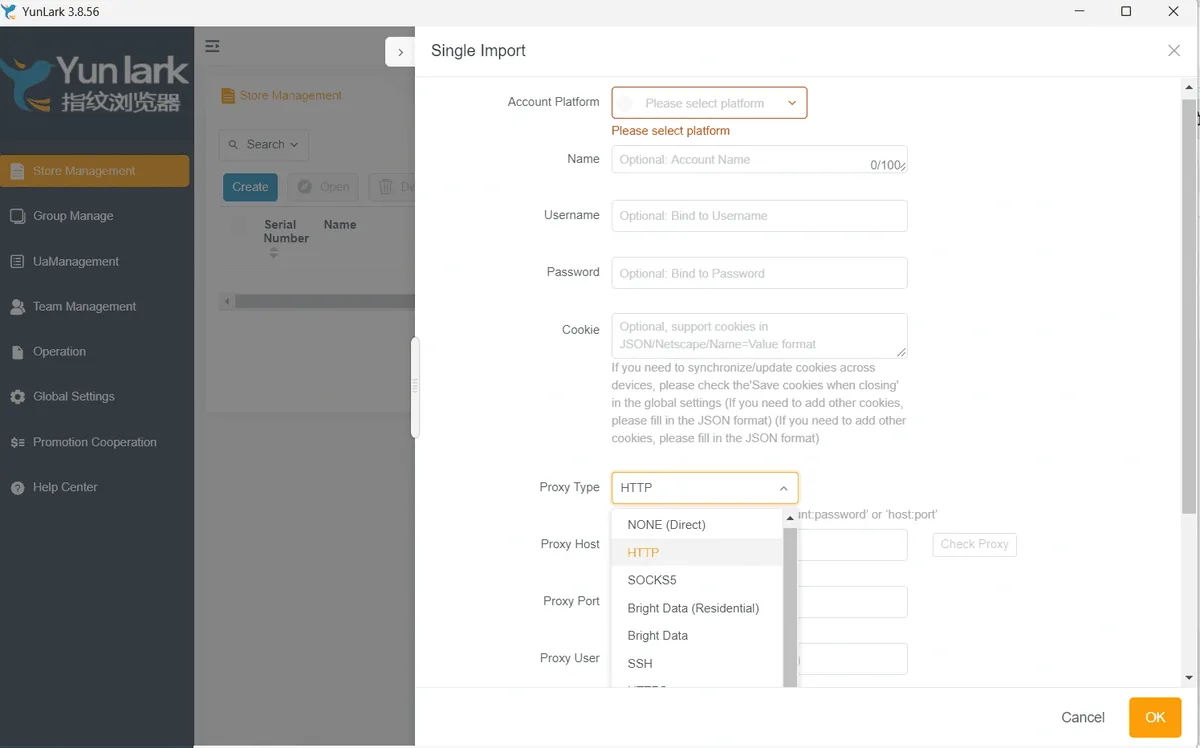
If you leave Account Platform empty, Yunlark marks it red with "Please select platform" and will not let you save.
Step 4. Enter Host, Port and Proxy Credentials
Under the type, Yunlark hints that you may paste the proxy as host:port:account:password or host:port. Otherwise fill the fields one by one:
- Proxy Host: for example
203.0.113.77; - Proxy Port: the number from the dashboard;
- Proxy User and Proxy Password: leave empty only if the provider authorises your IP instead.
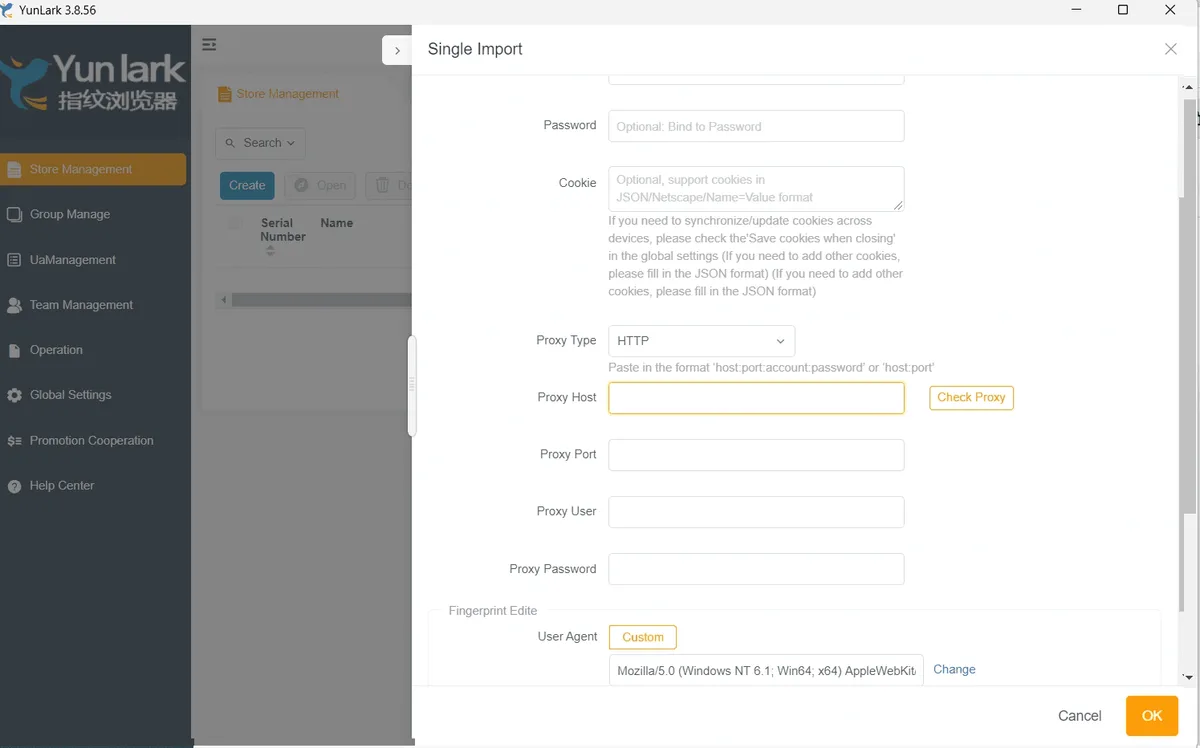
Step 5. Press Check Proxy
Click Check Proxy next to the host field. A successful check confirms that the server answers with the data entered; an error means a wrong value, protocol or an inactive proxy. Fix it here rather than after the profile is saved.
Step 6. Review the Fingerprint and Save
Lower in the panel, the Fingerprint Edite block holds the User Agent with a Custom option and a Change link to pick another one. Choose a User Agent whose operating system matches how the store is normally run, then press OK. The profile appears in the Store Management table, from which you start it with Open.
Confirming the Connection
Open the profile and visit an IP lookup site. The IP and country must match the proxy, and ordinary sites should load without connection errors. Quick checklist:
- the profile opens without errors;
- the right protocol is selected;
- host and port match the dashboard;
- proxy credentials are in the Proxy User and Proxy Password fields, not in the account fields;
- the external IP equals the proxy address.
Separate Proxies for Separate Stores
Marketplaces compare login locations across accounts. Two stores sharing one IP risk being linked, so give each profile its own address and keep it stable. Sellers on Amazon and eBay in particular should keep the same region for the life of an account and follow each platform's rules on multiple seller accounts.
Fixing Typical Errors
Check Proxy fails. Recheck host, port and type; then confirm the proxy is still active in your provider's panel.
Authentication error. Make sure the proxy login went into Proxy User, not into the account Username field near the top.
Cannot save the profile. Account Platform is empty. Select a platform and press OK again.
IP whitelist authorisation. Add the public IP of the computer running Yunlark in the provider's dashboard and leave the proxy credentials empty.
Proxy expired. Renew or replace it, then edit the profile and run Check Proxy again.
More setup walkthroughs for similar programs are in our antidetect browser proxy hub.
Yunlark proxy FAQ
Which proxy protocols does Yunlark support?
The Proxy Type list includes HTTP, HTTPS, SOCKS5 and SSH, plus a direct mode called NONE (Direct) and vendor presets.
Why does Yunlark ask for an account platform?
The browser is built for e-commerce store management, and each profile is tied to a platform. The field is required, and the profile cannot be saved without it.
Are Username and Password the same as the proxy login?
No. The upper Username and Password belong to the store account. Proxy credentials go into Proxy User and Proxy Password.
Can I paste a proxy as one line in Yunlark?
Yes, the form accepts host:port:account:password or host:port, as the hint under Proxy Type shows.
Does each Yunlark store need its own proxy?
It is strongly advised. Separate IPs keep store accounts from looking connected to the marketplace.