Android Proxy Setup: Wi-Fi Networks, Mobile Data and Proxy Apps

Android does have a native proxy option, yet it is tucked away inside each saved network rather than living in one global menu. For Wi-Fi, you open the details of the network you are joined to, flip Proxy from None to Manual and supply a server plus port number. For cellular data, comparable fields belong to the APN, the access point profile your carrier provides. Neither screen has room for credentials, so Chrome will prompt for them when you load the first page.
This walkthrough covers both routes with screenshots taken on a Samsung handset. It also spells out what the built-in option quietly fails to do, how to push apps that disregard it through a proxy anyway, and which mistakes cause most of the failed attempts.
Mobile proxies
Mobile proxies with carrier IPs for Android phones and apps
Gather the Details First
Open your provider's dashboard and copy four values into a note:
- Host: a numeric IP or a domain name;
- Port: the number on which the server accepts connections;
- Username and Password: needed only when access is protected by a login.
A key detail many tutorials skip: the proxy box in Android network settings understands HTTP alone. An HTTP/HTTPS endpoint drops right in, whereas a server that only speaks SOCKS5 gets rejected and calls for a separate app, described later. If the gap between those web protocols is fuzzy, our piece on HTTP vs HTTPS proxies sorts it out.
Think, too, about scope. A Wi-Fi proxy is stored with a single saved network, a cellular one with a single APN profile, and Android treats them as unrelated settings.
Route 1: Proxy on a Wi-Fi Network
Our screenshots show Samsung One UI. Pixel owners and anyone running near-stock Android will find the same option under Network & internet, then Internet; tap the cog beside the network name, press the pencil, expand Advanced options and look for Proxy. Xiaomi, OnePlus and other makers shuffle labels around, though the proxy option always sits within a saved network's properties.
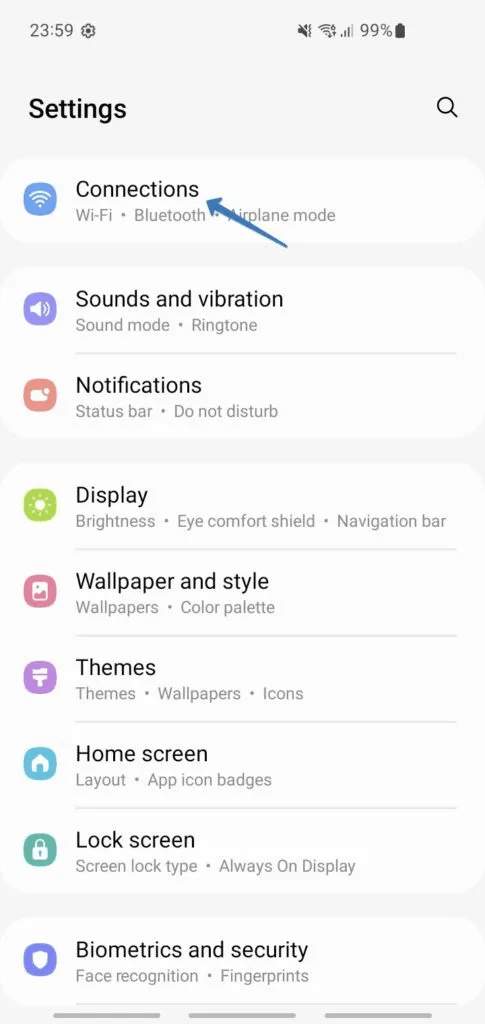
Step 1. Enter the Connections Group
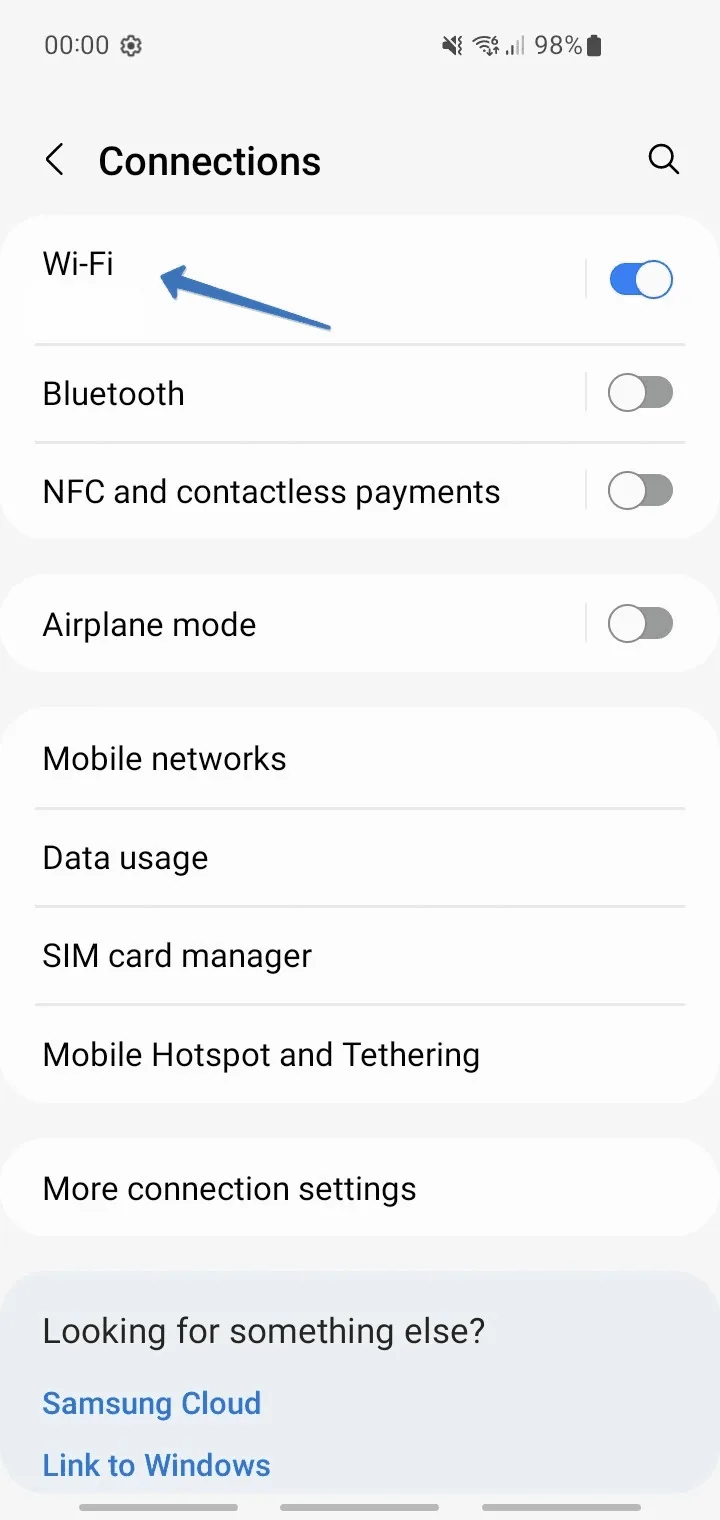
From the home screen launch Settings, then choose Connections, where Samsung bundles Wi-Fi, Bluetooth and Airplane mode.
Step 2. Open the Wi-Fi Page
Press the word Wi-Fi rather than its toggle; the toggle merely switches the radio off and on.
Step 3. Pick the Active Network
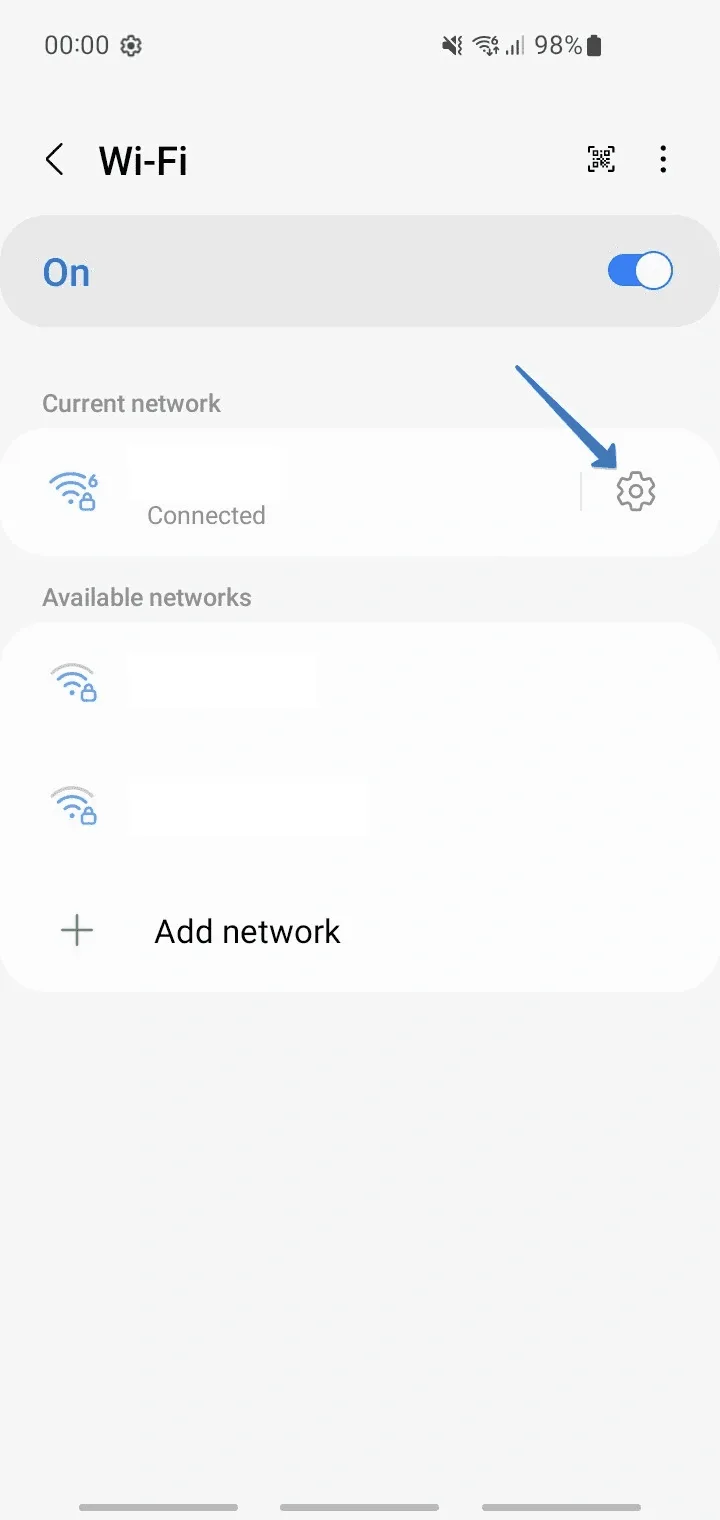
Look under Current network and press the small cog on the right of the entry marked Connected.
Step 4. Reveal Hidden Options
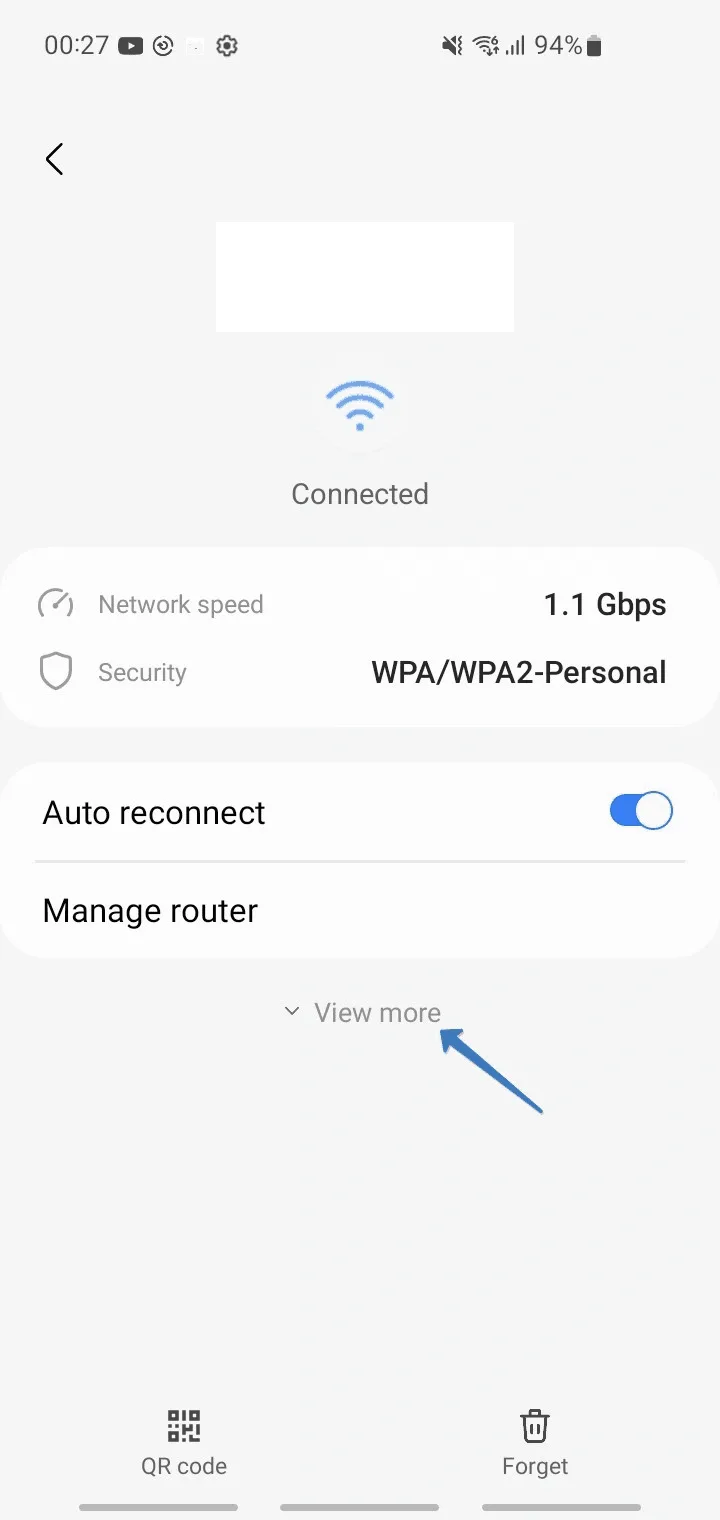
Initially Samsung displays only link speed, the security standard and Auto reconnect. Press View more near the bottom to unfold everything else.
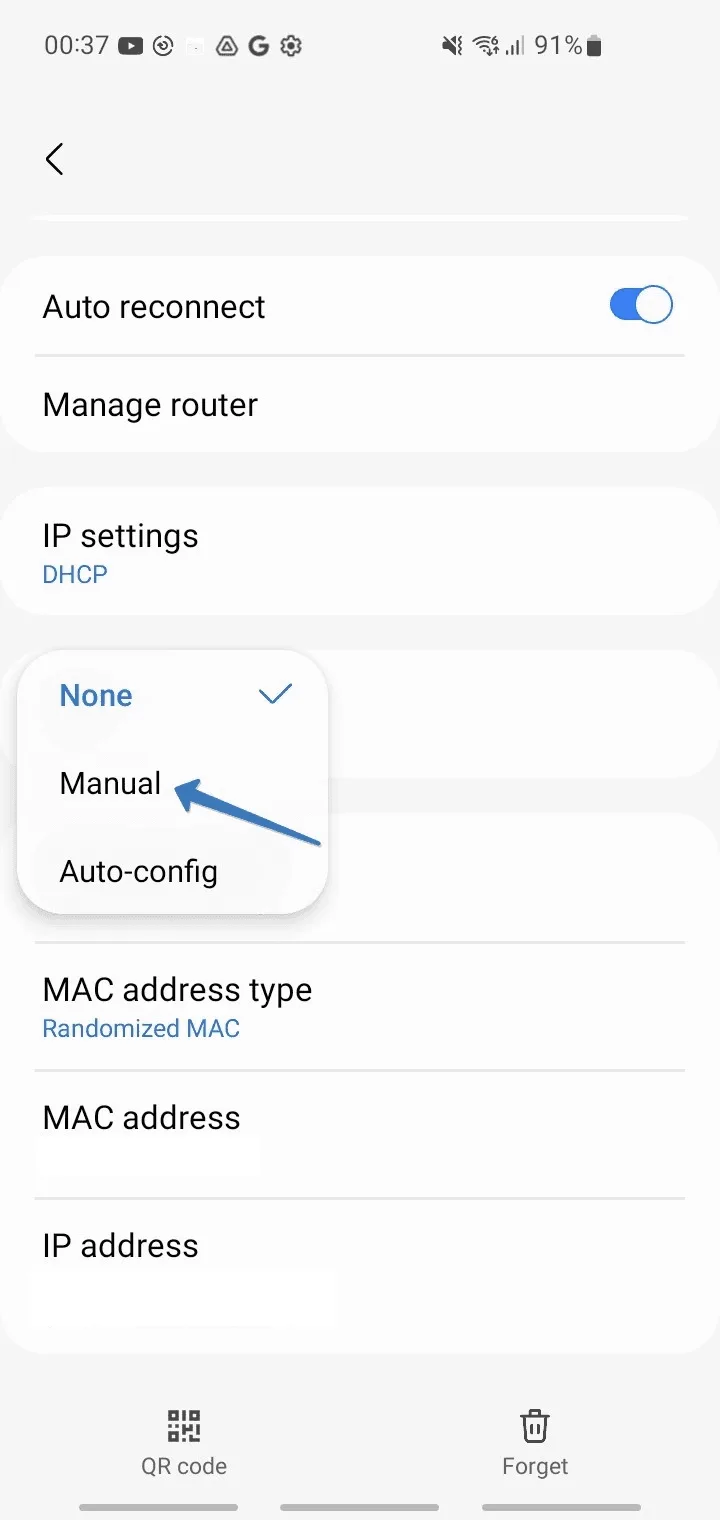
Step 5. Change Proxy From None to Manual
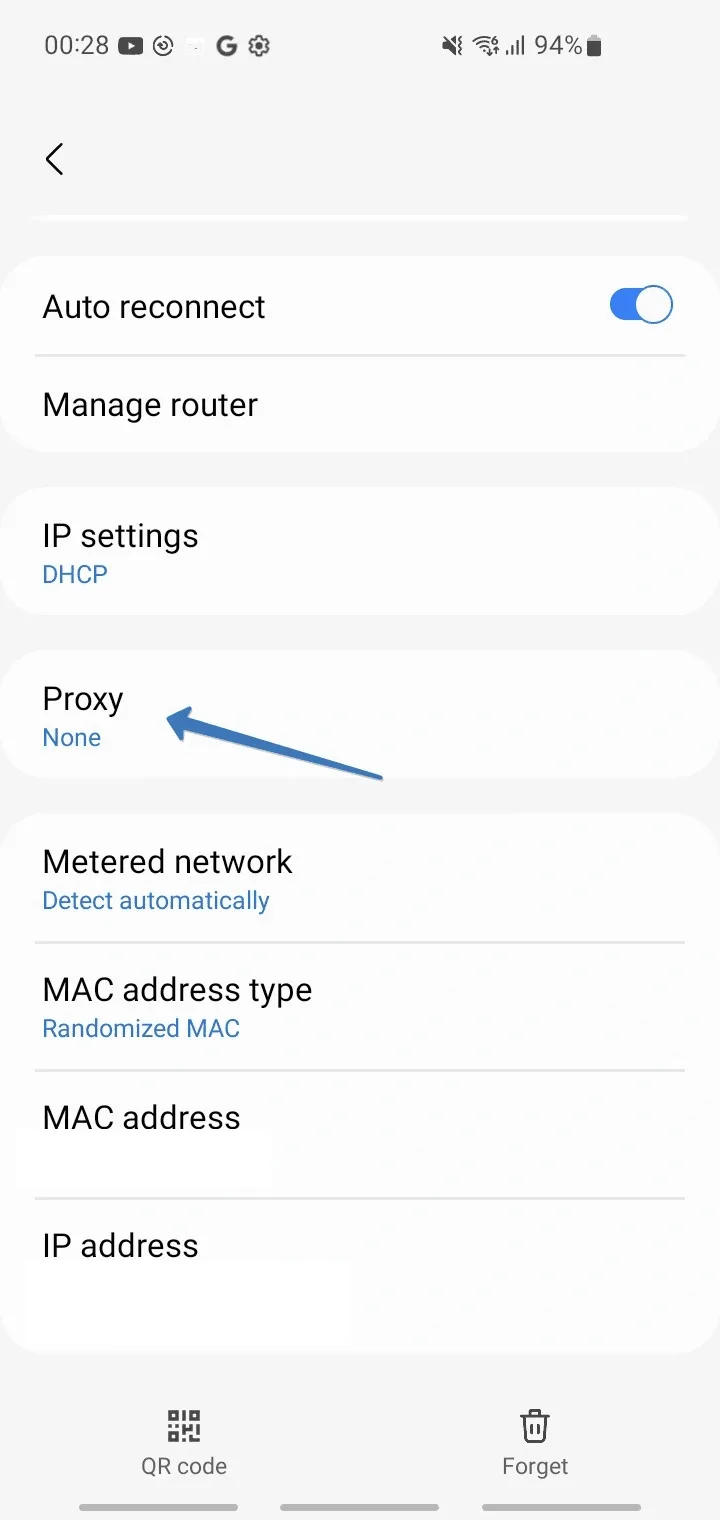
Locate the Proxy row, which reads None out of the box, and press it. A small menu lists None, Manual and Auto-config. Go with Manual. Auto-config exists for corporate networks that publish a PAC script address, something a commercial proxy plan does not involve.
Step 6. Supply Server and Port, Then Save
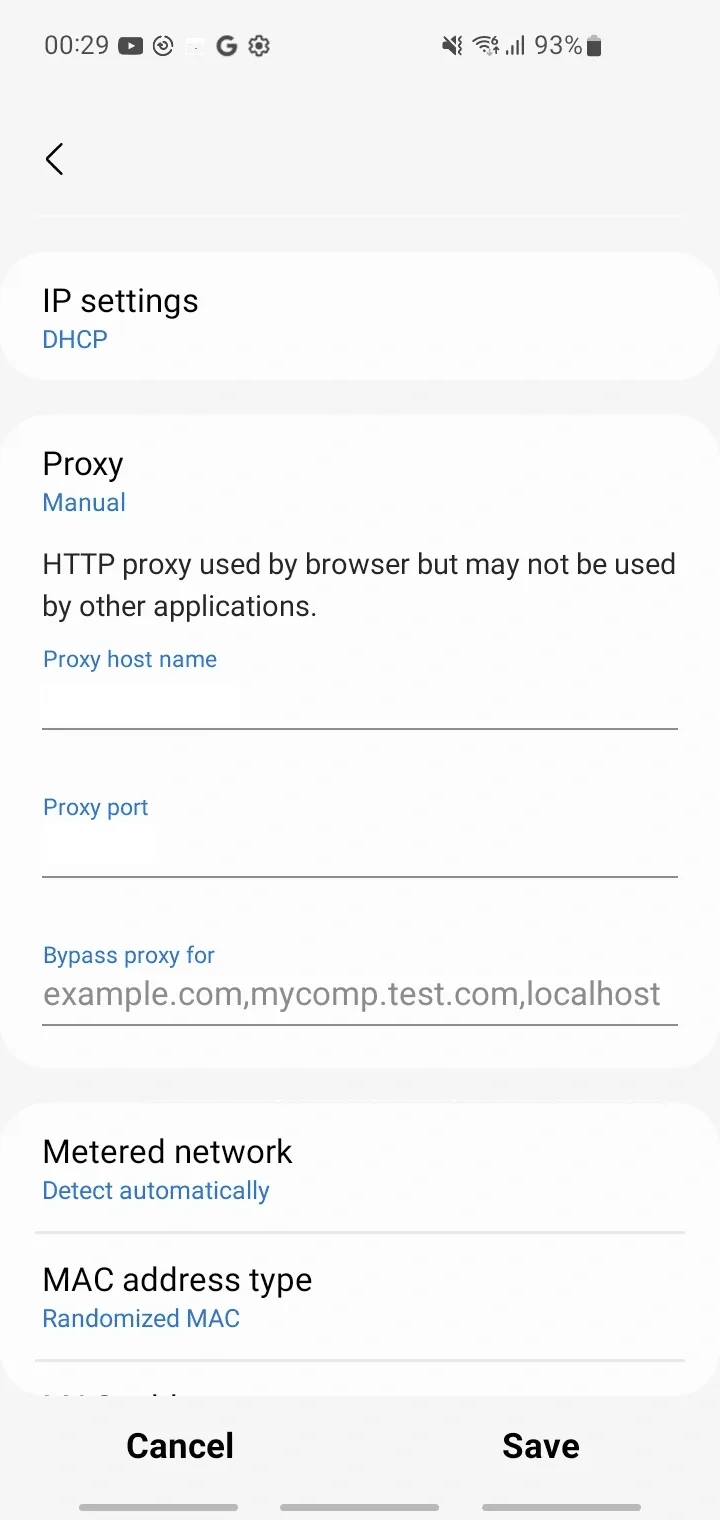
Two inputs unfold. Proxy host name takes the server, Proxy port takes its number. A third input, Bypass proxy for, accepts a comma-separated list of domains that should skip the server, for instance your router's admin page or an office intranet. If nothing needs excluding, keep it blank and press Save.
Read the grey note printed just above those inputs. Samsung warns that the HTTP proxy serves the browser and other applications might ignore it, which is precisely the biggest weakness of this approach.
Step 7. Log In When Chrome Asks
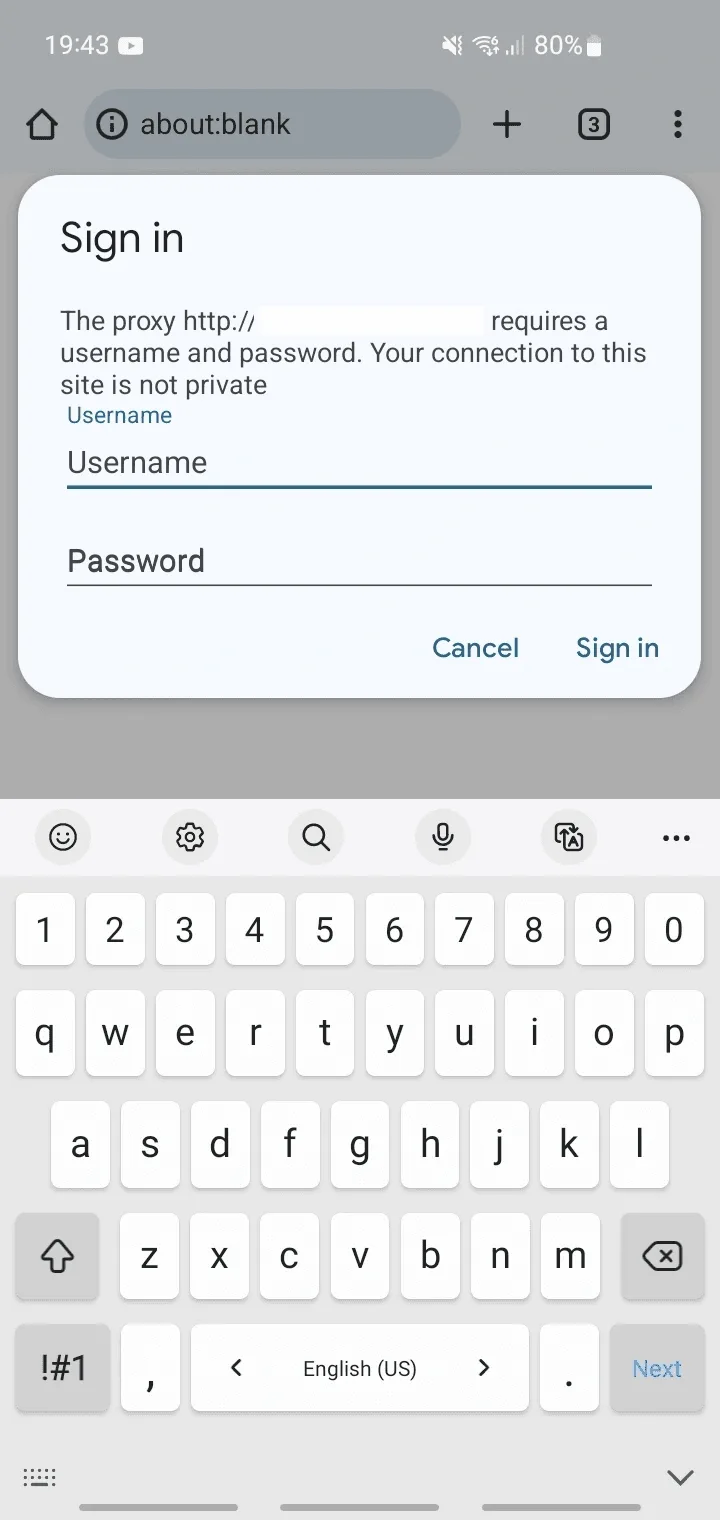
Launch Chrome and visit any site. With a login-protected proxy, a Sign in dialog appears, saying the proxy wants a username and password. Paste both from your dashboard and confirm. Chrome keeps them for the current browsing session, so expect the prompt again after the app is fully closed.
Route 2: Proxy on Cellular Data via the APN
Mobile data has no dedicated Proxy switch at all. Instead, the access point profile used by your SIM card carries its own proxy fields. Menu names below come from a Pixel; Samsung users reach the same list through Connections, Mobile networks and finally Access Point Names.
Step 1. Get to the SIM Card Page
Inside Settings choose Network & internet, then Internet, and press the cog shown beside your operator's name.
Step 2. Edit the Profile Currently in Use
Scroll to the very end and choose Access Point Names. The profile in use has a filled radio button; open it. On the Edit access point screen, enter the server into Proxy and the number into Port.
Do not touch Username or Password here. Within an APN those belong to your operator's own data login, unrelated to the proxy, and replacing them may kill cellular internet altogether. Chrome will handle proxy credentials just as it does on Wi-Fi.
Step 3. Store the Changes
Hit the three dots at the top and pick Save; leaving via the back arrow throws your edits away. Afterwards cycle mobile data or enable Airplane mode for a few seconds, which makes the modem re-register using the updated profile.
Certain operators lock their APN, leaving every field greyed out. The workaround is the + button on the APN list: recreate the original profile value by value, add the proxy, then select this copy. Even when everything is right, plenty of apps disregard an APN proxy, so count on it mainly for browsing.
When Built-In Settings Are Not Enough: Proxy Apps
Chrome honours the system proxy, and so do a few other apps. Messengers, games and many social networks open their own sockets and skip it completely, while a SOCKS5 server cannot be entered anywhere in Settings. Both gaps are closed by a client that spins up a local VPN interface and funnels every app through your proxy:
- SocksDroid: free and tiny, handles one SOCKS5 server and lets you pick which apps use it; read our SocksDroid walkthrough with screenshots.
- Super Proxy: works with HTTP and SOCKS5 and stores several profiles; see the Super Proxy guide.
- V2Box: built for VLESS, VMess and Shadowsocks configs while also accepting plain proxies; covered in our V2Box article.
On a handset, mobile proxies tend to be the most coherent choice, since the exit address comes from a genuine cellular network and matches what websites expect from a phone.
Did It Work?
Visit a what-is-my-IP site from the browser you just configured. You should see the proxy's address and its country rather than your operator or home ISP. Next, repeat the test inside whichever app you actually need, since a browser result tells you nothing about apps bypassing system settings.
When no page loads whatsoever, run the server through our free proxy checker. If it reports the proxy alive, the fault is somewhere in the phone's configuration.
Troubleshooting
Saved, but no site opens. A mistyped host is the classic culprit, so compare it symbol by symbol. Next, confirm that this port is an HTTP one and not reserved for SOCKS5.
Chrome keeps asking for the login. Either the credentials are wrong or a trailing space slipped in while pasting. IP whitelisting, offered by some providers, behaves poorly on phones because their public address keeps shifting, so a login is the safer bet.
Chrome is fine, but an app is not. That particular app ignores the system proxy. Look for a proxy option inside the app itself (Telegram has one) or switch to a VPN-based client from the list above.
There is no Proxy row. It hides behind View more, Advanced or a pencil icon. On company-managed handsets an MDM profile may remove it.
After joining another network the proxy is gone. Every saved Wi-Fi network keeps separate proxy values, so repeat the setup for the new one.
Switching the Proxy Off
For Wi-Fi, reopen the network's properties, set Proxy back to None and save. For cellular, wipe the Proxy and Port values in the APN, or reselect your operator's original profile if you made a copy, and reconnect. No other setting needs reverting.
Android Proxy FAQ
Is there one Android proxy setting covering all networks?
Not in stock Android. Proxies are stored per Wi-Fi network and per APN profile, so a single always-on proxy requires a VPN-style client such as SocksDroid or Super Proxy.
Why can't I type a username and password in Android Wi-Fi settings?
That form only has room for host, port and an exclusion list. Credentials are requested later by Chrome, which shows its own sign-in dialog and passes them to the server.
Will a SOCKS5 proxy work in Wi-Fi settings?
No, that box accepts HTTP proxies only. SOCKS5 needs an app that builds a local tunnel.
Does every app follow the system proxy?
Far from all. Browsers usually do, while many apps connect directly, so verify the IP inside the app you care about.
Is root access required for an Android proxy?
No. The Wi-Fi method, the APN method and VPN-based proxy clients all run on an ordinary, unrooted phone.