How to Set Up a Proxy in Brave Browser and Check That It Works

Brave is a Chromium-based browser focused on fast page loading and built-in blocking of unwanted content. At the same time, it does not have its own tools for separate proxy configuration within the browser: Brave uses the operating system’s network settings. Therefore, the connection is made not through a dedicated manager in the browser itself, but through the system’s network settings.
This approach is suitable when you need to route traffic through a different IP address, check how content is displayed for different locations, or build a more flexible connection scheme for work-related tasks. To set up a proxy in Brave, open Settings, then System, go to your computer's proxy settings, enter the proxy IP address and port, save the changes and restart the browser. For this, residential proxies with IP addresses of home users work well.
Proxies for Your Browser
Node Proxy residential IPs are available across a wide range of locations.
Why Connect a Proxy in Brave
Despite its own protection tools, Brave does not replace network routing. A proxy solves a different set of tasks: it changes the route of requests and allows you to work through an external IP address.
This can be useful in several cases:
Viewing content for other regions
Some websites, services, and platforms show different versions of pages depending on the user’s location. Through a proxy, you can check how a resource looks and opens from another country or region. Available countries are listed on our proxy locations page.
Separating work scenarios
Proxies are often used where there is a need to test web pages, advertising materials, localization, search results, service behavior for different regions, or to run several independent work sessions.
More flexible connection management
With a stable configuration, a proxy helps set a predictable traffic route.
How a Proxy Works in Brave
Brave does not store separate network settings and does not manage the connection on its own. It takes the settings from the operating system. This means that after changing the system proxy, Brave will start using it automatically.
In practice, this is important for two reasons:
- configuration is performed through the settings of the operating system in use;
- errors in the system will affect not only the browser, but also other applications that use the same network settings.
How to Set Up a Proxy in Brave
Step 1. Open the section with network settings
Launch Brave and open the browser menu in the upper-right corner. Go to the Settings section.
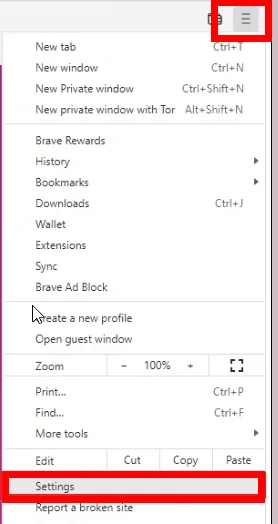
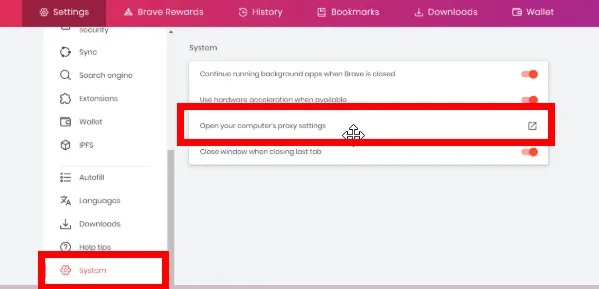
Then open the System block.
There will be an item here for going to the computer’s proxy settings.
After that, the browser will redirect you to the system section where the connection is configured.
Step 2. Go to manual configuration
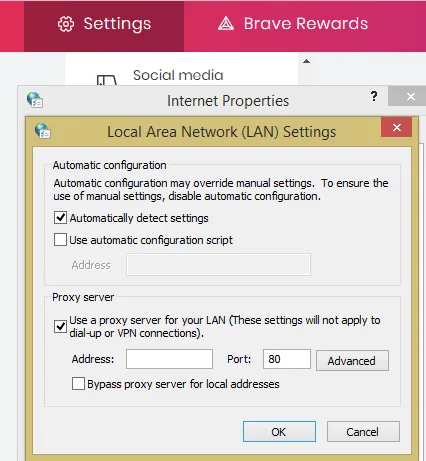
In the window that opens, select manual proxy configuration. In Windows, this may be a section with local network settings or the Manual proxy setup block — the name depends on the system version.
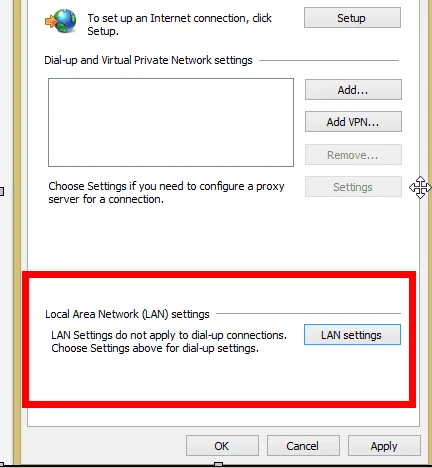
Next, you need to enable the use of a proxy server and specify the following information (Node Proxy users can find it in the client panel):
- server IP address;
- connection port.
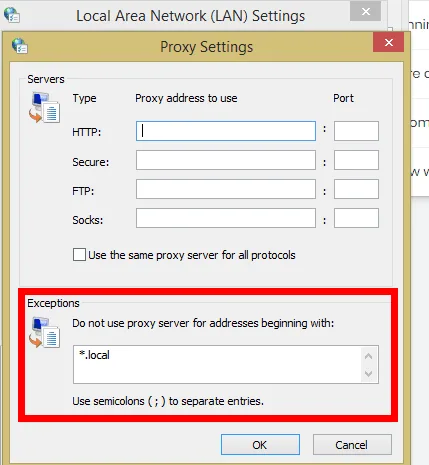
If your configuration includes exceptions, you can immediately add websites that should open directly, without a proxy.
Step 3. Save the settings
After entering the address and port, save the changes. From this moment on, Brave will start using the system’s new network settings.
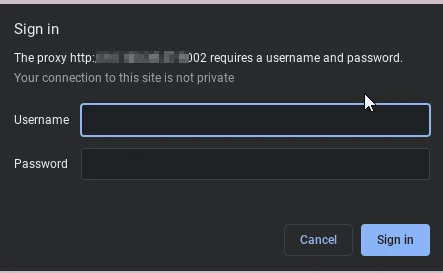
If the server requires authorization, the login and password input window usually appears when you try to open a page. Brave itself does not save this data separately as part of an internal proxy manager, because the browser has no such manager.
Step 4. Restart the browser and check the connection
After saving the settings, close and reopen Brave. Then check which IP is detected in the browser. If a new address and the required geolocation are displayed, the configuration was completed correctly. You can also test the proxy with our free proxy checker: it shows whether the proxy is alive, its exit IP and its location.
If your regular IP is shown, it is worth checking:
- whether the server address is specified correctly;
- whether there is an error in the port;
- whether the proxy is activated in the system settings;
- whether the settings conflict with other system network rules.
What Is Important to Consider During Setup
Brave has a specific feature: the browser does not offer a separate advanced proxy control panel, unlike some specialized solutions. Because of this, everything depends on the capabilities of the operating system and the specific connection scheme.
Before setting it up, it is useful to consider several points.
The proxy works at the system level
If you change the network settings manually, this may affect not only Brave, but also other programs that use the system proxy.
Checking after connection is mandatory
Even if the data was entered correctly, the connection should be checked immediately. This helps quickly detect an error in the address, port, routing, or authorization.
The browser version also matters
If Brave has not been updated for a long time, compatibility issues with certain system functions are possible. Therefore, before setting it up, it is advisable to use the current version of the browser.
Advantages and Limitations of This Approach
Setting up a proxy in Brave is fairly straightforward: the browser simply uses the system connection without any separate internal logic. This has both advantages and limitations.
Advantages:
- no separate module inside the browser is required;
- configuration is performed using standard system tools;
- you can quickly switch the traffic route for Brave together with other applications.
Limitations:
- there is no built-in proxy manager;
- less flexibility compared to specialized tools;
- some settings depend not on the browser, but on the operating system.
Why the Proxy May Not Work in Brave
If pages do not open after setup or the connection bypasses the server, the cause is usually one of the following:
- the IP address or port was entered incorrectly;
- the server is unavailable;
- the system did not apply the saved settings;
- a conflict arose with the current network settings;
- an unsuitable connection type is being used for your workflow;
- the server requires authorization, but the credentials were not entered or were entered incorrectly.
In such a situation, it is better to first recheck the connection settings, then restart the browser, and only after that test the result again.
Brave Proxy FAQ
Does Brave have its own proxy settings?
No. Brave has no built-in proxy manager and uses the proxy settings of the operating system. The Settings menu only opens the system proxy section.
How do I set up a proxy server in Brave?
Open Settings, then System, and click the item that opens your computer's proxy settings. Enable manual proxy setup, enter the IP address and port, save the changes and restart Brave.
Where do I enter the proxy login and password in Brave?
If the proxy requires authorization, Brave shows a login window when you open a page. Enter the username and password from your proxy provider there.
Will the proxy affect other programs?
Yes. Because the proxy is set at the system level, other applications that use the system network settings will also go through it.
Conclusion
In Brave, a proxy is configured not inside the browser, but through the system’s network settings. This is the key principle that determines the entire connection process. If you know this feature, setup takes little time: just open the System section, go to the computer’s proxy settings, specify the IP and port, save the settings, and check the result after restarting the browser. If you use other privacy-focused browsers, see how to set up a proxy in Epic Privacy Browser and in Avant Browser.