How to add proxies to the Afina antidetect browser: a step-by-step guide for single profiles and bulk setup
 ·September 18, 2026·5 min read
A proxy in an antidetect browser means a separate network route for a profile, helping split accounts by IP, geo and session. Teams use it so each browser profile works with its own IP address, cookies, fingerprint and local settings. In real workflows, it is not enough to paste a host and port. You also need to check the protocol, authorization, geolocation, UDP support and the proxy assignment inside the right profile.
Afina Browser works as an antidetect environment for multi-accounting: profiles are isolated from one another, while proxies are configured per account or managed through a shared saved-proxy pool. This model is useful when different accounts need different countries, separate cookies and a network layer that can be changed without rebuilding the whole browser profile.
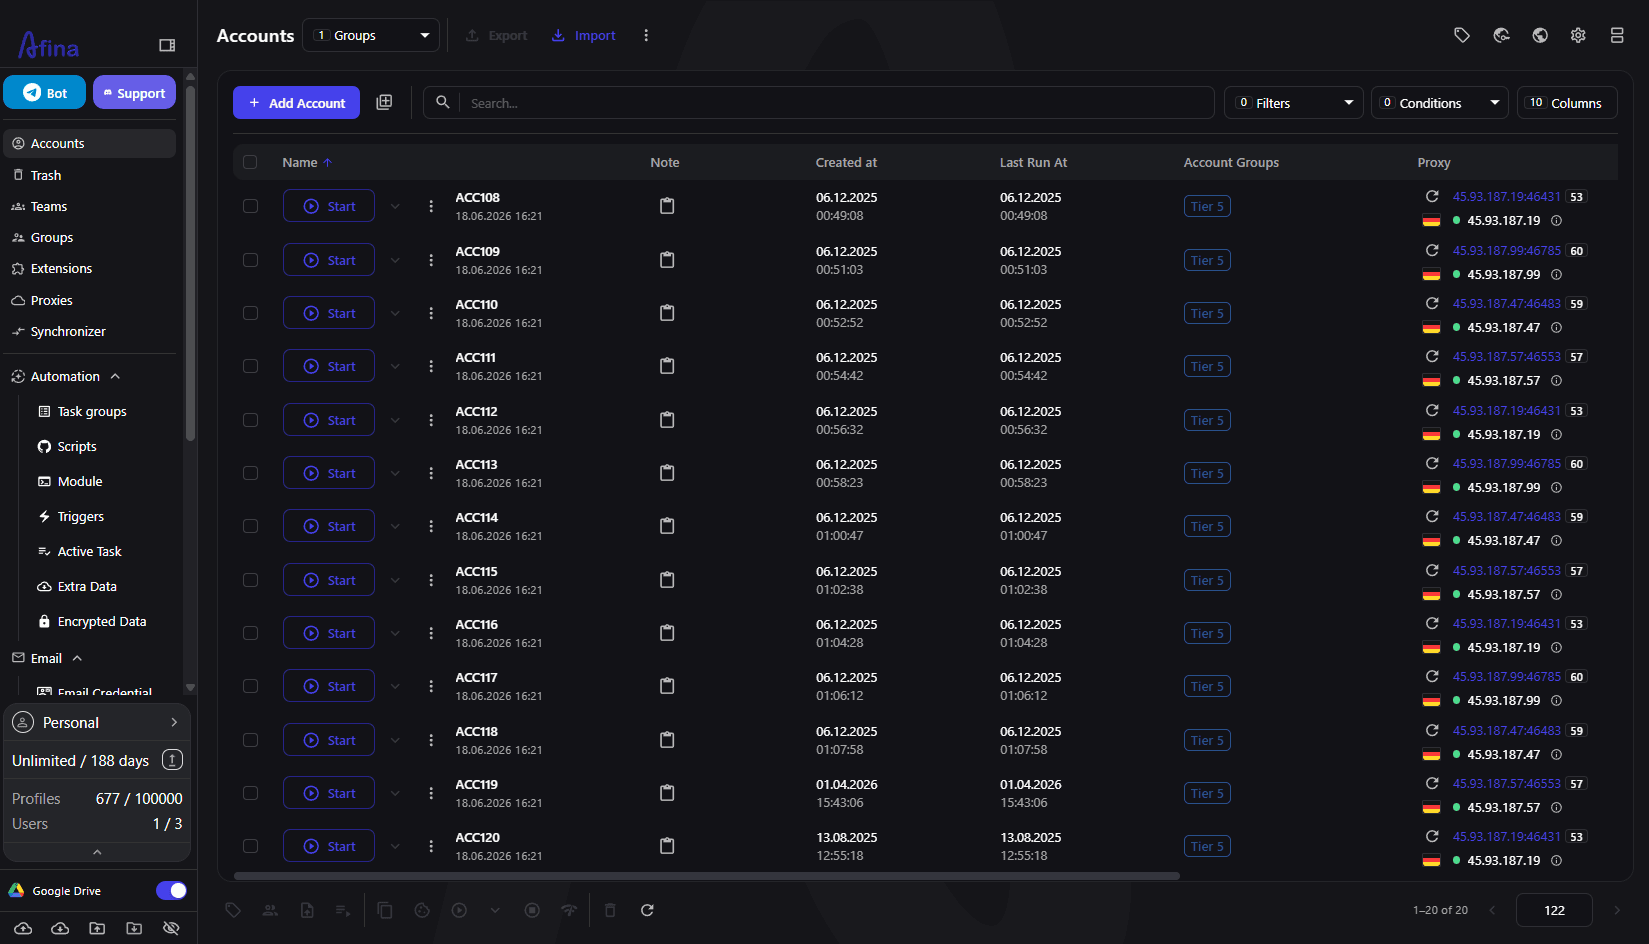
Below is a practical route for two common scenarios: adding one proxy manually and assigning it to a profile, then importing a proxy list in bulk for a larger account pool. The guide also covers what to check after launch and which Afina features matter beyond basic antidetect profiles.
What should you prepare before adding a proxy in Afina?
Before setting up a proxy in Afina, prepare the full proxy data from your provider. The minimum set is host or IP, port and protocol type. If the proxy uses authentication, you also need login and password. For rotating or mobile proxies, the provider may also give a Change IP URL that triggers IP rotation through a link. All this information can be found on Node Proxy website.
For account work, it is better to prepare a table or text file where every line follows the same format. This makes it easier to catch extra spaces, a wrong port or a row without a password before import. Afina supports proxy settings for browser profiles in HTTP, HTTPS and SOCKS5 formats, so you should know the exact protocol before pasting the data.
| What to check | Why it matters | Example |
|---|---|---|
| Protocol | Afina must connect through the same type issued by the provider | HTTP, HTTPS or SOCKS5 |
| Host and port | One wrong character can break the connection | proxy.example.com:10001 |
| Login and password | Most private proxies do not work without authentication | user:pass |
| Geo | Language, timezone and IP should look consistent | German IP plus European timezone |
| Status | The proxy should be tested before profile launch | green status after Check proxy |
If the profile already has cookies, session history or a working account, do not switch its proxy randomly. A sudden change of ASN, country or IP type can look suspicious to a platform. For stable accounts, sticky or static IPs usually make more sense, while rotation is better for tasks where the session is not tied to a long history.
How do you add one proxy in Afina manually?
Manual proxy setup is best when you need to configure one profile or test a new proxy before bulk import. In this workflow, the proxy first goes into the Proxies section, passes a check and then can be assigned to a specific account.
1. Open Afina and go to Proxies in the left menu
2. Click Add Proxy to open the manual proxy form
3. Select the proxy type: HTTP, HTTPS or SOCKS5
4. Paste the host or IP into the Host field
5. Enter the port in the Port field
6. Add login and password if the proxy requires authentication
7. Paste the Change IP URL if your provider gave one
8. Click Check proxy and wait for the test result
9. Make sure Afina shows the country, city, outgoing IP and green status
10. Click Add Proxy to save the proxy to the shared list
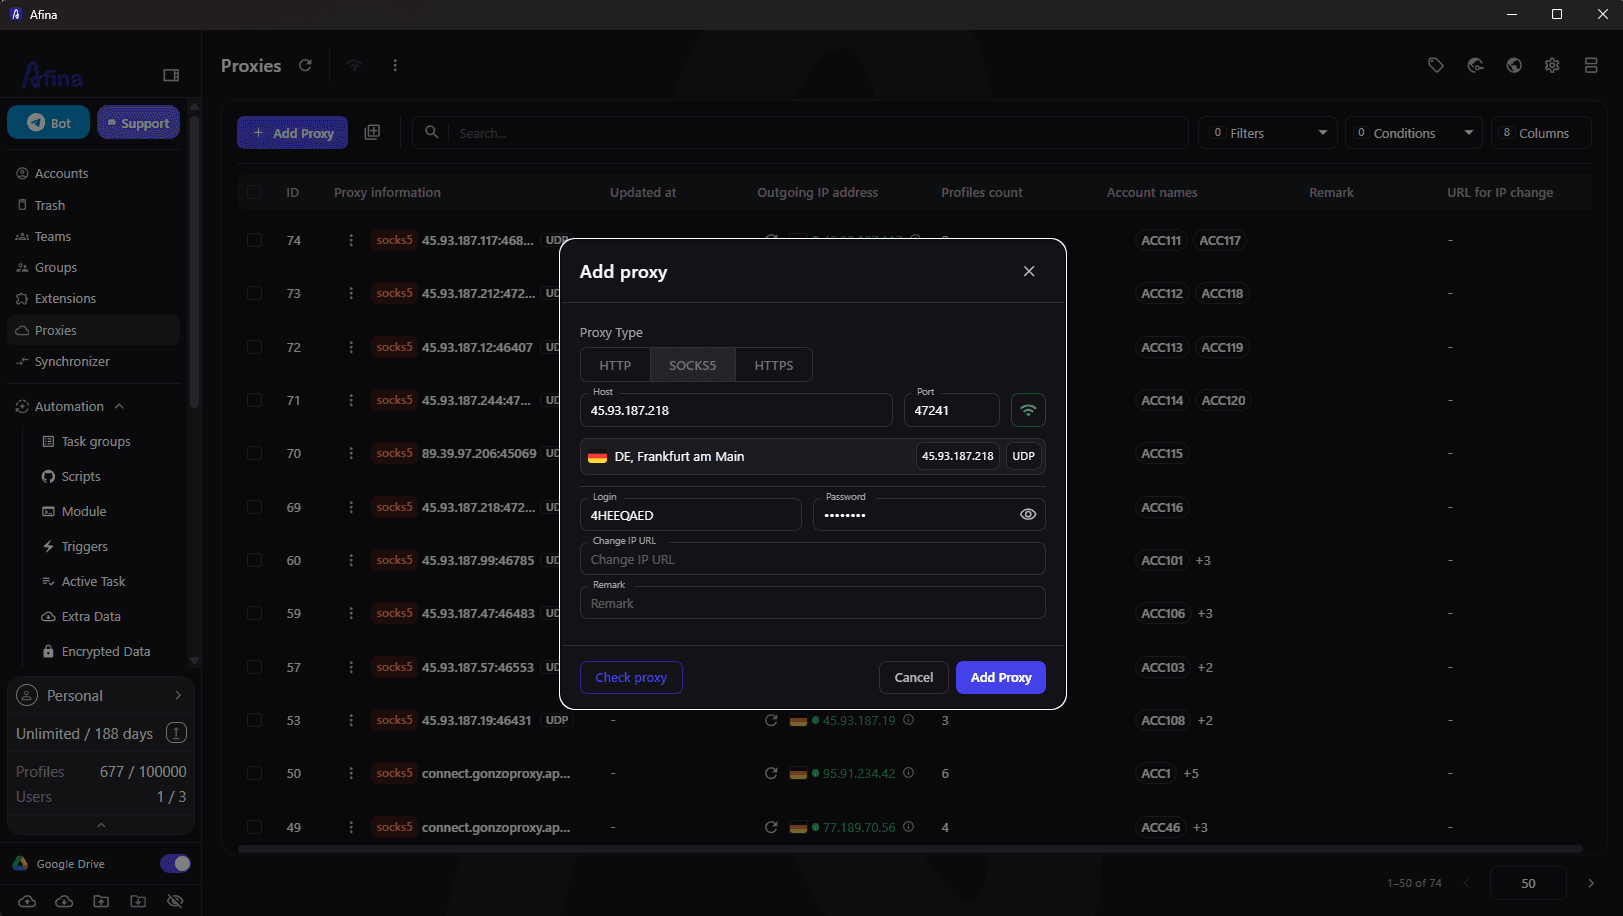
After the check, Afina shows connection data, geolocation and outgoing IP. If you use SOCKS5 with UDP support, pay attention to the UDP label in the interface. UDP matters for scenarios that use QUIC, HTTP/3, WebRTC or other traffic that does not always pass correctly through a basic TCP-only proxy.
If Check proxy returns an error, do not rush to delete the profile. The most common causes are simple: a mismatched protocol, an extra space in the password, a wrong port, an expired package from the provider or an IP allowlist that does not include your current address. Fix the data, run the check again and assign the proxy only after a green status.
Residential Proxies for Browsers
Connect Node Proxy to your browser and use IPs from the location you need.
How do you assign a saved proxy to a specific profile?
After adding a proxy to the shared list, you still need to bind it to a profile. This is an important distinction: a proxy stored in Proxies does not automatically mean that an account is using it. In Afina, each profile has its own Proxy tab where you can choose a saved proxy or enter a new one manually.
1. Open Accounts
2. Find the required profile in the table
3. Open the account edit window
4. Go to the Proxy tab
5. Select Saved proxies if the proxy is already stored
6. Enable Only unassigned proxies if you want to see only free proxies
7. Choose the required host:port from the list
8. Check the type, geo, login, password and UDP status
9. Click Save
10. Start the profile and verify the IP inside the browser window
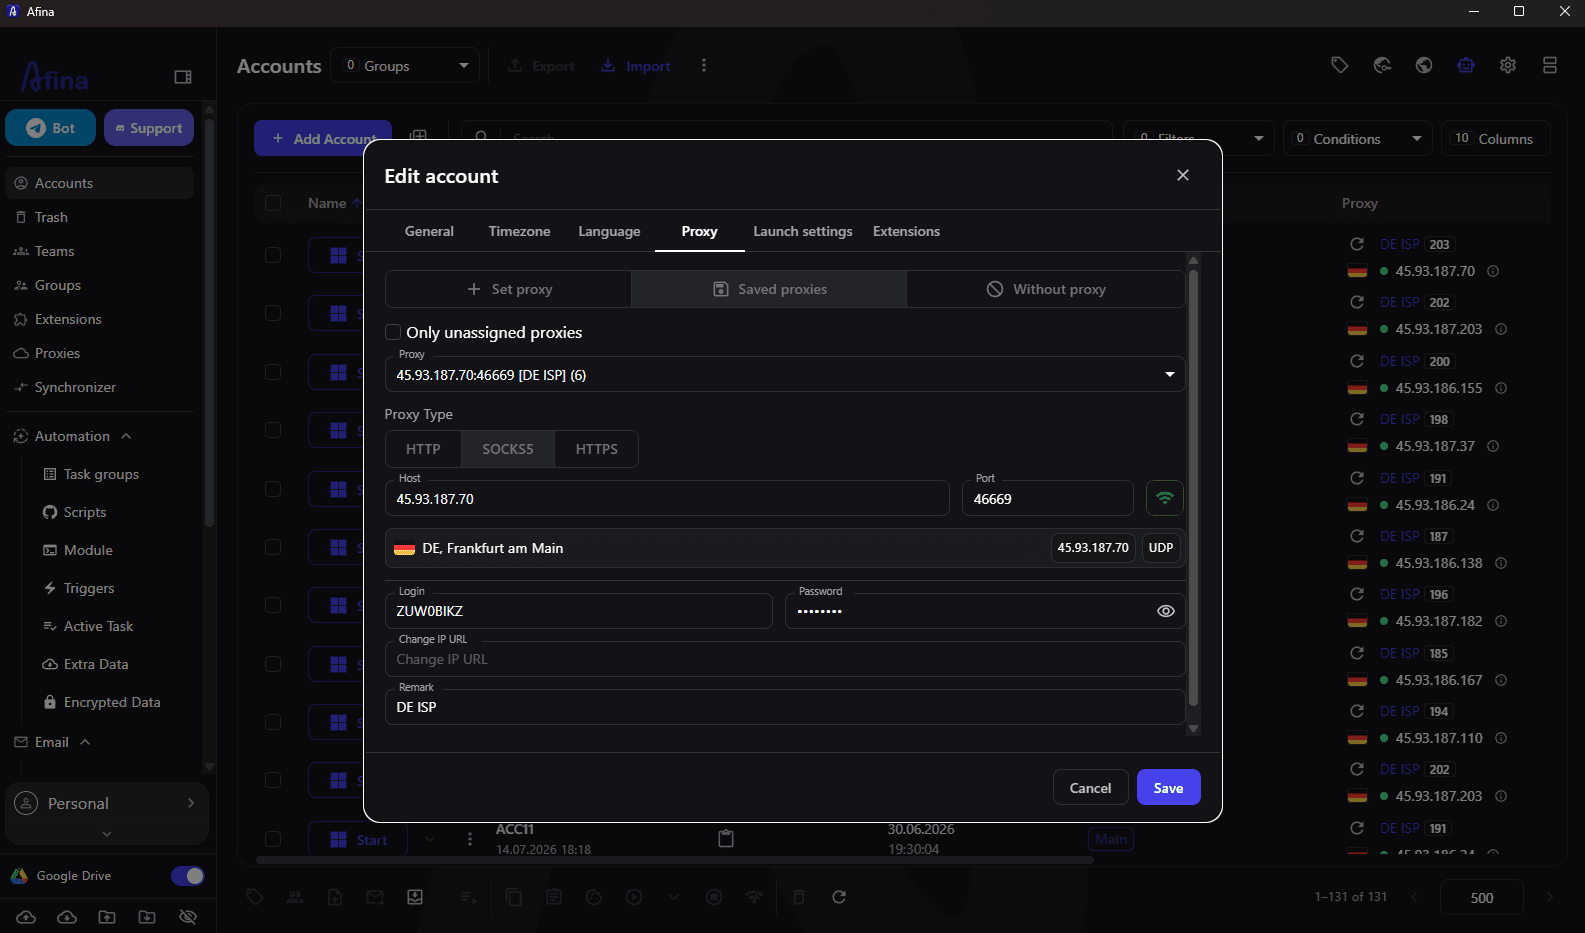
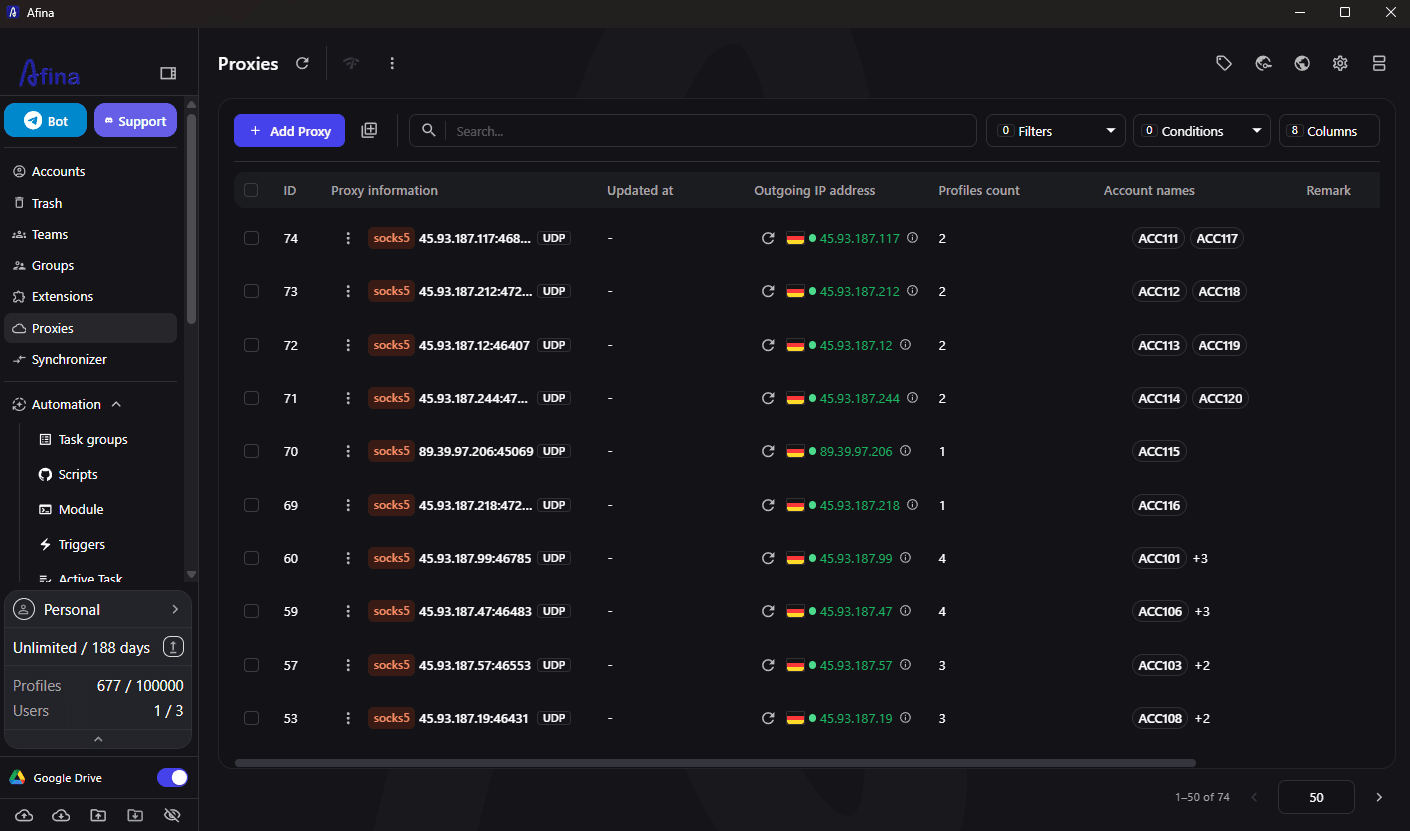
For long-running sessions, it is usually better to keep one IP tied to one profile. If the same IP is used across several accounts, the platform may link them through the network layer even when the browser fingerprints are different. Afina helps control this: the Proxies table shows how many profiles are assigned to each proxy, while the Accounts table shows which IP is attached to each row.
How do you add proxies to Afina in bulk?
Bulk proxy import is useful when you work with dozens or hundreds of profiles. Manual entry of host, port and passwords takes too long and creates room for typos. Afina solves this through Bulk add proxies: you paste a list, the app parses the rows, shows a preview table and lets you test everything before saving.
The most convenient formats are:
host:port
host:port:login:password
http://login:password@host:port
socks5://login:password@host:port
1. Open Proxies
2. Click Add Proxy
3. Choose Bulk add proxies
4. Add a shared Remark if you want to label the batch
5. Paste the proxy list into the large text field
6. Select HTTP, HTTPS or SOCKS5 if the type is not already included in the URL format
7. Check how Afina parsed the rows into Host, Port, Login, Password and Type
8. Click Check proxy to test the batch
9. Fix rows with errors or remove them from the import
10. Click Add Proxy to save the working proxies
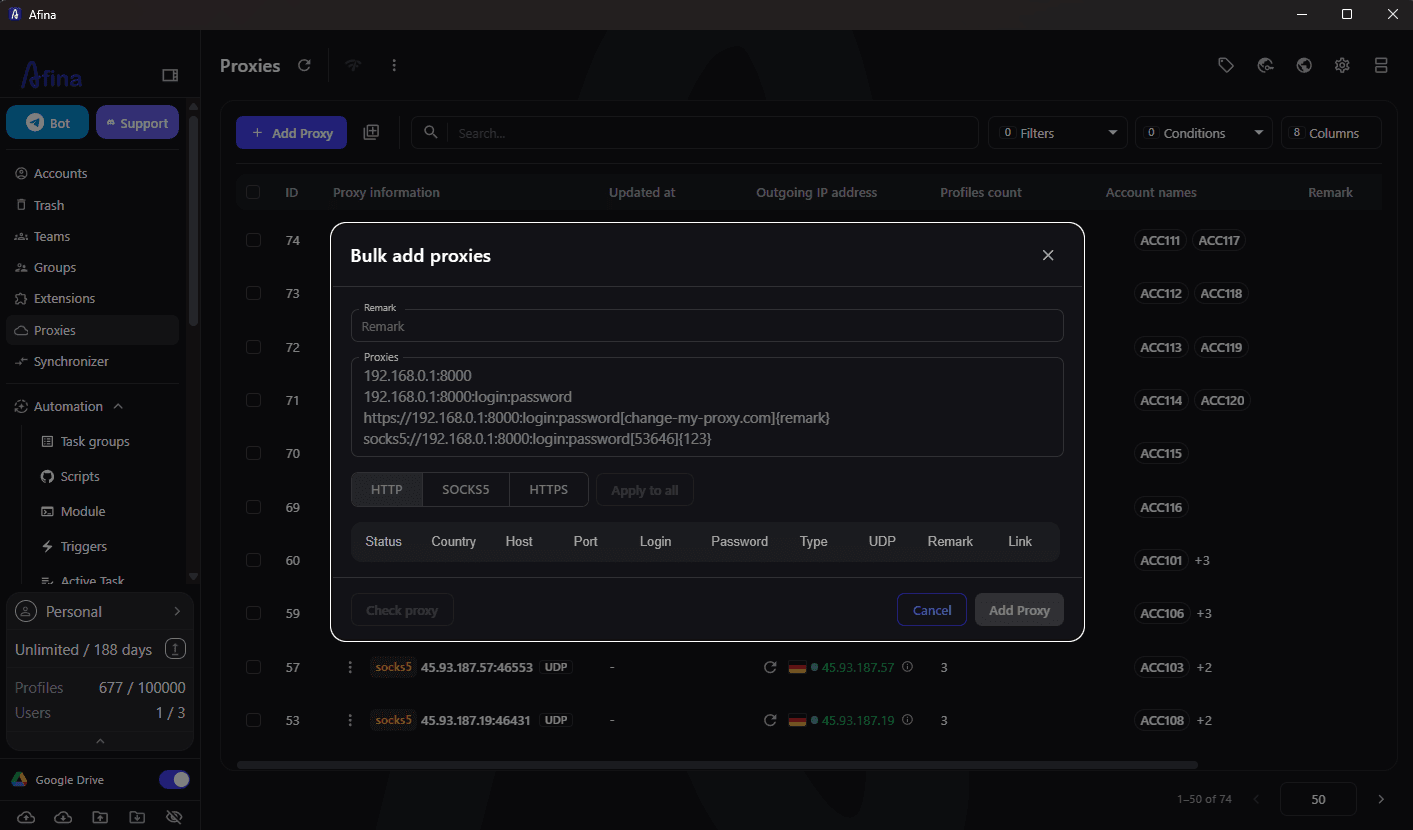
After import, it is worth opening the Proxies table and checking the batch again. The table shows proxy type, outgoing IP, country, UDP label, profile count and account names already linked to each proxy. This is especially important with large pools, where it is easy to assign the same IP to several profiles by mistake.
How do you distribute proxies across many profiles?
Once proxies are saved, the next job is distributing them across accounts. For one profile, the Proxy tab inside the account card is enough. For a larger group, it is more practical to work from the Accounts table: select the required rows and assign proxies to several profiles in one action.
A practical workflow looks like this:
1. Open Accounts
2. Filter profiles by group, tag or status
3. Select the required rows with checkboxes
4. Start the proxy assignment action
5. Choose the saved proxy list
6. Make sure the number of proxies matches the number of profiles
7. Avoid reusing one IP across different accounts if those accounts should stay separate
8. Save the assignment
9. Review the Proxy column in the Accounts table
10. Launch several test profiles and compare the IP through an external IP checker
If you have fewer proxies than profiles, do not launch the whole group at once. Split accounts into waves or expand the proxy pool first. The rule is simple: one stable account should have one stable network route. Bulk assignment saves time, but it does not replace hygiene. Geo, timezone, language, cookies and login history should not contradict each other.
What should you check after launching a profile?
Proxy verification does not end after saving the settings. Afina's built-in Check proxy confirms that the app can connect to the server, but the final test should happen inside the launched profile. That is where you see which IP the target website detects, whether WebRTC leaks anything and whether language and timezone signals match the proxy geo.
After the first launch, check the following:
1. Open the profile with Start
2. Go to an IP checker or WebRTC checker
3. Compare country, city, ISP or ASN with the expected values
4. Make sure the real IP is not exposed through WebRTC
5. Check the profile timezone and language
6. Save the test result in your working table if you manage a large pool
If the profile starts without a proxy or shows the wrong country, stop it and return to settings. For team workflows, it is worth enabling a policy that prevents profiles from launching without a proxy. It is a small setting, but it protects against one of the most expensive mistakes: logging into an account from the real network by accident.
Which Afina features matter beyond antidetect profiles?
Afina is not limited to profiles and proxies. For teams that manage large account pools, the most valuable layer often starts after basic setup: automation, scripts, API, MCP and team controls. These tools reduce the number of manual actions that usually cause operational mistakes.
Afina includes a visual automation editor where a workflow is built from blocks: open a tab, visit a website, click an element, enter text, scroll, execute JavaScript, wait, check a condition or write a result. This works for warming profiles, repeated checks, form filling, account dashboards and other tasks you do not want to repeat manually in every profile.
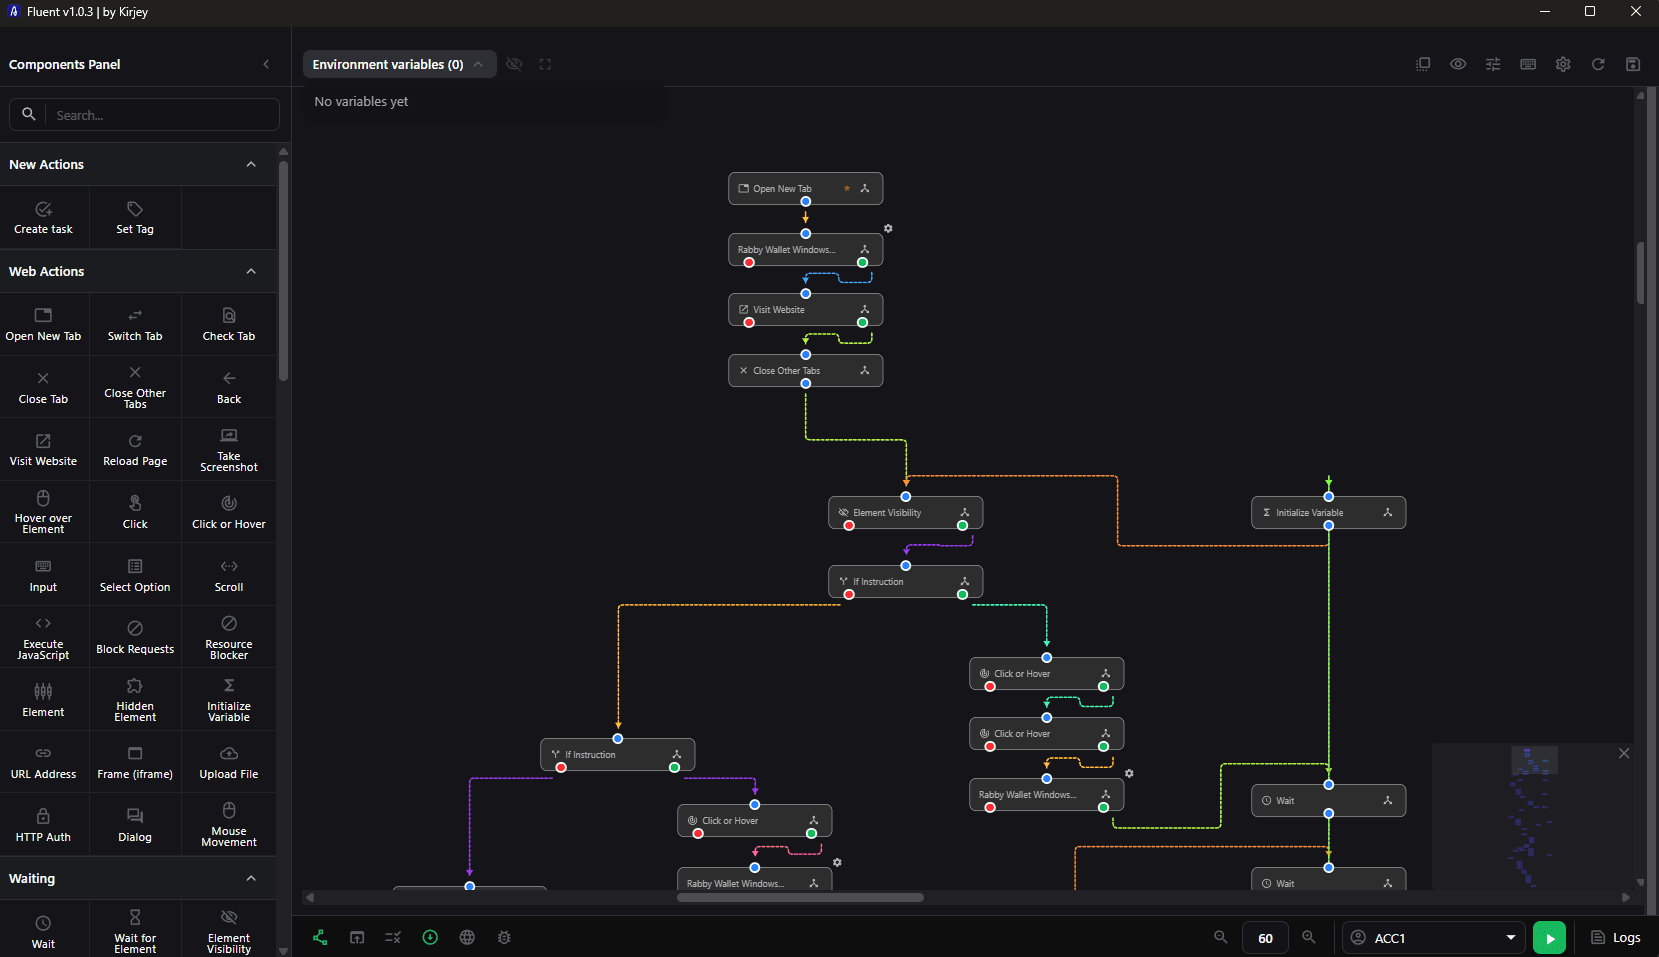
For more complex workflows, Afina also supports modules, task groups and delayed launches. For example, a team can prepare a profile group, assign proxies, add individual variables and run scripts in waves instead of opening all profiles at the same time. This lowers load, makes behavior less repetitive and keeps the task queue easier to control.
Another useful layer is no-code automation in Afina through scripts, variables and conditions. It helps when a workflow has many small steps: open a profile, check a page, take data from a table, perform an action, write the status and move to the next account. Technical teams can also use the local API and MCP server, which let Afina interact with AI agents and external tools.
Cookie management, browser extensions and additional account data also matter. Cookies can be imported and kept separate for each profile, extensions can be enabled selectively, and service values such as email, seed phrases, tags or workflow variables can be stored so automation can read them at the right moment. This material is provided for informational and educational purposes only.
Promo code for new users:
- SALE20 gives you a 20% discount on the Base, Standard, and Max plans
FAQ
How do you add a proxy to the Afina antidetect browser?
Open Proxies, click Add Proxy, enter host, port, protocol, login and password, run Check proxy and save the proxy.
Which proxy format works with Afina?
Afina works with HTTP, HTTPS and SOCKS5. For bulk import, `host:port:login:password` or a protocol-based URL format is usually the easiest option.
Can you add proxies to Afina in bulk?
Yes, Afina has a Bulk add proxies mode in the Proxies section. It lets you paste a proxy list, parse rows into a table, test them and save the batch.
Does every profile need its own proxy?
For stable multi-accounting, a separate proxy per profile is usually the cleaner setup. A shared IP can link accounts through the network layer.
Why does a proxy fail the Afina check?
Common reasons include the wrong protocol, wrong port, extra spaces in login or password, an expired proxy package or a provider-side IP allowlist.
What should you do after assigning a proxy to a profile?
Launch the profile, open an IP checker or WebRTC checker, and verify the IP, country, timezone, language and absence of real IP exposure.