How to Set Up a Proxy in MoreLogin: Single and Batch Setup

To set up a proxy in MoreLogin, create a profile, open Advanced create mode, enter the proxy details in Proxy settings and check them with Proxy detection. Below we show how to configure a single proxy, change it in an existing profile, and import many proxies at once.
What to Prepare Before Setup
Before getting started, you will need the installed MoreLogin browser, an account in the service, and the proxy details: IP address or host, port, and, if required, username and password.
You can download the browser from the official MoreLogin website.
A Global Residential IP Network
Access proxies in 195+ locations worldwide.
How to Set Up a Single Proxy in MoreLogin
1. Create a new profile
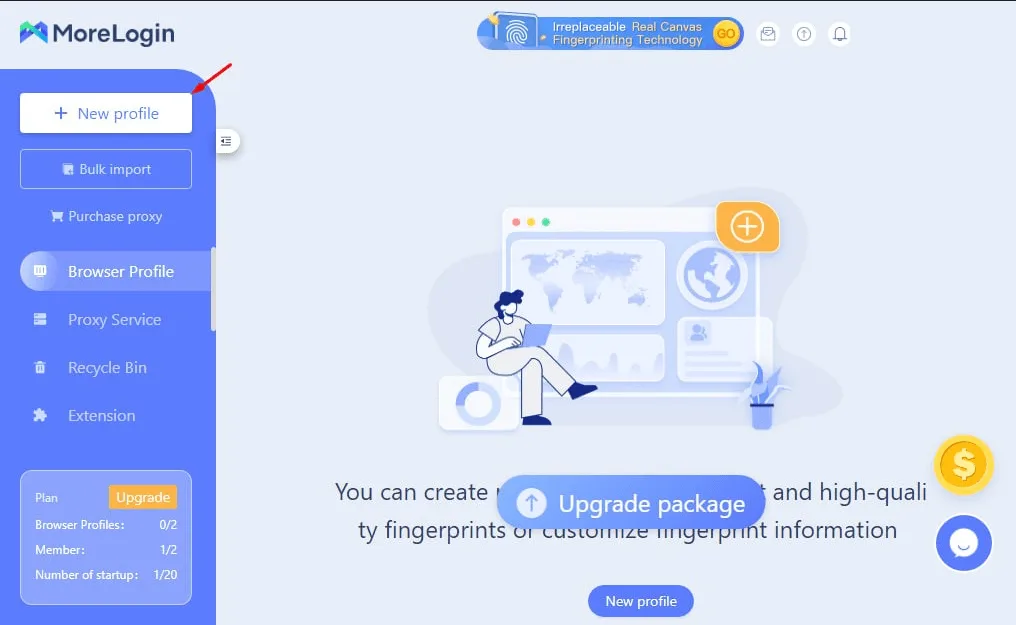
After launching MoreLogin, click New Profile.
Give the profile a name.
2. Go to advanced settings
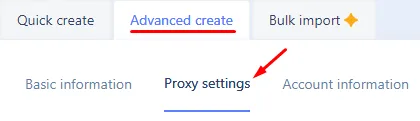
In the profile creation window, open Advanced create mode.
This is where the browser profile parameters and the section for network connection are available.
3. Open the Proxy settings section
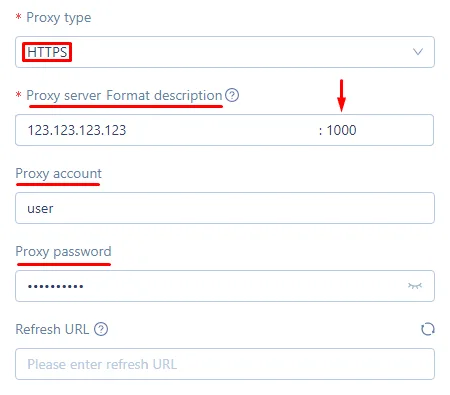
Go to Proxy settings and choose the option to connect through a custom proxy.
Then specify the protocol type from the available list. In MoreLogin, HTTP and SOCKS5 are usually used, and other formats may also be supported in batch addition.
Depending on the proxy type, fill in the main fields. If you use Node Proxy, you will find these details in your client panel:
- IP/Host — the proxy server address or domain name;
- Port — the connection port;
- Username and Password — if the proxy requires authorization.
If a static proxy is used, a specific IP address and a fixed port are usually provided.
If a rotating proxy is used, a domain name may be used instead of an IP.
4. Check the connection
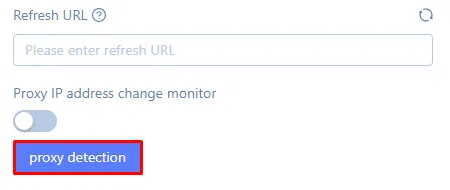
After filling out the form, click Proxy detection.
MoreLogin will run a check and display the connection result. If the system reports an error, it is worth checking again:
- the protocol type;
- the host or IP;
- the port;
- the username and password;
- the format of the entered data.
5. Save the profile
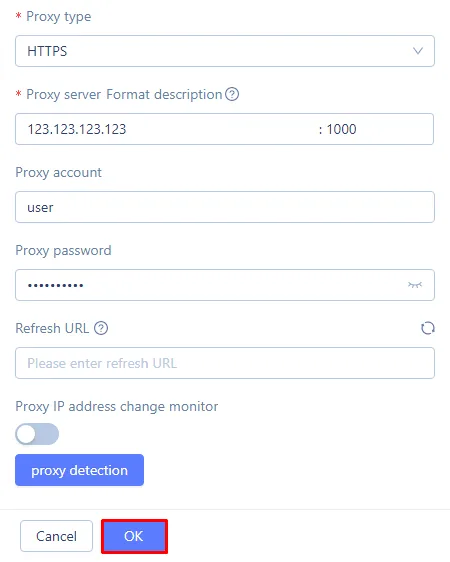
If the check is successful, click OK.
After saving, the profile will appear in the list of browser profiles with the assigned network parameters.
6. Launch the profile
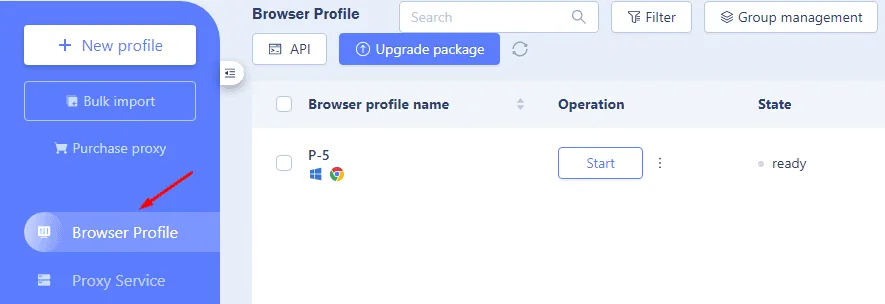
To begin working, click Start.
MoreLogin will open the browser profile with the specified settings. After launch, you can additionally verify whether the required IP address has been applied and whether the profile parameters match the specified configuration. A similar profile-based setup is described in our guide to NST Browser.
How to Change or Delete a Proxy in an Existing Profile
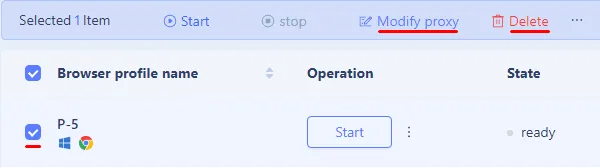
If the profile has already been created, there is no need to configure it again from scratch. In the profile list, select the required option and use:
- Modify proxy — to change the proxy;
- Delete — to delete the profile if it is no longer needed.
This approach is convenient when you need to replace a non-working proxy, update access parameters, or redistribute profiles to another pool of addresses.
How to Set Up Batch Proxies in MoreLogin
If you need to connect several proxies at once, it is more convenient to use batch addition through Proxy Service. This method saves time when working with a large number of profiles.
1. Prepare the proxy list
Before importing, collect the proxies in a .txt or .csv text file.
The basic line format usually looks like this:
proxyIP:port:username:password
Example:
192.168.1.1:8080:user1:pass1
192.168.1.2:8080:user2:pass2
If no username and password are used, the format may be shorter, depending on the proxy type.
It is important to keep in mind that during batch upload, the data must be entered without errors.
2. Open Proxy Service
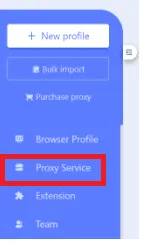
In the MoreLogin panel, expand the left-hand menu and go to Proxy Service.
3. Select batch add
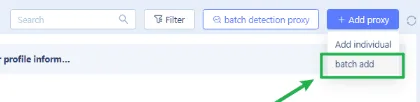
Click Add proxy, then choose batch add mode.
4. Paste the proxy list
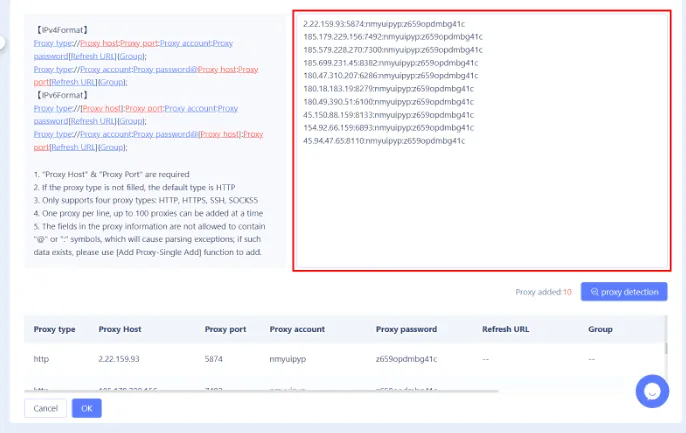
Copy the prepared lines and paste them into the text field.
After that, MoreLogin should automatically recognize the data and fill in the proxy table.
5. Run the check
Click proxy detection to test the imported entries.
The results are usually displayed both in a general view and for each line separately. This makes it possible to immediately see which proxies are working correctly and which require correction.
6. Confirm the import
After a successful check, click OK.
The proxy list can now be used for assignment to different browser profiles.
What Is Important to Check After Launching a Profile
After the first launch of a profile, it is useful to make sure of three things:
- the proxy is actually connected;
- the IP address matches the expected one (you can compare it with the result of the free proxy checker);
- the profile parameters do not conflict with each other.
If the profile launches but the connection behaves unstably, the problem is most often related not to MoreLogin itself, but to incorrect proxy data, an unsuitable protocol, or an authorization error.
Additional Features of MoreLogin
In addition to manual profile configuration, MoreLogin supports tools for large-scale work, including a local API and integrations with automation systems such as Selenium, Puppeteer, and Playwright. This is useful in cases where profiles need to be launched centrally, connection parameters changed, and a large number of configurations managed.
MoreLogin Proxy FAQ
How do I add a proxy in MoreLogin?
Click New Profile, open Advanced create mode, go to Proxy settings and choose a custom proxy. Select the protocol, enter the IP or host, port, username and password, run Proxy detection and click OK.
Which proxy protocols does MoreLogin support?
For a single proxy, HTTP and SOCKS5 are usually used. Batch addition may support other formats as well.
How do I add many proxies to MoreLogin at once?
Open Proxy Service, click Add proxy and choose batch add. Paste the prepared list, run proxy detection and confirm the import with OK.
How do I change the proxy of an existing profile?
Select the profile in the list and use Modify proxy. There is no need to create the profile again.
Conclusion
Setting up a proxy in MoreLogin comes down to three main actions: create a profile, enter the connection parameters, and check the connection through Proxy detection. For one-off tasks, this is sufficient. If there are many profiles, it is better to use batch addition through Proxy Service right away.