How to Set Up a Residential Proxy in GoLogin
 ·July 28, 2026·4 min read
GoLogin allows you to assign separate proxies to browser profiles and thereby separate work environments by tasks, regions, and accounts. This approach helps you manage connections more precisely, reduce the risk of conflicts between profiles, and maintain stable operation in projects where session isolation, traffic geography, and settings matter.
Why Connect a Proxy in GoLogin
Proxies in GoLogin are usually used in cases where you need to distribute several profiles across different IP addresses and locations. This is especially relevant for teams working with ad accounts, website display testing, routine task automation, scraping, and other activities where using the same connection source for all profiles is undesirable.
A properly assigned proxy provides several practical advantages:
Profile separation. Each profile can operate through a separate IP address. This simplifies multi-profile work and helps avoid overlap between sessions.
More stable workflow organization. When each profile has its own dedicated proxy, it becomes easier to track settings, find errors faster, and scale the “profile + task” setup.
Flexibility in launch and management. In GoLogin, you can either manually assign proxies to individual profiles or import a list of servers in advance for later selection.
The Internet Likes Natural.
Work through residential IPs trusted by websites.
How to Open Proxy Settings in GoLogin
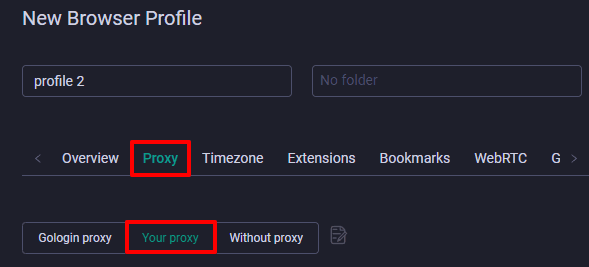
To add a proxy to a new profile, open GoLogin and click Add Profile.

After that:
1. Enter the profile name.
2. Go to the Proxy tab.
3. Select the option to connect through your own proxy — Your proxy.
Which Proxy Type to Choose
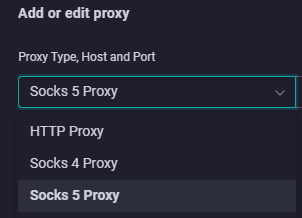
GoLogin usually supports several proxy types, including HTTP, SOCKS4, and SOCKS5. The choice depends on your specific workflow.
HTTP is suitable for standard web tasks when you need a basic proxy for browser work.
SOCKS4 is used in simpler scenarios where advanced functionality and authentication are not required.
SOCKS5 is most often considered the most versatile option. It is suitable for more complex scenarios, supports different types of traffic, and usually provides greater flexibility when configuring the connection.
Step-by-Step Proxy Setup in a Profile
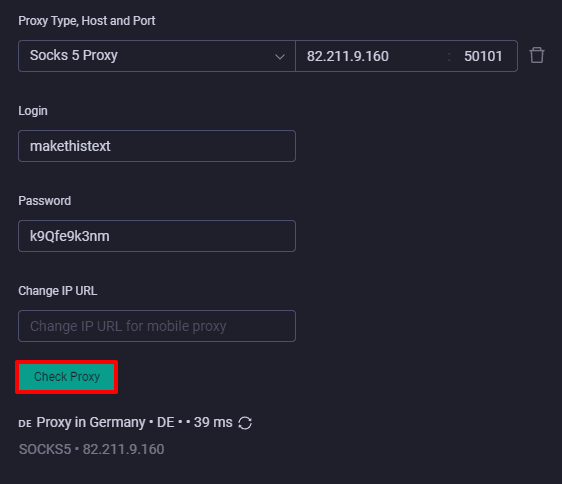
Once the profile is created and the Proxy tab is open, enter the connection details (this information can be found on our website node-proxy.com):
• proxy IP address;
• port;
• username and password, if the proxy server requires authentication.
After entering the parameters, click Check proxy. This check is needed to immediately determine whether the server is available and whether the details were entered correctly.
If GoLogin shows an error, the reason is usually related to one of the following factors:
• incorrect username or password;
• incorrect IP address or port;
• unsuitable proxy type;
After a successful check, finish creating the profile by clicking Create Profile, then select it in the list and click Run or Start, depending on the interface version.
How to Check That the Proxy Is Connected Correctly
The built-in check in GoLogin is usually enough for initial diagnostics, but after launching the profile, it is better to make sure that the connection is actually going through the required IP address.
To do this, you can open any IP checking service, such as whoer.net, iphey.com, or a similar tool, and see which address and geography are detected in the running profile.
If the service shows the wrong IP or the wrong location, it is worth checking again:
• the format of the entered data;
• the proxy type;
• the correctness of the selected server;
• whether an active proxy is assigned specifically to the current profile.
How to Import Multiple Proxies into GoLogin
If you work not with a single proxy, but with a whole set of proxies, it is more convenient not to enter each server manually, but to upload the list at once.
To do this, open the menu in GoLogin and go to the Proxies section.
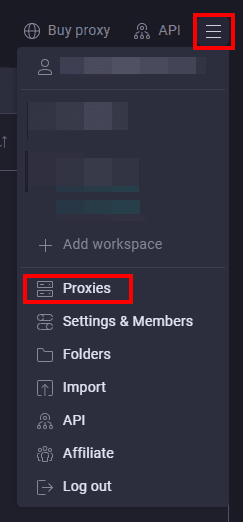
Next, you can import the proxy list from a prepared file using Import proxies.

After insertion, the browser usually checks the added addresses automatically. The check result is displayed directly in the interface:
• green mark — the proxy is available;
• red mark — there is a connection problem.
If several proxies are added to the list, when assigning servers to profiles, you can select the required option from the drop-down list in the Proxy column.
This method is especially convenient when you need to quickly distribute proxies across several profiles without repeated manual entry.
Practical Recommendations
To make sure proxy settings in GoLogin remain functional not only at launch but also in day-to-day use, it is important to follow several basic rules.
Use high-quality proxies
For work tasks, it is better to choose reliable paid solutions. Free proxies are usually unstable, often overloaded, and poorly suited for continuous work.
Match the geography to the scenario
If the task is tied to a specific region, check in advance whether the proxy matches the required country or city. This helps avoid errors during testing, campaign launches, and local search result checks.
Check the settings after import
Bulk import saves time, but after it, you should still make sure that the required proxies were assigned correctly to the profiles and launch without errors.
Conclusion
Setting up a proxy in GoLogin comes down to several basic actions: create a profile, choose the proxy type, enter the connection details, check the connection, and launch the profile. For one-off tasks, this is enough. If you have many profiles, it is more convenient to import the proxy list in advance and assign the required addresses through the built-in manager.