How to Connect a Residential Proxy in Indigo Browser
 ·August 8, 2026·6 min read
Indigo Browser allows you to configure a proxy in the settings of an individual profile. This is the standard way to set up an internal network connection: first, a profile is created, and then the proxy type, server address, port, and authentication details are specified in its settings.
Set Up Your Antidetect Browser the Right Way
Add a dedicated residential proxy to every profile.
What Data You Need Before Setup
- proxy type: HTTP, SOCKS4, or SOCKS5;
- proxy IP address or hostname;
- port;
- username and password, if credential-based authentication is used;
(all of these parameters can be found on our website node-proxy.com)
Without this data, the connection will fail verification, and the profile will not be able to work through the required server.
Step 1. Launch Indigo Browser
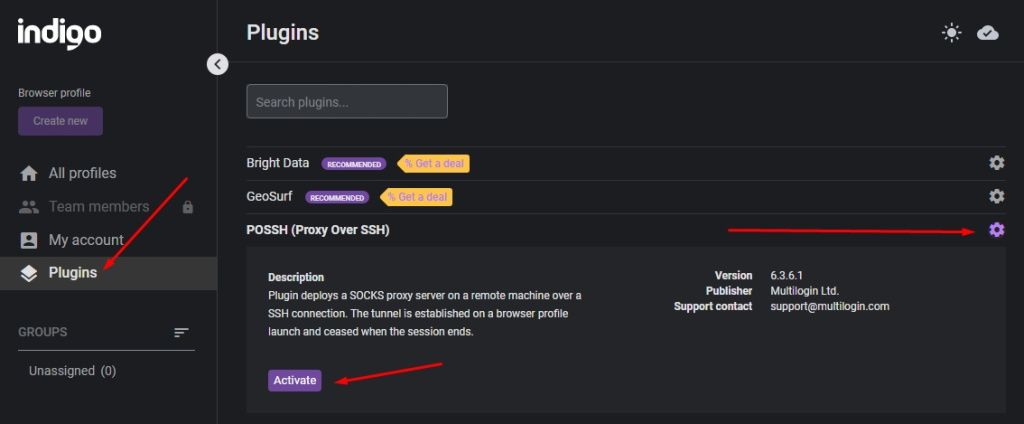
Open the browser and go to the main profile management window. If your build requires a separate module for working with proxies, first check the Plugins section. In some versions, you need to activate the proxy-related component there before proceeding with further setup.
Step 2. Create a New Profile
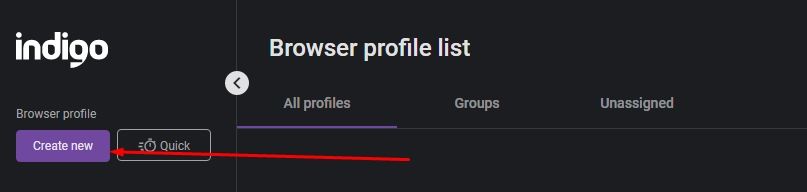
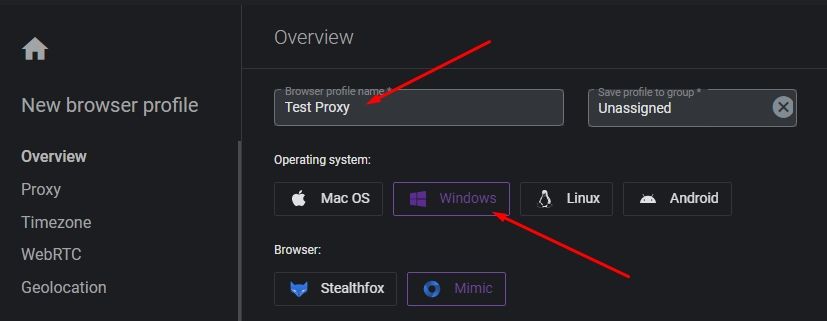
Click the button for creating a new profile. Depending on the interface version, it may be labeled New browser profile or Create new.
In the new profile form, fill in the basic parameters:
- Profile Name — profile name;
- Group — group, if you use profile sorting;
- Operating System — operating system;
- Browser — browser version;
It is better to assign a profile name that makes the purpose of the configuration easy to understand at a glance.
Step 3. Open the Proxy Settings
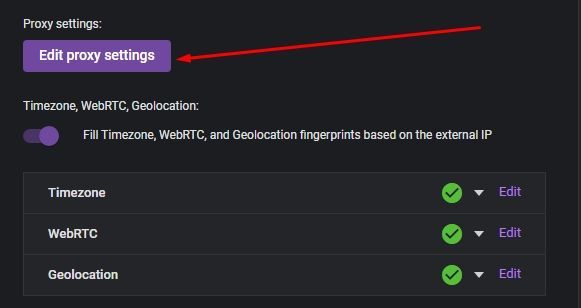
In the profile card, find the Proxy settings section and click Edit proxy settings. This will open a window with the connection parameters.
This is where the network route for the selected profile is configured.
Step 4. Select the Connection Type
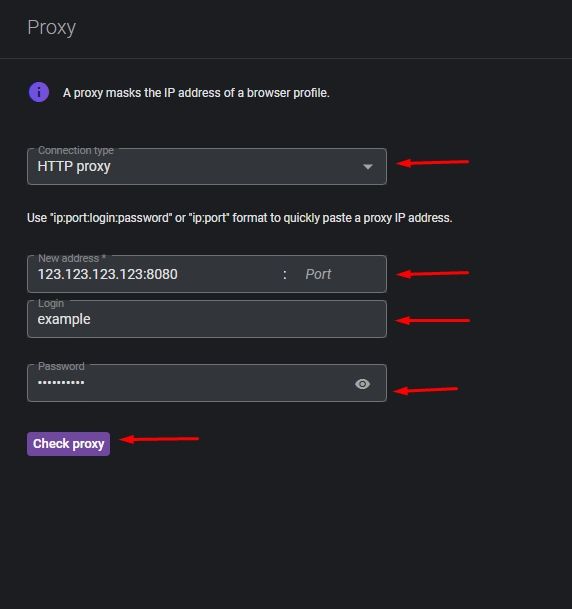
In the Connection type field, specify the type of proxy you want to use:
HTTP, SOCKS5, SOCKS4.
The connection type must exactly match the parameters of the proxy you selected. If you choose the wrong option, the connection check will fail.
After selecting the connection type, fill in the main fields:
- Address / Host — IP address or domain name of the proxy server;
- Port — connection port;
- Login — username, if required;
- Password — password, if required.
In some interface versions, the address and port may be entered in a single field separated by a colon. In others, they are entered separately. The format depends on the specific Indigo build, but the set of data remains the same.
Step 5. Check the Connection
After entering the parameters, click the Check proxy button. The browser will run a connection test and display the result.
A successful check is usually shown as a positive status, often in green. This means that:
- the proxy server is available;
- the connection type is specified correctly;
- the address and port are entered without errors;
- authentication is completed successfully.
If the test fails, you need to recheck all fields. The most common causes of an error are:
- the wrong proxy type was selected;
- there is an error in the IP address or host;
- the wrong port was specified;
- an incorrect username or password was entered;
Step 6. Save the Profile
If the check is successful, complete profile creation by clicking Create profile or the equivalent command in your interface.
After saving, the profile will use the specified proxy settings when launched. This makes it possible to configure a separate connection for each profile without changing the network settings of the entire system.
What to Check After Setup
After saving the profile, it is worth making sure that:
- the profile launches without errors;
- the proxy passes a repeated check;
- the connection type matches the provided configuration;
Conclusion
Setting up a proxy in Indigo Browser follows a standard workflow: a new profile is created, the connection settings are opened, the proxy type is selected, the address, port, and authentication data are entered, after which the connection is checked and the profile is saved. If all fields are filled in correctly, the entire setup takes just a few minutes and does not require changing the system-wide network settings.