How to Set Up a Residential Proxy in Lalicat
 ·August 8, 2026·7 min read
Lalicat allows you to assign separate network settings to each browser profile. This is useful when different profiles require different IP addresses, connection regions, and independent sessions. The setup is done inside the profile card: you only need to select the proxy type, enter its parameters, and test the connection before saving.
Residential Proxies for Modern Antidetect Browsers
Run browser profiles through real IPs in the locations you need.
What You Need Before Setup
Before you begin, you need to prepare two things: the installed Lalicat browser and the proxy details. The browser itself does not provide proxy servers, so the address, port, and, if necessary, credentials must be obtained in advance.
The following parameters are usually required for connection (this information can be found on our website node-proxy.com):
• proxy IP address or host
• port
• username
• password
If the proxy does not require authorization, the username and password fields can be left blank.
How to Add a Single Proxy to a Lalicat Profile
After installing and logging in to Lalicat, open the dashboard and proceed to create a new profile.
1. Create a profile
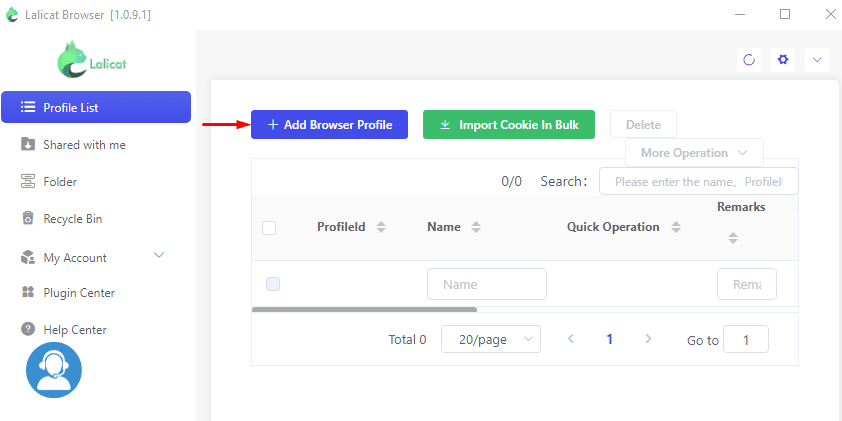
In the side menu, open the section with the list of profiles and click Add Browser Profile. The form for creating a new browser profile will open.
2. Fill in the basic parameters
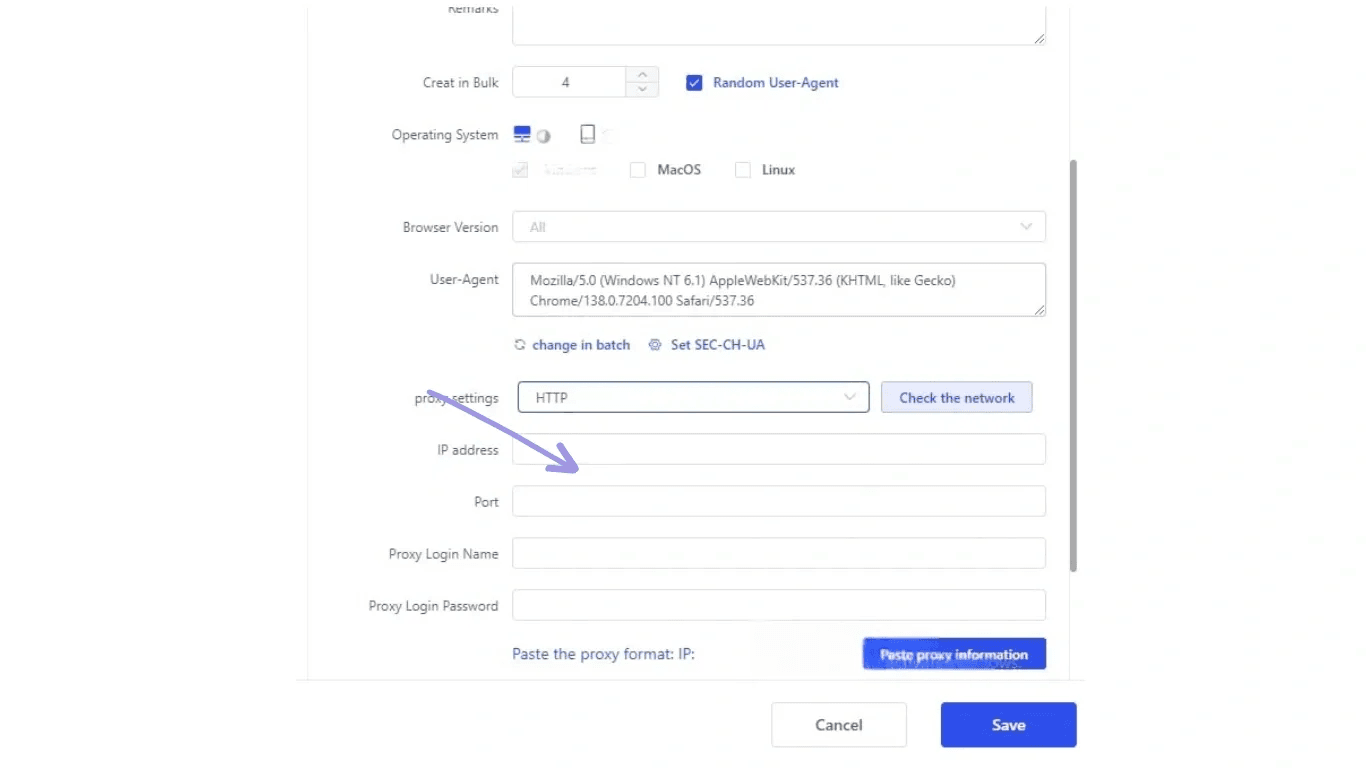
Enter the profile name in the Name field. If necessary, add a comment in Remarks so it is easier to navigate the list of profiles later. Then select the operating system and browser version that should be used in this profile.
3. Go to the proxy settings
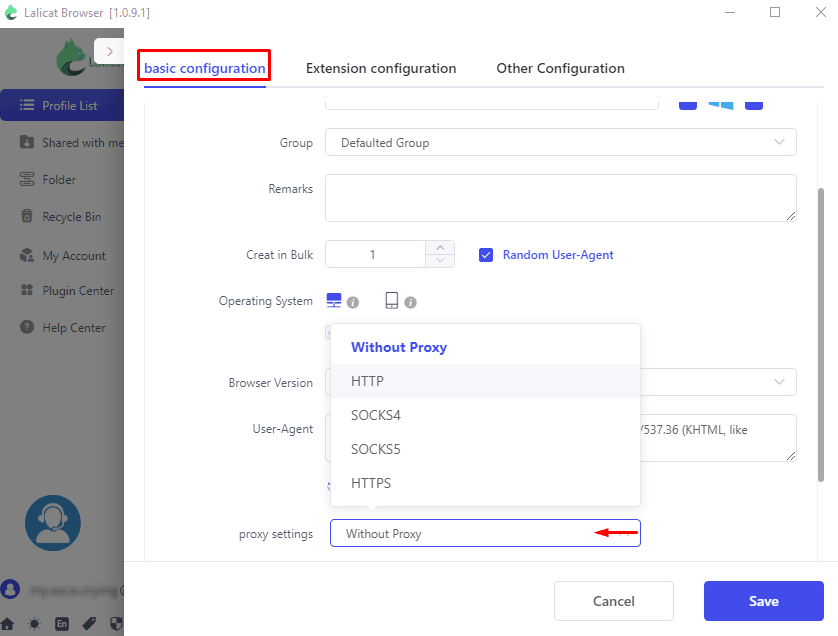
In the profile form, find the Proxy settings block. In the drop-down list, select the connection type. Depending on the Lalicat configuration, HTTP, HTTPS, SOCKS4, and SOCKS5 are usually available.
The proxy type must match the one you intend to use. A mistake at this stage is one of the most common causes of failed connections.
4. Enter the connection parameters
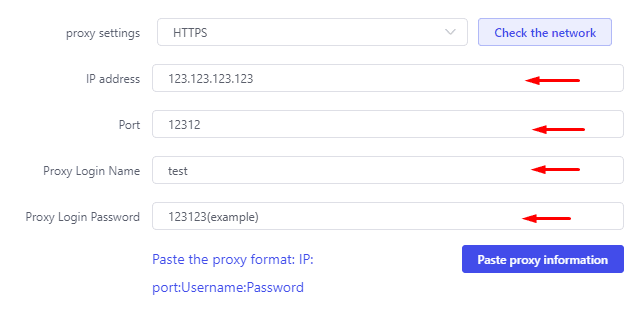
After selecting the type, the fields for network data will appear. Enter:
• IP / Host — the proxy server address
• Port — the connection port
• Username — the login, if required
• Password — the password, if required
If the interface includes a Paste proxy information button, you can paste the entire string at once and check whether the system distributed the values across the fields correctly. After auto-fill, it is better to manually verify the address, port, and authorization details once again.
5. Test the connection
Click Check the network. Lalicat will test the connection and display the result. If everything is entered correctly, the system will confirm the connection and show information about the current IP address and region.
If the test fails, the first things to recheck are:
• proxy type
• port
• username and password
• correctness of the IP address
• absence of extra characters when pasting the string

6. Save the profile
After a successful test, click Save. The proxy will be assigned to the selected profile, and all further work in this profile will go through the specified connection.

How to Set Up Multiple Proxies at Once
If you need to create many profiles, entering the parameters one by one for each of them takes too much time. In this case, it is more convenient to use bulk creation and import a list of proxies.
1. Prepare the proxy list
Collect all connections into a single list. The following format is most commonly used:
IP:PORT:USERNAME:PASSWORD
If some proxies work without authorization, the format may differ. The main thing is to keep the list consistent and make sure in advance that it matches the import requirements of your version of Lalicat.
2. Create a profile template
Open Add Browser Profile again and fill in the main profile parameters: name, comment, operating system, and browser version. These data will be used as the base for the profiles being created.
3. Enable bulk creation
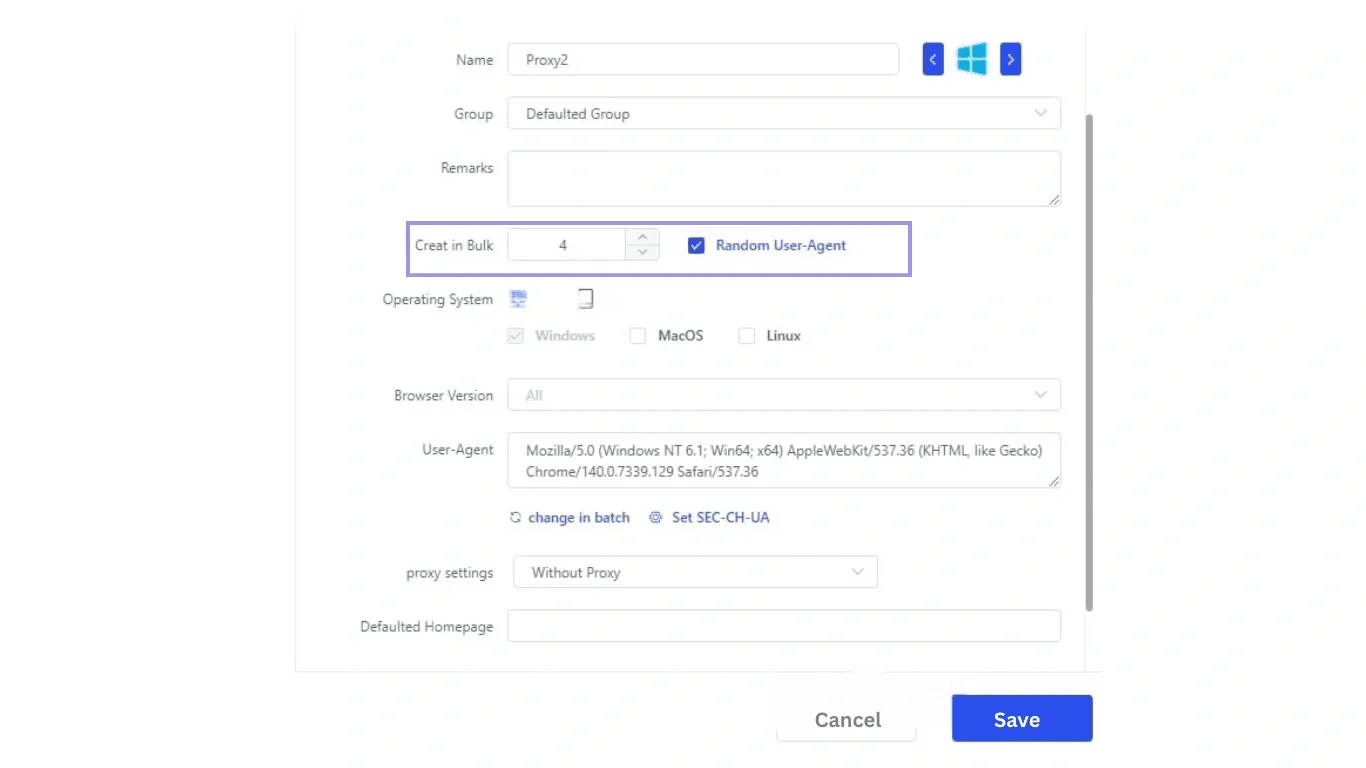
Find the Create in Bulk option and specify the number of profiles to be created. Usually, this number should match the number of proxies in the prepared list.
4. Specify the proxy type
In the network settings block, select the required proxy type, but do not manually fill in the IP address, port, username, and password if you plan to import the list next. These fields will be filled automatically from the file or the pasted list.
5. Save the profiles
Click Save. After that, the created profiles will appear in the list, and you can apply bulk proxy import to them. This approach reduces the number of manual actions and simplifies the work when there are many profiles.
What to Check After Setup
Even if the connection passes the test, it is useful to make sure before starting work that the profile is using exactly the parameters that were assigned. Usually, it is enough to open the profile, review its network settings again, and, if necessary, run the IP check once more.
This is especially important after bulk import, when an error in a single character can affect several profiles at once.
Common Connection Errors
Problems with proxy setup in Lalicat are usually related not to the browser itself, but to the original connection parameters. The following situations are the most common:
Incorrect proxy type selected
If the server works via SOCKS5 but HTTP is selected in the profile, the connection will fail even if the IP address and port are correct.
Port error
Even a single incorrect digit makes the connection unavailable. The port must be checked especially carefully.
Incorrect username and password
This is a typical issue during manual entry or when pasting a string from the clipboard.
Incorrect list import
When uploading in bulk, it is important that all lines follow the same format. If the structure of the entries differs, some profiles may be filled incorrectly.
Conclusion
Setting up a proxy in Lalicat comes down to three actions: creating a profile, entering the connection parameters, and testing the network before saving. For a single profile, the process takes only a few minutes. If there are many profiles, it is more convenient to use bulk creation and then import the proxy list. This workflow helps you deploy the required number of profiles faster and reduces the likelihood of errors during manual entry.