Residential Proxy Setup in BitBrowser
 ·July 28, 2026·8 min read
What a Proxy Provides in BitBrowser
BitBrowser is used to work with isolated browser profiles in which separate network parameters, session settings, and environment characteristics can be configured. One of the key elements of such a profile is a proxy. It allows you to assign a separate IP address to a specific session, which is useful for multi-profile work, regional testing, marketing tasks, and analysis of platforms in different countries.
The practical value of a proxy in BitBrowser is not limited to traffic routing alone. This approach helps separate working environments, organize the launch of multiple profiles more carefully, and manage access conditions for each session more precisely. This is especially important where stable operation of separate accounts, checking website localization, testing advertising campaigns, or analyzing search results and content by region is required.
What BitBrowser Is and How It Works with Profiles
BitBrowser is a browser designed to work with many independent profiles on a single device. Each profile can be configured as a separate browser environment with its own parameters: name, group, platform, cookies, and network settings.
Because of this, the user does not switch between different computers or separate browsers, but manages all sessions from a single interface. In this scheme, proxies become a basic part of the profile configuration: they determine the network exit point for a specific browser session.
Residential IPs Websites Trust
Node Proxy provides real residential proxies for smoother online operations.
How to Set Up a Proxy in BitBrowser
1. Install the program and open the profiles section
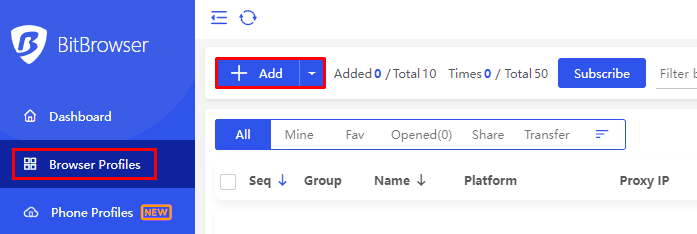
After installing BitBrowser and logging into your account, open the Browser Profiles section. To create a new session, click Add. This starts the setup of a separate browser profile.
2. Fill in the main profile parameters
At the first stage, the basic data is specified: profile name, group, platform, and other session parameters. If necessary, at the same step you can add cookies or specify auxiliary settings if they are needed for a specific work scenario.
3. Go to the proxy settings
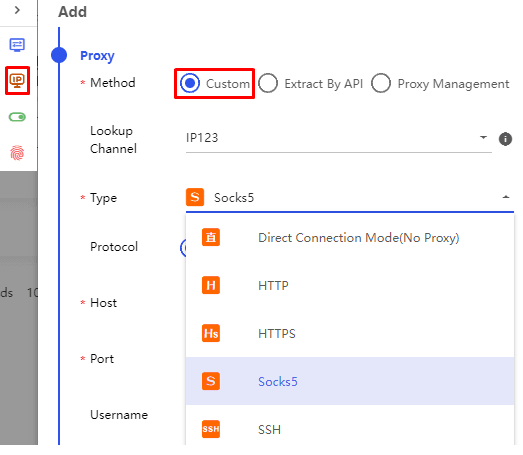
Next, open the Proxy tab. In BitBrowser, there are several ways to add a proxy:
• manually through Custom;
• by loading via API;
• from an already saved list in Proxy Management.
The choice of method depends on how your work is organized. If you need to connect one address, manual input is usually sufficient. If proxies are issued via a link or used in large quantities, it is more convenient to work through the API or import from the internal list.
4. Specify the connection protocol
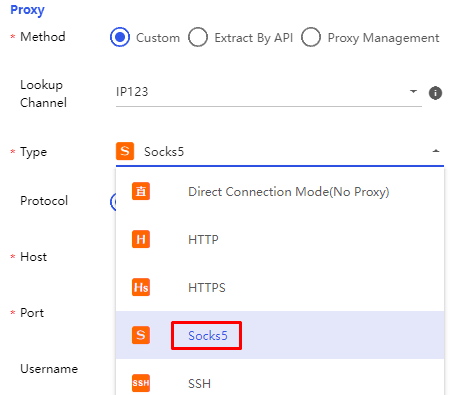
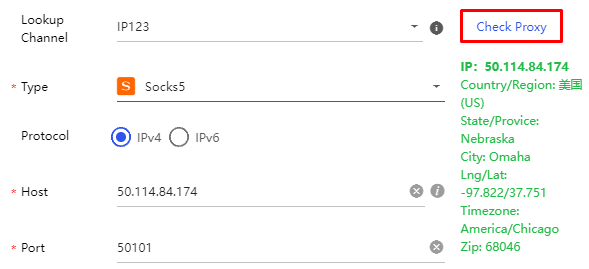
After choosing the method of adding, you need to determine the protocol. BitBrowser supports different types of proxies, including HTTP and SOCKS5. Here it is important not to rely on a universal template, but to choose exactly the protocol that matches your proxy data.
If the parameters do not match, the connection will either fail to establish or will work incorrectly. Therefore, before saving the profile, it is worth checking the connection type against the source data once again.
5. Enter the address, port, and authorization details
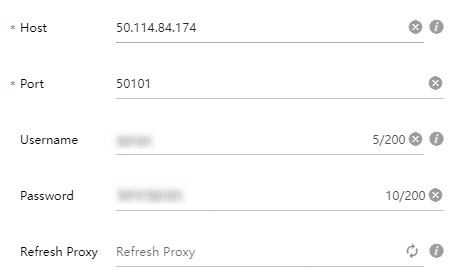
When setting up manually, specify the following information (it can be found on our website node-proxy.com):
• IP address;
• port;
• username;
• password.
All fields must be filled in without mistakes: an extra character in the address, username, or port will lead to a failure during verification.
6. Check the connection
After entering the data, click Check Proxy. BitBrowser will perform a check and, if the parameters are specified correctly, will display information about the connection and IP. This step allows you to immediately identify errors in the protocol, authorization, or server address.
7. Complete the profile setup
When the proxy has successfully passed verification, you can move on to the additional profile parameters. BitBrowser offers settings for cookie storage, session behavior, and fingerprint characteristics. After that, click Confirm to save the profile.
The completed session will appear in the general list. To launch it, click Open next to the required profile. After the settings are loaded, the browser will open with the parameters that were specified during creation.

Which Parameters Should Be Checked Before Launch
To ensure that the profile works correctly, before opening it for the first time it is worth making sure of several things:
• the correct proxy protocol has been selected;
• the IP, port, username, and password have been entered without errors;
• the profile has been saved in the correct group;
• the connection has been checked through Check Proxy.
Such basic verification is especially important in large-scale work, when one inaccuracy in a template leads to errors in several profiles at once.
Bulk Proxy Upload in BitBrowser
If there are many proxies, entering them one by one is inconvenient. For such cases, BitBrowser provides batch import.
Prepare the list
First, you need to compile a list of proxies in text format. Usually, each line is arranged according to the following scheme:
IP:Port:Username:Password
If the proxies are stored in a table, they can also be prepared in an Excel file for subsequent import.
Use Batch Add or file import
For bulk upload, open the Proxy Management section and select Batch Add. In the window that opens, you can paste the prepared list line by line.
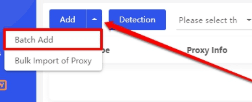
If the list is saved in Excel, the Batch Import of Proxy function is suitable, as it uploads data from a file.
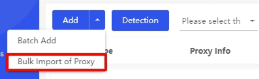
Both options solve the same task: quickly add a large pool of addresses without manually filling in each field.
Run a bulk check immediately
After import, it is worth launching batch testing. BitBrowser allows you to check the entire list at once. This helps filter out non-working entries, incorrect authorization data, and problematic addresses in advance.
In Which Tasks This Is Especially Useful
Setting up proxies in BitBrowser is most often in demand in scenarios where it is important to separate profiles and browser operating conditions. For example:
Managing multiple accounts
If the tasks are related to multi-profile work, separate network settings for each session help build a more orderly structure.
Marketing analysis and market research
Proxies are convenient for checking content, advertising, prices, search results, and interfaces in relation to different regions. This is useful for comparative analysis and local research.
Website testing and SEO tasks
When checking websites, it is important to see the page the way a user from the target region sees it. This concerns localization, search result structure, availability of individual blocks, and content behavior in different geographic zones.
Conclusion
BitBrowser allows you to flexibly configure browser profiles and assign separate network parameters to each of them. The basic workflow looks simple: create a profile, fill in the main information, add a proxy, choose the correct protocol, check the connection, and save the settings. If there are many addresses, instead of manual input you can use batch import and bulk testing.
In practice, it is careful setup at the start that determines how stable and convenient the profiles will be in дальнейшей работе. The more accurately the profile structure, proxy list, and verification stage are organized, the fewer technical failures occur in day-to-day work.